
Can you sharpen a table saw blade at home? Yes, you can sharpen a table saw blade at home, but it requires precision, the right tools, and a bit of practice to achieve professional results. While many woodworkers opt for professional sharpening services, especially for specialized blades or when facing a demanding project, the ability to sharpen your own blades can save you money and keep your tools performing optimally. This guide will walk you through the process, from preparation to the final touch, ensuring your table saw blades cut with renewed sharpness and efficiency. We’ll also touch on how this knowledge can inform other sharpening tasks, like sharpening bandsaw blades, sharpening planer blades, sharpening jointer blades, sharpening chisel, sharpening knife, sharpening drill bits, sharpening scissors, and even sharpening mower blades.
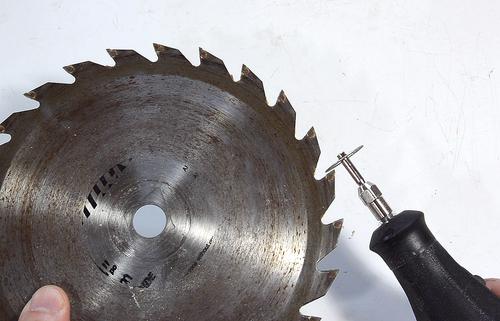
Image Source: woodgears.ca
Why Sharpen Your Table Saw Blades?
A dull table saw blade is more than just an inconvenience; it’s a safety hazard and a detriment to your woodworking. Blades lose their edge due to regular use, encountering nails or screws, or simply through the abrasive nature of wood itself.
Signs of a Dull Blade:
- Rough Cuts: Splintering, tear-out, and fuzzy edges on your workpiece.
- Increased Feed Resistance: You have to push harder to feed the wood through the saw.
- Burning: The blade leaves scorch marks on the wood.
- Excessive Noise: A dull blade often vibrates and makes a louder, harsher sound.
- Blade Wander: The blade drifts off its intended cut line.
Benefits of a Sharp Blade:
- Cleaner Cuts: Achieves smooth, precise cuts with minimal tear-out.
- Easier Operation: Requires less effort to push the wood, reducing fatigue.
- Reduced Risk of Kickback: A sharp blade cuts cleanly, minimizing the chance of the wood binding and being thrown back at you.
- Increased Tool Lifespan: Reduces strain on your table saw motor.
- Improved Woodworking Quality: Leads to better finished products.
Preparing for Table Saw Blade Sharpening
Before you begin sharpening, proper preparation is key to a safe and effective process. This includes gathering your tools, cleaning the blade, and setting up your workspace.
Essential Tools and Materials:
- Table Saw Blade: The blade you intend to sharpen.
- Sturdy Work Surface: A stable bench or workbench.
- Magnifying Glass or Loupe: To inspect the carbide teeth closely.
- Stiff Wire Brush: For removing sawdust and grime.
- Degreaser or Solvent (e.g., denatured alcohol): To clean resin and pitch.
- Gloves: To protect your hands from sharp edges and chemicals.
- Safety Glasses: Essential for eye protection.
- Sharpening Stone or File: Diamond files, carbide-specific files, or fine-grit sharpening stones are best. The grit size will depend on the desired finish.
- Honing Oil or Water: To lubricate the stone/file and carry away debris.
- Bench Vise: To securely hold the blade.
- Angle Gauge or Protractor: To maintain the correct bevel angle.
- Center Punch or Awl: To help align the blade with the sharpening tool.
- Optional: Table Saw Blade Sharpening Jig: For more consistent and precise results.
Cleaning the Blade:
A clean blade is crucial. Any residual pitch, resin, or sawdust can interfere with the sharpening process and lead to an uneven edge.
- Remove the Blade: Ensure the table saw is unplugged and the blade is completely cool. Carefully remove the blade from the saw arbor.
- Initial Cleaning: Use a stiff wire brush to remove loose debris.
- Degreasing: Dip a rag in denatured alcohol or a suitable degreaser and wipe down the entire blade, paying attention to the teeth. You may need to scrub stubborn pitch with the wire brush.
- Rinse and Dry: Rinse the blade with water if using a water-based cleaner, and dry it thoroughly with a clean cloth. Avoid letting it rust.
Sharpening Methods: Hand vs. Jig
There are two primary methods for sharpening table saw blades: hand sharpening and using a specialized jig. Each has its advantages and is suited to different skill levels and desired outcomes.
Hand Sharpening a Table Saw Blade:
This method requires a steady hand and a keen eye for detail. It’s more accessible for those without specialized equipment but demands greater skill and patience. It’s similar in principle to hand sharpening a knife or sharpening scissors, but with the added complexity of multiple teeth at specific angles.
Process for Hand Sharpening:
- Secure the Blade: Mount the blade securely in a vise, ensuring it is held flat and does not wobble. You can use wood blocks in the vise to protect the blade.
- Identify the Tooth Angle: Table saw blades have specific bevel angles on the teeth. These are typically stamped on the blade itself or can be found in the manufacturer’s specifications. Common angles range from 15 to 30 degrees.
- Select Your Sharpening Tool:
- Diamond Files: Excellent for carbide-tipped blades. They are durable and remove material efficiently. Choose a file with a fine grit for finishing.
- Carbide-Specific Files: Designed to work with carbide and can provide a very sharp edge.
- Sharpening Stones: Fine-grit stones (e.g., 1000 grit and higher) can be used with a guide to maintain the angle.
- Set the Angle: Use an angle gauge or protractor to set the correct bevel angle against the tooth. A small block of wood or a metal guide can help maintain this angle as you file.
- Sharpen Each Tooth:
- Start with the first tooth. Place the file or stone against the bevel of the tooth, maintaining the correct angle.
- Use smooth, consistent strokes, moving the file away from the cutting edge. Typically, one to two strokes per tooth are sufficient.
- Apply light to moderate pressure. Too much pressure can remove too much material or damage the carbide.
- Move to the next tooth, ensuring you maintain the same angle and pressure.
- Work your way around the entire blade, sharpening each tooth in the same direction of travel.
- Honing and Deburring:
- After sharpening all teeth, use the fine-grit file or a ceramic honing rod to lightly hone each tooth. This refines the edge and removes any burrs.
- A burr is a small, rough edge that can form during sharpening. It needs to be removed for a clean cut. You can often feel a burr with your fingertip (carefully!) or by lightly dragging a fingernail across the edge.
- A few light strokes on the back of the tooth with the fine grit can remove these burrs.
- Clean and Inspect: Clean the blade again to remove any metal filings. Inspect each tooth with a magnifying glass to ensure consistent sharpening and a clean edge.
Using a Table Saw Blade Sharpening Jig:
A table saw blade sharpening jig is designed to hold the blade and guide the sharpening tool (usually a grinding wheel or file) at the precise angles required. This method is generally more consistent and can produce sharper edges faster, especially for those less experienced with manual sharpening. This is a more specialized tool than something you’d use for sharpening mower blades or sharpening drill bits, requiring a more dedicated setup.
Process with a Sharpening Jig:
- Mount the Jig: Securely mount the jig to your workbench or a dedicated stand.
- Install the Blade: Attach the table saw blade to the jig’s arbor or indexing mechanism. The jig will allow the blade to rotate precisely to each tooth.
- Set Up the Grinding Wheel/File:
- Jigs often accommodate a grinding wheel (like a diamond wheel) or a file.
- Adjust the height and angle of the grinding wheel or file to match the bevel angle of the teeth. Many jigs have built-in angle guides or adjustable mounts.
- Ensure the grinding wheel or file makes contact with the carbide tooth at the correct bevel.
- Index the Blade: Rotate the blade to the next tooth. Most jigs have an indexing pin or mechanism that locks the blade in place for each tooth.
- Sharpen Each Tooth:
- Advance the grinding wheel or file along the bevel of the tooth. Use steady, consistent pressure.
- For grinding wheels, a light mist of coolant can help prevent overheating the carbide.
- Work your way around the blade, sharpening each tooth.
- Honing and Finishing:
- Once all teeth are ground, you may need to follow up with a finer grit diamond file or a honing stone to polish the edge and remove any burrs. Some jigs may have a secondary stage for this.
- Clean and Inspect: As with hand sharpening, clean the blade thoroughly and inspect the teeth for a uniform, sharp edge.
Mastering Tooth Angles and Grits
The success of sharpening lies in accurately replicating the original tooth angles and using the appropriate grit for the desired finish.
Understanding Tooth Angles:
Table saw blades have various tooth configurations and associated angles, each designed for different materials and cutting actions.
- Rake Angle: This is the angle of the tooth face relative to the direction of cut.
- Positive Rake: The face of the tooth slopes forward. Good for general-purpose cutting in wood.
- Negative Rake: The face of the tooth slopes backward. Better for hardwoods and abrasive materials, but can increase kickback risk.
- Zero Rake: The face of the tooth is perpendicular to the blade face. Often used for plastics and non-ferrous metals.
- Clearance Angle (or Relief Angle): This is the angle on the back of the tooth that allows it to cut without dragging. If this angle is too small, it will bind. If too large, the tooth will be weak.
Crucially, when sharpening, you want to restore the original bevel angle on the face of the tooth (the cutting edge) and maintain the correct clearance angle on the back of the tooth. Most sharpening guides focus on replicating the face bevel.
Choosing the Right Grit:
The grit of your sharpening stone or file determines how aggressively it removes material and the fineness of the resulting edge.
- Coarse Grit (e.g., 100-200): Removes material quickly. Best for severely damaged teeth or re-establishing a damaged bevel. Use sparingly.
- Medium Grit (e.g., 400-600): Good for general sharpening and restoring a moderately dull edge.
- Fine Grit (e.g., 1000+): Used for honing and polishing the edge to a razor-sharp finish. Essential for removing burrs and achieving the cleanest cut.
For most table saw blades, starting with a medium grit and finishing with a fine grit is ideal. Diamond files are particularly versatile as they are available in a range of grits.
Advanced Techniques and Considerations
Once you’ve grasped the basics, there are additional techniques and factors to consider for professional-quality results.
Indexing:
Ensuring each tooth is sharpened identically is paramount. This involves accurately indexing, or moving the blade, from one tooth to the next.
- Hand Sharpening: Use a pointer or a small block of wood aligned with the gullet (the space between teeth) to guide your rotation to the next tooth.
- Jigs: Jigs have built-in indexing mechanisms that automatically position the blade for each tooth.
Sharpening Different Tooth Configurations:
- ATB (Alternate Top Bevel): Teeth alternate between left and right bevels. Sharpen one side of the tooth, then rotate the blade and sharpen the other side.
- FTG (Flat Top Grind): All teeth are flat on top. Sharpen the leading edge.
- TCG (Triple Chip Grind): Features three types of teeth: chamfered teeth that cut an undercut, flat-topped teeth that clear chips, and angled teeth that finish the cut. Each type needs specific attention.
Re-establishing Bevels:
If a blade has significantly chipped teeth or a worn bevel, you might need to re-establish the primary bevel before refining it. This requires more aggressive filing or grinding and careful attention to the original angle.
Avoiding Over-Sharpening:
It’s possible to remove too much material. This weakens the tooth and reduces the lifespan of the blade. Aim for just enough strokes to restore the sharp edge.
Sharpening Other Tools:
The principles of sharpening are similar across many woodworking tools. For instance:
- Sharpening bandsaw blades: Often involves specialized jigs and diamond files to match the unique tooth profiles.
- Sharpening planer blades and sharpening jointer blades: These typically require grinding machines or specialized jigs to maintain the long, straight cutting edge and perfect flatness.
- Sharpening chisel and sharpening knife: Usually done with stones or honing steels, focusing on a keen, consistent bevel.
- Sharpening drill bits: Requires specific jigs and grinding techniques to maintain the correct cutting angles for efficient drilling.
- Sharpening scissors: Involves a specific file stroke along the scissor blade’s bevel.
- Sharpening mower blades: Typically done with files or grinders, focusing on restoring the cutting edge and balancing the blade.
While the specific tools and techniques vary, the core concepts of maintaining an angle, using the right grit, and removing burrs remain consistent.
When to Consider Professional Sharpening
While DIY sharpening is rewarding, there are times when professional services are the better choice.
When to Outsource Sharpening:
- Extremely Damaged Blades: Teeth that are chipped, broken, or significantly worn beyond repair.
- Specialized Blades: Blades with complex tooth geometries (like those for laminate or metal) or very fine tooth counts.
- Lack of Time or Patience: If you don’t have the time or inclination to learn and perform sharpening yourself.
- High-Quality Blades: If you have invested in premium blades, professional sharpening can ensure they are restored to their peak performance without risking damage.
- Noisy or Vibrating Blades: If your blade is causing significant vibration or noise, it might indicate uneven sharpening or damage that’s hard to correct at home.
Professional sharpening services have specialized machinery that can precisely grind and hone teeth, often restoring blades to better-than-new condition. They can also re-tension blades and check for flatness, issues not easily addressed by DIY methods.
Maintaining Your Sharpened Blades
Proper maintenance after sharpening will extend the life of your newly sharp blades.
- Cleanliness: Always clean blades after use to prevent pitch and resin buildup.
- Storage: Store blades properly to avoid damage and rust. Use blade cases or hang them on racks.
- Avoid Contamination: Never let your table saw blade come into contact with metal objects or abrasive materials.
Frequently Asked Questions (FAQ)
Q1: How often should I sharpen my table saw blade?
A1: The frequency depends on how much you use your saw and the types of wood you cut. A general guideline is every 4-8 hours of actual cutting time, or when you notice a decline in cut quality.
Q2: Can I use a Dremel to sharpen a table saw blade?
A2: While a Dremel with a grinding attachment can be used for minor touch-ups or to quickly hone a slightly dull edge, it’s generally not recommended for full sharpening. It’s difficult to maintain consistent angles and can easily overheat and damage the carbide teeth.
Q3: What happens if I sharpen my blade at the wrong angle?
A3: Sharpening at the wrong angle can result in duller cuts, increased tear-out, premature dulling, and potentially higher risk of kickback. It’s crucial to match the original bevel angle.
Q4: Is it cheaper to sharpen blades myself or buy new ones?
A4: Sharpening is almost always cheaper than buying new blades, especially for high-quality blades. Professional sharpening services are also usually more cost-effective than purchasing new blades.
Q5: How do I know if my blade is beyond repair?
A5: If teeth are broken off, the carbide is chipped or cracked, or the blade body is warped, it may be beyond economical repair. A professional sharpener can best assess the blade’s condition.
By investing the time to learn how to sharpen your table saw blades, you’ll not only improve your woodworking results but also enhance safety and save money in the long run. The precision and care you apply to your table saw blades will serve you well as you tackle sharpening other essential tools in your workshop.