
Image Source: d2culxnxbccemt.cloudfront.net
How To Drill A Mirror Safely: A Step-by-Step Guide
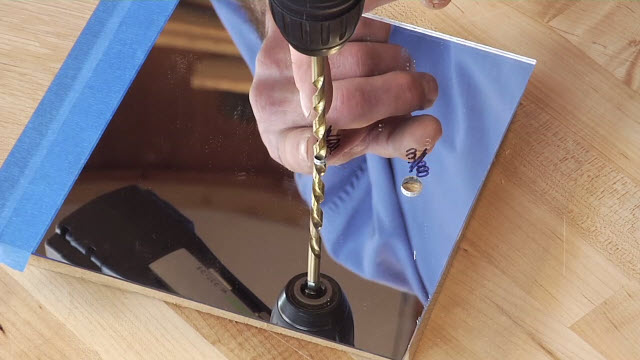
Can you drill a mirror? Yes, you can drill a mirror, but it requires specific tools, techniques, and a great deal of patience. Drilling through glass, especially a mirror, is a delicate operation that can easily lead to cracks or complete breakage if not performed correctly. This comprehensive guide will walk you through the essential steps for safely and effectively drilling a hole in your mirror.
Essential Tools and Materials for Mirror Drilling
Before you begin any mirror drilling project, gather all the necessary supplies. Having everything ready will ensure a smooth and safe process.
- Mirror: The mirror you intend to drill.
- Diamond Drill Bit: This is crucial for glass drilling. Standard drill bits will not work and will shatter the glass. Look for a bit specifically designed for glass or tile. The size of the bit will depend on the size of the hole you need.
- Hole Saw for Glass: For larger holes, a hole saw for glass is the preferred tool. These are essentially circular blades coated with diamond grit.
- Drill: A variable speed drill is highly recommended. A drill press mirror setup offers the most stability and control, minimizing the risk of the drill bit wandering.
- Water or Lubricant: Essential for wet drilling. Water helps to cool the drill bit and the glass, preventing overheating and reducing stress. You can also use specialized glass drilling lubricants.
- Masking Tape: To create a stable surface for the drill bit to start on and to help prevent the bit from slipping.
- Safety Gear:
- Protective Eyewear: Safety glasses or goggles are non-negotiable. Glass shards can fly unexpectedly.
- Gloves: Protect your hands from sharp edges and potential cuts.
- Dust Mask: If dry drilling (not recommended), a mask is important.
- Support for the Mirror: A flat, stable surface is vital. You might need a piece of wood or a soft cloth to support the mirror and prevent it from moving during drilling.
- Marker: To mark the drilling spot.
- Paper Towels or Cloths: For cleanup.
Safety Precautions Mirror: Prioritizing Your Well-being
Safety is paramount when working with glass. Adhering to these safety precautions mirror will protect you from injury.
- Always wear protective eyewear. This cannot be stressed enough. Small chips or larger shards can easily be ejected.
- Wear sturdy gloves. The edges of glass, even if not broken, can be sharp.
- Work in a well-lit area. Good visibility is key to accurate drilling and spotting potential hazards.
- Ensure the mirror is stable. Any movement during drilling will likely cause it to break.
- Keep children and pets away from the work area.
- Never apply excessive pressure. Let the diamond drill bit do the work. Pushing too hard is a recipe for disaster.
- Be mindful of the drill’s speed. Slow speed drilling is critical for glass.
- Handle broken glass with extreme care.
Preparing Your Mirror for Drilling
Proper preparation is the foundation of successful glass drilling.
Marking the Drill Location
- Clean the Mirror: Ensure the surface where you plan to drill is clean and free of dust or debris. This will help the tape adhere better and prevent debris from getting under the drill bit.
- Mark the Spot: Use a marker to precisely mark the center of the hole you want to drill.
- Apply Masking Tape: Apply a generous layer of masking tape over the marked area. Overlap the tape slightly. This serves several purposes:
- Prevents Slipping: It provides a textured surface for the drill bit to grip, preventing it from skittering across the glass.
- Contains Debris: It helps to contain any small glass particles that might break away.
- Guides the Bit: You can re-mark your drilling point on the tape for extra accuracy.
Securing the Mirror
A moving mirror is a broken mirror. Securing it is vital.
- Flat Surface: Place the mirror on a perfectly flat, sturdy surface.
- Support from Below: Use a piece of soft wood or a thick, folded cloth to support the mirror from underneath. Ensure the support is directly behind where you will be drilling. This helps absorb vibrations and prevents the glass from flexing and cracking as the drill bit exits.
- Clamping (with caution): If you are using a drill press mirror setup, you can gently clamp the mirror to the drill press table. Use soft pads on the clamps to avoid putting direct pressure on the glass. Never clamp directly on the drilling area.
The Drilling Process: Step-by-Step
Now for the core of the operation: drilling the hole. Remember, patience and a gentle touch are your best allies.
Step 1: Setting Up Your Drill
- Insert the Diamond Drill Bit: Securely fit the chosen diamond drill bit into your drill chuck. Ensure it’s tight.
- Adjust Drill Speed: Set your drill to its lowest speed setting. For most drills, this is around 200-500 RPM. High speeds generate heat, which is the enemy of glass.
- Cordless vs. Corded: Cordless drills often have more manageable low-speed control, which can be beneficial.
Step 2: Starting the Hole (The Crucial First Contact)
- Position the Drill: Hold the drill perpendicular to the mirror surface.
- Gentle Contact: Bring the tip of the diamond drill bit to the marked spot on the masking tape.
- Start Slow: Begin drilling at an extremely slow speed. You want to gently score the glass rather than aggressively cut into it.
- Create a Guide Dimple: Apply just enough pressure to create a small indentation or dimple in the glass through the tape. This dimple will act as a guide for the drill bit, preventing it from wandering.
Step 3: Drilling with Lubrication (Wet Drilling)
Wet drilling is the preferred method for glass drilling. It significantly reduces friction and heat buildup, thus minimizing the risk of cracking.
- Creating a Water Reservoir:
- Tape Dam: A popular method is to create a small dam around the drilling area using plumber’s putty or a thick ring of masking tape. Fill this dam with water.
- Water Bottle: Alternatively, have a helper slowly drip water onto the drilling site using a water bottle with a fine nozzle as you drill.
- Drilling Technique:
- Maintain Low Speed: Continue drilling at the lowest speed.
- Apply Light, Consistent Pressure: Let the diamond drill bit’s grit do the cutting. Avoid pushing down forcefully.
- Keep it Wet: Ensure the area is constantly lubricated. If the water evaporates, stop and add more.
- Periodically Lift: Every so often, lift the drill bit slightly out of the hole while it’s still spinning. This helps to clear out glass dust and allows fresh water to flow in, further aiding cooling.
Step 4: Using a Hole Saw for Glass (For Larger Holes)
If you’re using a hole saw for glass, the process is similar but with some key differences:
- Pilot Bit: Most glass hole saws have a pilot bit in the center. Ensure this pilot bit is sharp and set correctly.
- Angle Entry: Start the hole saw at a slight angle (around 45 degrees) to the glass. Let the pilot bit establish a starting point.
- Gradually Straighten: As the hole saw begins to cut, slowly and gently bring the drill perpendicular to the mirror.
- Maintain Lubrication: Continue to keep the area well-lubricated with water.
- Moderate Pressure: Apply steady, moderate pressure. You should hear a grinding sound as the diamond grit cuts through the glass.
- Clear Debris: Periodically lift the hole saw slightly to clear out the glass slurry.
Step 5: Approaching the Exit
This is another critical point where the mirror is prone to cracking.
- Reduce Pressure: As you feel the drill bit about to break through the other side, significantly reduce the pressure you are applying.
- Maintain Lubrication: Keep the water flowing.
- Slow Down Further (if possible): If your drill has an even slower speed, engage it.
- Let it Finish: Allow the drill bit to gently finish the cut. Avoid forcing it.
Step 6: Finishing and Cleanup
- Withdraw the Bit: Once the hole is complete, carefully withdraw the drill bit while it’s still spinning slowly.
- Remove Tape: Gently peel off the masking tape.
- Clean the Hole: Use a damp cloth to carefully wipe away any remaining glass dust and debris from the hole and the surrounding area. You can use a soft brush to help clean the edges of the hole.
- Inspect: Check the hole for any sharp edges or chips. If there are minor imperfections, you can try to smooth them with very fine-grit sandpaper designed for glass, used wet. However, be extremely cautious, as this can also cause damage.
Troubleshooting Common Issues in Mirror Drilling
Even with careful preparation, you might encounter problems. Here’s how to address them.
The Drill Bit is Slipping
- Cause: The glass surface is too smooth, or the tape isn’t adhering well.
- Solution: Ensure the surface is clean. Apply a fresh layer of good quality masking tape, pressing it down firmly. You can even create a small cross with tape over the marked spot for extra grip.
Overheating and Cracking
- Cause: Insufficient lubrication, too much pressure, or high drill speed.
- Solution: Immediately stop drilling. Ensure you are using plenty of water. Reduce speed and pressure. Allow the glass to cool down if it feels hot.
Slow Progress
- Cause: Dull drill bit, low drill speed, or not enough pressure.
- Solution: Ensure your diamond drill bit is new and sharp. While you don’t want to apply too much pressure, a little consistent pressure is needed. If it’s still too slow, you might need a higher quality diamond bit or a more powerful drill.
Chipping Around the Hole
- Cause: Excessive pressure, especially on exit, or a dull bit.
- Solution: Reduce pressure. Ensure you are lubricating well and at a slow speed. For minor chipping on the exit side, you might be able to smooth it with fine-grit wet sandpaper, but proceed with extreme caution.
Alternatives and Considerations
While drilling a mirror is possible, it’s not always the best or only solution.
Using a Drill Press for Mirror Drilling
A drill press offers superior stability and control compared to a handheld drill. This is ideal for achieving precise holes and significantly reduces the risk of the drill bit wandering or causing the mirror to flex and crack. When using a drill press mirror setup:
- Secure Mounting: Ensure the mirror is securely mounted to the drill press table using appropriate padding to protect the glass.
- Adjustable Speed: Utilize the drill press’s adjustable speed settings, prioritizing very slow speeds.
- Lubrication System: Consider a simple gravity-fed drip system or a pump system for consistent water lubrication.
When Not to Drill
- Antique or Valuable Mirrors: If the mirror has significant historical or monetary value, it’s best to avoid drilling and seek professional advice.
- Very Thin Mirrors: Extremely thin mirrors are more fragile and much harder to drill without damage.
- Mirrors with Complex Designs or Edges: Drilling near decorative edges or intricate patterns can be risky.
Professional Mirror Drilling Services
If you’re not comfortable with the process or have a particularly important or delicate mirror, consider using a professional glass cutting and drilling service. They have specialized equipment and expertise to ensure perfect results.
Frequently Asked Questions (FAQ) about Drilling Mirrors
Q1: What kind of drill bit do I need for a mirror?
A1: You absolutely need a diamond drill bit or a hole saw for glass specifically designed for drilling glass and tile. Standard drill bits will shatter the mirror.
Q2: Can I drill a mirror with a regular drill?
A2: Yes, you can use a regular drill, but it must be a variable speed drill set to its slowest speed setting. A drill press offers better stability, but a handheld drill can work with extreme care.
Q3: How do I prevent the mirror from cracking when drilling?
A3: Prevention involves several key factors: using a diamond drill bit, employing wet drilling (keeping the area lubricated with water), drilling at a slow speed drilling, applying only light pressure, and ensuring the mirror is securely supported and doesn’t move. Applying masking tape mirror to the drilling area also helps.
Q4: What is the best way to lubricate while drilling glass?
A4: Wet drilling is essential. Use water, either by creating a dam around the drilling area with plumber’s putty or tape and filling it, or by having someone slowly drip water onto the bit as you drill. Specialized glass drilling lubricants can also be used.
Q5: How deep should I drill into the mirror?
A5: You only need to drill through the thickness of the glass. As the drill bit nears the exit side, reduce pressure significantly to prevent chipping or cracking.
Q6: My mirror chipped when I drilled it. What can I do?
A6: Minor chipping can sometimes be smoothed with very fine-grit wet sandpaper designed for glass. However, this must be done with extreme caution and minimal pressure, as it can worsen the damage. For significant chips, the mirror may be compromised.
Q7: Is it safe to drill a mirror without water?
A7: While technically possible with specific diamond bits designed for dry drilling, it is strongly discouraged, especially for mirrors. Wet drilling is crucial for cooling the bit and glass, drastically reducing the risk of breakage and improving the quality of the hole. Dry drilling generates excessive heat, which is the primary cause of glass cracking.
By following these detailed steps and prioritizing safety at every stage, you can successfully drill a hole in your mirror for your DIY projects. Remember, patience is key, and a gentle approach will yield the best results.