
Can you cut perfectly straight lines with a track saw? Yes, a track saw is specifically designed to make incredibly straight and precise cuts, especially when used with its accompanying track. Who is a track saw for? A track saw is an excellent tool for any woodworker, from hobbyists to professionals, who needs to make accurate cuts on sheet goods like plywood and MDF, or for trimming doors and other large panels.
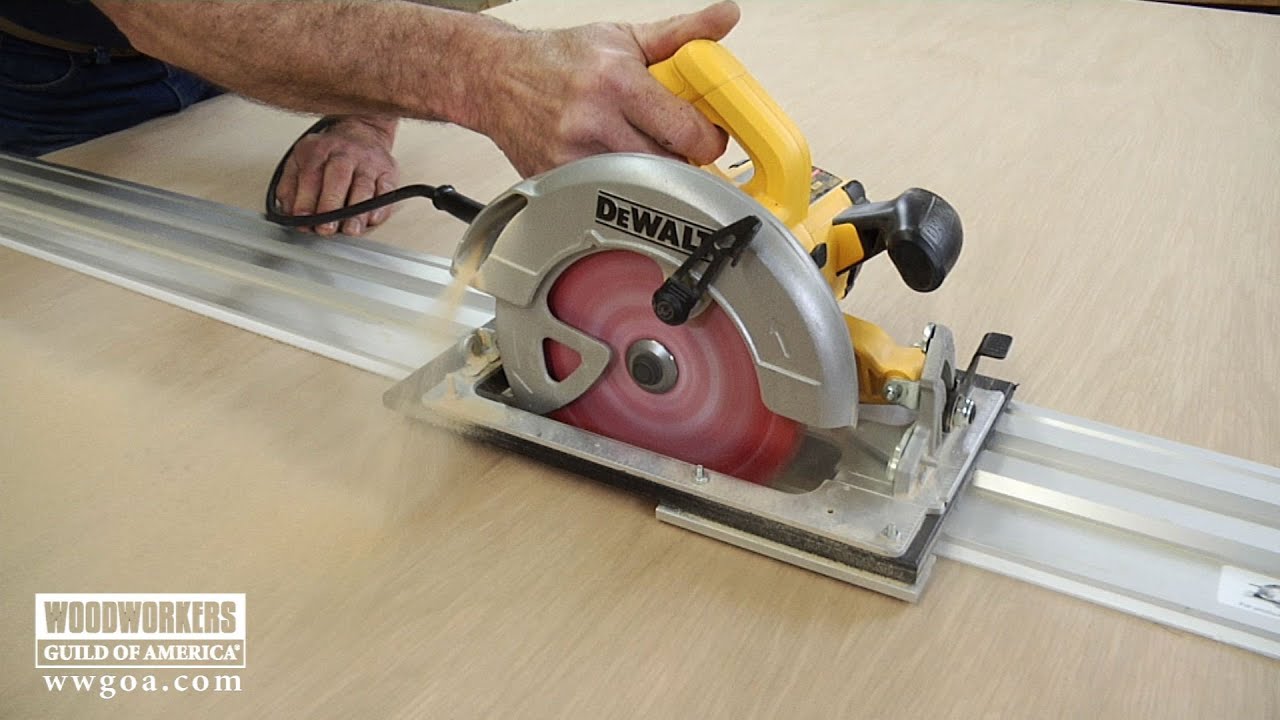
Image Source: i.ytimg.com
Introducing the Track Saw
The track saw, often referred to as a circular track saw, is a game-changer in the world of woodworking. Unlike traditional circular saws that rely on your steady hand and a separate guide, a track saw integrates a circular saw with a specialized guide rail, often called a track saw guide. This combination ensures perfectly straight and repeatable cuts, making it an indispensable tool for anyone serious about achieving professional-level results.
Why Choose a Track Saw?
For years, woodworkers have grappled with the challenge of making clean, straight cuts on large sheet goods like plywood, MDF, and melamine. Traditional circular saws, while versatile, often require complex setups with homemade or purchased guides, and even then, achieving a perfectly splinter-free edge can be elusive. This is where the track saw shines.
- Precision: The primary advantage of a track saw is its unparalleled precision. The guide rail ensures the saw blade follows a perfectly straight line, eliminating the wobbles and inaccuracies common with freehand cutting.
- Plunge Cutting: Many track saw models, including the popular plunge track saw variants, allow you to start cuts in the middle of a workpiece without needing to drill a starting hole. This is invaluable for cutting out internal shapes or making dados.
- Splinter Control: Track saws are designed with an anti-splinter strip along the edge of the guide rail. This strip is placed directly against the cutting line, minimizing tear-out and producing clean edges, even on delicate materials like veneers and laminates.
- Portability and Versatility: While powerful, track saws are relatively portable and can be used on-site for tasks like trimming doors or cutting cabinets to size. They offer a controlled cutting experience that’s often more manageable than a table saw for large panels.
- Dust Collection: Most track saws feature efficient dust collection ports, which, when paired with a shop vacuum, create a much cleaner and healthier working environment.
What Can You Do with a Track Saw?
The applications for a track saw are vast, making it a highly versatile tool in any workshop.
- Cutting Sheet Goods: This is the track saw’s bread and butter. Whether you’re breaking down full sheets of plywood for cabinets, building furniture, or creating a custom workbench, a track saw delivers factory-edge quality.
- Trimming Doors: Need to shorten an interior or exterior door to fit a new frame? A track saw with its guide rail makes this a quick and accurate job, ensuring a clean bottom edge.
- Cabinetry: From cutting cabinet boxes to resizing drawer fronts, the precision of a track saw is crucial for building well-fitting and aesthetically pleasing cabinetry.
- Furniture Making: Whether you’re building a large dining table or a small side table, the ability to make precise cuts on all the components is essential.
- Track Saw Joinery: Advanced joinery techniques, such as cutting precise dados, rabbets, and even tenons (with specialized jigs), can be achieved with a track saw and the right accessories.
- Deck Building and Renovations: For larger projects, a track saw can be used to cut deck boards or other lumber to size quickly and accurately.
Track Saw Setup: Getting Ready to Cut
Proper track saw setup is crucial for achieving the best results. This involves more than just turning the tool on; it’s about preparing both the saw and your workpiece for a clean and safe cut.
Preparing Your Workpiece
Before you even touch your track saw, ensure your workpiece is ready.
- Measure Twice, Cut Once: This old adage is more critical than ever with a track saw. Double-check all your measurements and mark your cut line clearly.
- Support Your Material: Large sheet goods need adequate support to prevent sagging, which can lead to inaccurate cuts or the blade binding. Use sawhorses, workbench outfeed tables, or dedicated panel stands. Ensure the support doesn’t interfere with the track or the saw’s movement.
- Marking the Cut Line: Use a sharp pencil or a marking knife for the most precise lines. The anti-splinter strip on the track is designed to sit precisely on the intended cut line.
Aligning the Track Saw Guide
The guide rail is the heart of the track saw system. Accurate alignment is paramount.
- Placing the Track: Lay the guide rail on your workpiece, aligning the edge of the anti-splinter strip precisely with your marked cut line. Remember, the saw blade will cut to the right of the anti-splinter strip.
- Securing the Track: Most tracks come with clamps. Use these to firmly secure the track to your workpiece. Ensure the clamps don’t obstruct the saw’s path. For very long cuts, you might need multiple clamps. Some users also employ double-sided tape for temporary, but very secure, holding.
- Zeroing the Saw: Most track saws have a built-in indicator or a way to zero the saw’s position relative to the track. This is crucial for making precise repeatable cuts, especially when making identical pieces or adjusting for the saw’s kerf.
Track Saw Setup Checklist
| Step | Description | Importance |
|---|---|---|
| Workpiece Prep | Measure accurately, mark clearly, and support material adequately. | High |
| Track Placement | Align the anti-splinter strip of the track precisely with the cut line. | Critical |
| Track Securing | Use clamps or tape to firmly fix the track to the workpiece, ensuring it won’t shift during the cut. | Critical |
| Saw Zeroing | Calibrate the saw’s position relative to the track for precise adjustments. | High |
| Blade Depth Setting | Adjust the blade depth so it cuts slightly deeper than the material thickness, just enough to clear the track. | Medium |
| Safety Check | Ensure all guards are in place, hands are clear of the blade, and power cord is managed. | Critical (Absolute) |
| Dust Collection | Connect a vacuum or dust extractor to the saw’s port for efficient dust management. | High |
Track Saw Cutting Techniques
Once your track saw is set up, the actual cutting begins. Mastering these techniques will ensure you get the most out of your tool.
Basic Straight Cutting
This is the most common use for a track saw.
- Position the Saw: Place the track saw onto the guide rail. Ensure the saw is seated correctly and moves smoothly along the track.
- Set Blade Depth: Adjust the blade depth. A good rule of thumb is to set it so the blade extends about 1/8″ to 1/4″ below the material. This depth ensures a clean cut without excessive blade exposure, which can be a safety hazard and increase tear-out. Importantly, ensure the blade depth is not so deep that it cuts into the track itself, which can damage both.
- Start the Saw: With the saw firmly on the track, switch it on. Let it reach full speed before engaging the blade with the material.
- Push Through: Smoothly and steadily push the saw along the track. Maintain consistent pressure and keep the saw base flat against the track. Avoid forcing the saw; let the blade do the work.
- Complete the Cut: Continue pushing until the blade has completely passed through the material. Release the trigger and allow the blade to stop spinning before lifting the saw off the track.
Plunge Cutting with a Plunge Track Saw
A plunge track saw offers the ability to start cuts mid-material.
- Set Blade Depth: This is crucial for plunge cuts. Set the blade depth so that when the saw is plunged, the blade will emerge from the material at the desired depth, without cutting into the track or the support below.
- Position the Saw: Place the saw on the track at the starting point of your plunge cut.
- Engage the Blade: Turn the saw on.
- Plunge the Blade: Gently and steadily push the saw down until the blade reaches its preset depth.
- Move Along the Track: Once the blade is at the correct depth, begin to push the saw forward along the track to complete the cut.
- Retract Safely: After the cut is finished, lift the saw back up to its starting position.
Cutting with a Cordless Track Saw
Cordless track saws offer the freedom of no cords, making them ideal for job sites or situations where power outlets are inconvenient. The cutting technique is largely the same as a corded model.
- Battery Management: Ensure your batteries are fully charged before you start. For extended use, you might need spare batteries.
- Power Output: Be aware that cordless saws might have slightly less sustained power than corded versions, especially under heavy load. You might need to adjust your feed rate accordingly.
Mitre and Bevel Cuts
Many track saws allow for bevel cuts, which are essential for tasks like scribing cabinets or creating angled joinery.
- Adjust the Bevel Angle: Loosen the bevel adjustment mechanism on the saw and set it to your desired angle. Most saws have positive stops for common angles like 45 degrees.
- Recalibrate for Depth: After setting a bevel, you may need to re-adjust the blade depth. The angled blade will cut at a different effective depth.
- Cut as Usual: Proceed with the cut as you would a straight cut, ensuring the saw base remains flat against the track.
Track Saw Accessories: Enhancing Your Capabilities
The versatility of a track saw can be significantly expanded with a range of specialized accessories. These not only improve accuracy but also open up new possibilities for joinery and specialized cuts.
Essential Track Saw Accessories
- Guide Rails: While most track saws come with one or two rails, having additional lengths or connector pieces can be invaluable for cutting very long materials or creating longer cutting paths.
- Track Clamps: Essential for securing the guide rail. Having several sets ensures your track stays put, even on smooth surfaces.
- Splinter Guards/Strips: These are consumable and need periodic replacement. Keeping spares handy ensures you always have a clean anti-splinter edge.
- Dust Extraction Hoses and Adapters: A good dust extraction system is crucial for clean work. Ensure you have the correct adapters for your saw and vacuum.
- Carrying Cases/Bags: For portability and protection of your investment.
Advanced Track Saw Accessories
- Track Connectors: Allow you to join multiple guide rails together to create one continuous, very long track. This is useful for cutting large panels or long workpieces.
- Angle Guides: Some systems offer angle guides that attach to the track, allowing for precise angled cuts without relying on setting up a miter saw.
- Circular Saw Blades: Different blades are available for various materials and cut qualities. A fine-tooth blade is excellent for plywood and laminates, while a coarser blade might be better for rougher lumber.
- Dust Bags/Vacuums: High-quality shop vacuums with fine dust filters are ideal for capturing the fine dust generated by cutting composites and hardwoods.
- Jigs and Fixtures: Specialized jigs can be purchased or made to allow for precise dado cuts, rabbets, or even mortises using the track saw.
Track Saw Joinery: Precision Connections
The precision of a track saw makes it an excellent tool for creating tight-fitting joinery, often associated with more advanced woodworking techniques.
Creating Dados and Rabbets
Dados (grooves cut across the grain) and rabbets (grooves cut along the edge) are fundamental joinery techniques.
- Dado Jigs: While some track saws have depth-setting capabilities that can approximate a dado, dedicated dado jigs that attach to the track are the most accurate way to achieve consistent dadoes. These jigs often use a sacrificial fence or a mechanism that precisely controls the depth and width of the cut relative to the track.
- Rabbets: You can create rabbets by setting the saw’s depth and making a cut along the edge of the workpiece. The width of the rabbet is determined by the distance you offset the track from the edge. Using a stop block on the track can ensure consistency if you’re making multiple identical rabbets.
Spline Joinery and Box Construction
Track saws can be used to create strong and attractive spline joints for box construction.
- Marking: Mark the locations for your spline slots on the mating pieces.
- Cutting Slots: Use the track saw with an appropriate blade (a thin kerf blade is often preferred) to cut shallow slots into the edges of your joinery.
- Making the Spline: Cut thin strips of wood (splines) that will fit snugly into these slots.
- Assembly: Apply glue to the slots and the spline, then assemble the pieces. The spline adds significant strength and alignment to the joint.
Domino-Style Joinery (with aftermarket jigs)
While not a native function, some aftermarket jigs are designed to work with track saws to create joints similar to those made with specialized tools like Festool’s Domino. These jigs allow for precise mortising of slots for domino tenons.
Track Saw Safety: Prioritizing Your Well-being
As with any power tool, track saw safety is paramount. Following these guidelines will help prevent accidents and ensure a safe working environment.
Essential Track Saw Safety Precautions
- Read the Manual: Always read and familiarize yourself with your specific track saw’s operating manual.
- Wear Safety Gear:
- Eye Protection: Safety glasses or a face shield are non-negotiable.
- Hearing Protection: Track saws can be loud. Earplugs or earmuffs are recommended.
- Dust Mask/Respirator: Essential for protecting your lungs from fine wood dust.
- Keep Guards in Place: Never remove or bypass the saw’s blade guard.
- Proper Blade Selection: Use the correct blade for the material you are cutting. Ensure the blade is sharp and free from damage.
- Blade Depth Setting: As mentioned, set the blade depth correctly to minimize blade exposure and avoid cutting into the track.
- Secure Workpiece and Track: Ensure both your workpiece and the guide rail are securely fastened. A loose track is a recipe for disaster.
- Clear Work Area: Keep your workspace clean and free of clutter. Ensure good lighting.
- Hands Clear: Always keep your hands and fingers away from the blade path and the spinning blade.
- Avoid Overreaching: Maintain a balanced stance and avoid overreaching.
- Disconnect Power: Always disconnect the power (unplug corded saws or remove the battery from cordless saws) before changing blades or making any adjustments.
- Dust Management: Connect to a dust extraction system to reduce airborne dust and improve visibility.
- Be Aware of Kickback: While less prone to kickback than traditional circular saws due to the guide rail, it’s still possible. Avoid binding the blade or cutting warped materials without proper support.
Track Saw Safety Checklist
| Safety Aspect | Action |
|---|---|
| Personal Gear | Wear safety glasses, hearing protection, and dust mask. |
| Tool Condition | Ensure blade guard is in place, blade is sharp and correct for material. |
| Workpiece Securing | Confirm workpiece is stable and not moving. |
| Track Securing | Verify track is firmly clamped or secured to the workpiece. |
| Blade Depth | Set blade depth appropriately, just deeper than the material. |
| Power Disconnect | Disconnect power before any adjustments or blade changes. |
| Work Area | Maintain a clean, well-lit, and uncluttered workspace. |
| Hands Placement | Keep hands away from the blade and the cutting path. |
| Dust Control | Utilize dust extraction to minimize airborne particles. |
Track Saw for Woodworking: A Comprehensive Tool
A track saw truly elevates woodworking projects. Its ability to deliver precise, clean cuts on a variety of materials makes it suitable for everything from basic DIY projects to intricate cabinetry and fine furniture.
Benefits for Woodworkers
- Improved Accuracy: Essential for tight-fitting joints and professional-looking results.
- Reduced Material Waste: Precise cuts mean fewer mistakes and less wasted material.
- Clean Edges: Minimizes the need for sanding and edge banding, saving time.
- Versatility: Handles various materials and can perform different types of cuts.
- Portability: Great for on-site work or small workshops where a large table saw might not be feasible.
- Ease of Use: Once set up, it’s generally easier and safer to use for long, straight cuts than a traditional circular saw.
Comparing Track Saws to Other Saws
- Table Saw: A table saw is ideal for ripping long boards and making repetitive cuts with fences. However, breaking down large sheet goods on a table saw can be cumbersome and requires additional support systems. A track saw excels here.
- Circular Saw: A standard circular saw is more portable and less expensive, but it lacks the precision and ease of use for straight cuts without additional guides.
- Jigsaw: A jigsaw is for curved cuts and intricate shapes, not for long, straight lines.
- Miter Saw: A miter saw is designed for crosscuts and angled cuts, not for cutting through large panels or ripping.
The track saw bridges the gap, offering precision for panel processing that’s difficult to achieve with other portable tools. It’s a complement, rather than a replacement, for many other saws in a well-equipped workshop.
Frequently Asked Questions (FAQ)
Q1: Do I need a track saw if I already have a table saw?
While a table saw is excellent for many tasks, a track saw is superior for breaking down large sheet goods like plywood, MDF, and melamine. It’s also more portable for on-site work like trimming doors. Many woodworkers find a track saw to be a valuable addition that complements their table saw.
Q2: Can I use a track saw without the track?
No, the primary benefit of a track saw is its integration with the guide rail. Using it without the track negates its precision advantage and makes it function like a standard circular saw, but with a more complicated base.
Q3: How do I prevent splintering when cutting laminate or veneer with a track saw?
Ensure the anti-splinter strip on your track is in good condition. Use a fine-tooth blade specifically designed for laminate or veneer. Some woodworkers also apply painter’s tape along the cut line, or use a thin sacrificial strip of material taped alongside the main workpiece.
Q4: What kind of blade should I use with my track saw?
For general woodworking and sheet goods, a blade with 48-60 teeth is usually a good choice for a clean cut. For melamine and laminate, a blade with more teeth (60+) and a positive hook angle can help prevent chipping. For ripping solid wood, a lower tooth count blade (24-40 teeth) can be more efficient. Always ensure the blade’s arbor size matches your saw.
Q5: Can I make dadoes with a track saw?
Yes, you can make dadoes. For precise, consistent dadoes, it is highly recommended to use a specialized dado jig designed for track saws. While you can set the depth on the saw, achieving perfectly uniform dadoes across a long panel can be challenging without a dedicated jig.
Q6: Are cordless track saws as powerful as corded ones?
Modern cordless track saws are very powerful and often rival their corded counterparts. However, for very long or demanding cuts, a corded saw might offer more consistent power without the concern of battery life. It depends on the specific model and battery technology.
Q7: How do I maintain my track saw?
Keep the saw clean, especially the base plate and the channels where it runs on the track. Regularly check and replace the anti-splinter strips on the track as they wear. Keep blades clean and sharp. Store your saw and track properly to prevent damage.
By following this comprehensive guide, you’ll be well-equipped to use a track saw effectively and safely, transforming your woodworking projects with unparalleled precision.