
Can you use a Ryobi circular saw for any DIY project? Yes, a Ryobi circular saw is a versatile tool perfect for many DIY projects, from cutting lumber for furniture to making precise adjustments to existing structures. This guide will help you get started with your Ryobi circular saw.
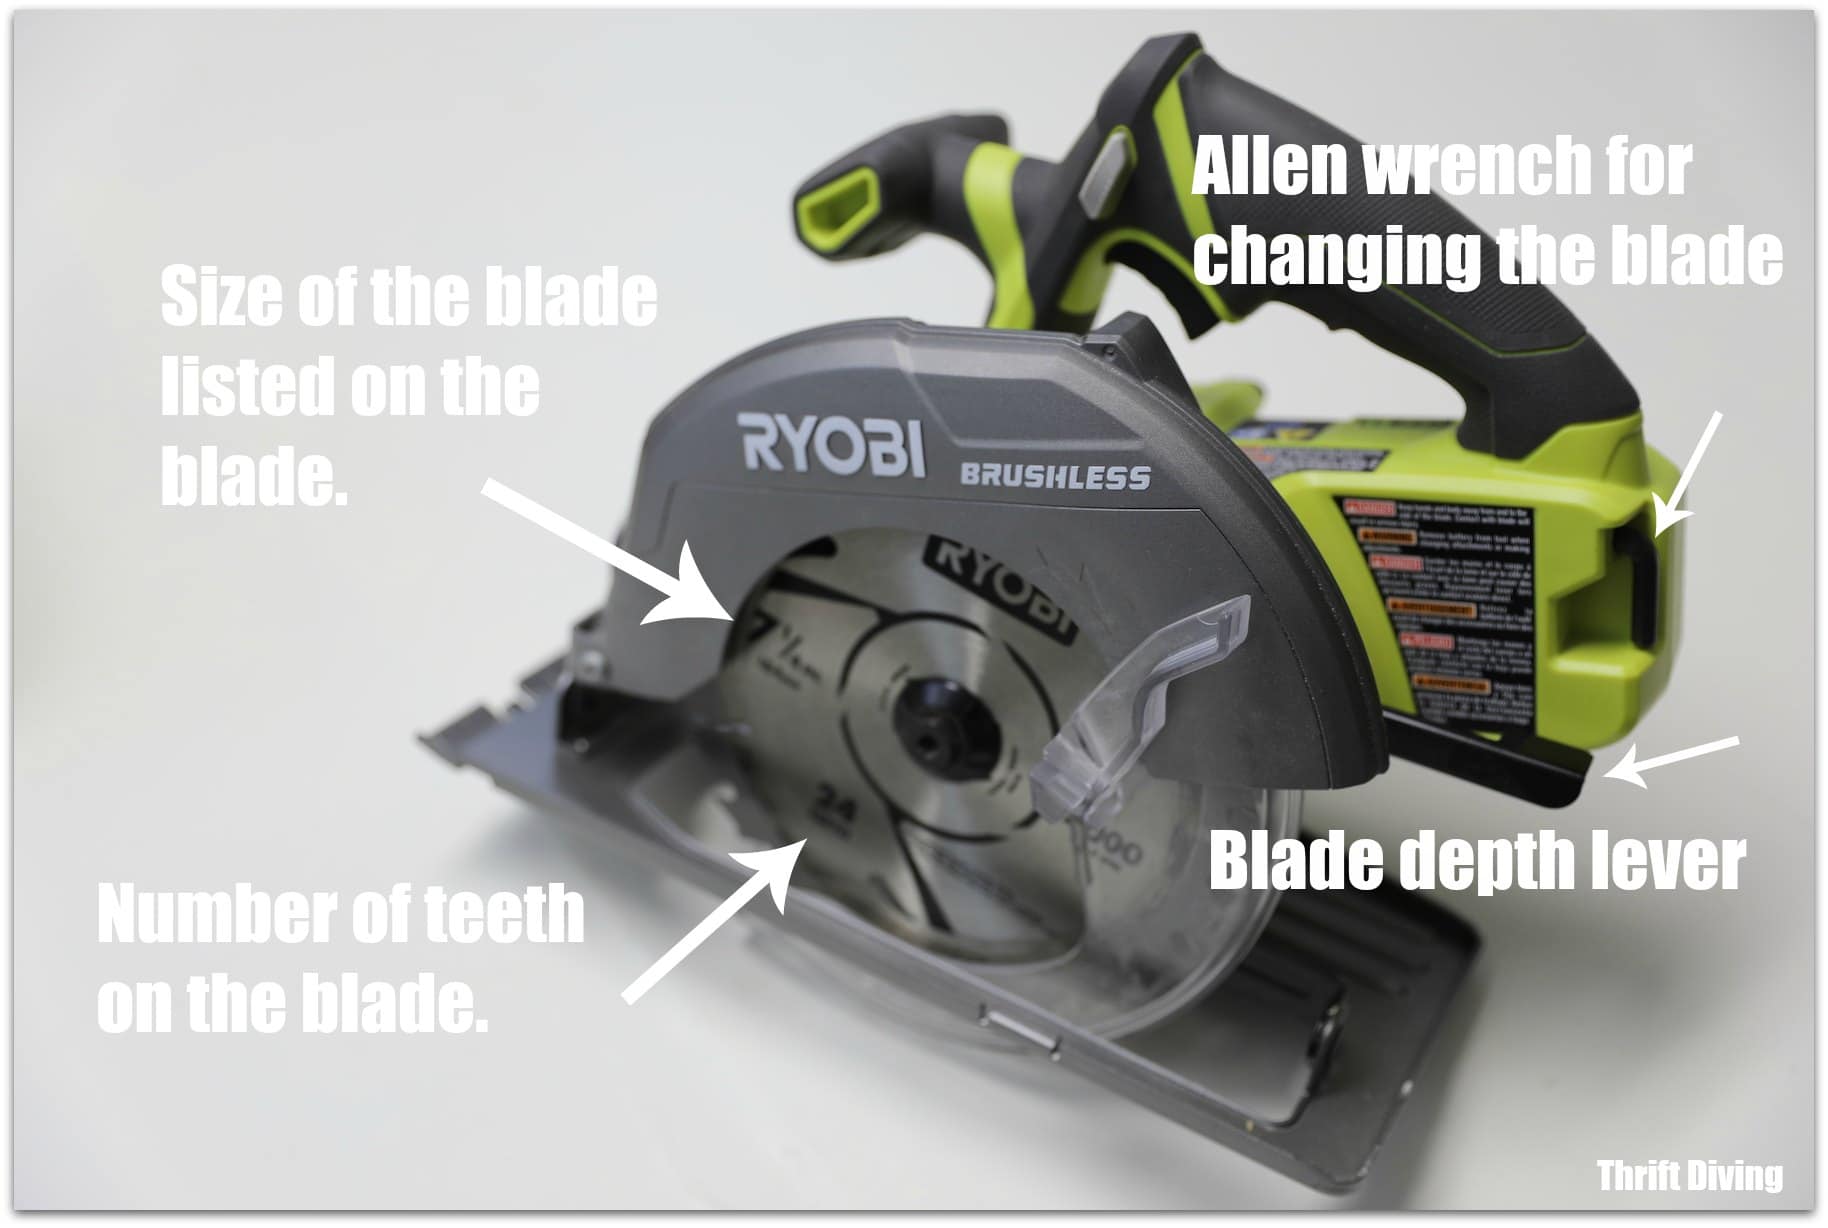
Image Source: thriftdiving.com
Getting Started with Your Ryobi Circular Saw
So, you’ve got a new Ryobi circular saw and you’re ready to tackle some projects. That’s great! Using a circular saw might seem a bit daunting at first, but with the right knowledge and practice, you’ll be making clean cuts in no time. This comprehensive Ryobi saw guide is designed to walk you through everything a beginner needs to know. We’ll cover setup, operation, safety, and even some basic maintenance.
What’s in the Box?
When you unbox your Ryobi circular saw, you’ll typically find the saw itself. Depending on the model, you might also get a saw blade, a blade wrench, and an owner’s manual. Take a moment to familiarize yourself with all the parts.
Essential Accessories
To get the most out of your Ryobi circular saw, consider these essential accessories:
- Extra Saw Blades: Different materials require different blades. A general-purpose blade is good for most wood, but you might need a finer-toothed blade for smoother finishes or a blade designed for specific materials like plywood or melamine.
- Ryobi Power Tool Battery: If you have a Ryobi cordless circular saw, ensure you have at least one fully charged Ryobi power tool battery and a charger. Having a spare battery is highly recommended so you don’t have to stop mid-project.
- Safety Glasses: Non-negotiable for protecting your eyes from flying debris.
- Hearing Protection: Circular saws can be loud. Earplugs or earmuffs are crucial for long-term hearing health.
- Measuring Tape and Pencil: For accurate marking of your cuts.
- Clamps: To secure your workpiece to your workbench or saw horses. This is a critical safety step.
- Dust Collection Bag or Vacuum: To manage the sawdust.
Preparing Your Ryobi Circular Saw for Use
Before you make your first cut, it’s important to properly set up your saw. This involves installing a blade and adjusting the cutting depth.
Ryobi Saw Blade Installation
Proper Ryobi saw blade installation is crucial for both performance and safety. Here’s how to do it:
- Disconnect Power: For corded models, unplug the saw. For cordless models, remove the Ryobi power tool battery. This is the most important safety step.
- Locate the Arbor: The arbor is the shaft where the blade mounts. You’ll find it in the center of the saw.
- Engage the Spindle Lock: Most Ryobi circular saws have a spindle lock button or lever. Press and hold this to prevent the arbor from spinning while you loosen the blade bolt.
- Loosen the Blade Bolt: Use the provided blade wrench to turn the blade bolt counter-clockwise. It might be on tight, so you may need to apply some force. Keep the spindle lock engaged.
- Remove the Old Blade (if applicable): Once the bolt is loose, remove it. Then, take off the outer flange (the metal washer on the outside of the blade). You can now slide the old blade off. Note the direction of the teeth on the old blade.
- Install the New Blade: Place the new blade onto the arbor. Make sure the teeth are facing the correct direction. The teeth should point forward and down on the side of the saw where the blade exits the base. The blade’s rotation arrow (if present) should also indicate the correct direction.
- Replace the Outer Flange: Put the outer flange back on.
- Tighten the Blade Bolt: Reinsert the blade bolt and tighten it clockwise using the wrench. Again, hold the spindle lock while tightening. Tighten it firmly, but don’t overtighten it, as this can damage the arbor.
- Remove the Spindle Lock: Release the spindle lock.
- Spin the Blade: Give the blade a gentle spin by hand to ensure it moves freely and doesn’t rub against anything.
Ryobi Saw Depth Adjustment
The depth of cut on your Ryobi circular saw determines how much of the blade extends below the base plate. Setting this correctly is vital for clean cuts and safety.
- The 1/8-inch Rule: The ideal depth setting is to have the blade extend about 1/8 inch (3mm) below the material you are cutting.
- How to Adjust:
- Ensure the saw is unplugged or the battery is removed.
- Locate the depth adjustment lever or knob, usually found at the front of the saw, near the base plate.
- Loosen the lever or knob.
- Lift or lower the saw’s base plate until the blade is at the desired depth relative to the surface of your material.
- Tighten the lever or knob securely.
- Why it Matters:
- Safety: Setting the depth too deep increases the risk of kickback and makes it harder to control the saw. It also exposes more of the blade unnecessarily.
- Cut Quality: A depth of 1/8 inch below the material allows the blade to cut cleanly through without binding, resulting in a smoother edge and less tear-out, especially on the bottom of the cut. It also reduces the amount of blade contact with the material, making it easier to push the saw.
Ryobi Saw Bevel Cut Setup
Many Ryobi circular saws can also make angled cuts, known as bevel cuts. This is useful for creating joints or decorative edges.
- Locate the Bevel Adjustment: You’ll find a bevel adjustment mechanism, usually a knob or lever, on the front of the saw, often near the depth adjustment.
- Loosen the Bevel Lock: Release the lock to allow the base plate to pivot.
- Set the Angle: Most saws have a built-in guide or ruler that shows common angles like 0°, 22.5°, and 45°. You can often adjust it to any angle in between.
- Lock the Bevel: Once you have the desired angle, tighten the bevel lock securely.
- Test Your Cut: Before cutting your actual workpiece, it’s a good idea to make a test cut on a scrap piece of wood to ensure the angle is accurate.
Ryobi Saw Safety Tips
Safety is paramount when using any power tool, and a circular saw is no exception. Adhering to these Ryobi saw safety tips will help prevent injuries.
- Read the Manual: Always start by reading your Ryobi circular saw’s owner’s manual. It contains specific information about your model and its safety features.
- Wear Safety Gear:
- Eye Protection: Always wear safety glasses or a face shield.
- Hearing Protection: Use earplugs or earmuffs.
- Dust Mask: Especially when cutting particle board or MDF.
- Gloves: Consider wearing gloves for a better grip, but ensure they don’t get caught in the blade.
- Appropriate Clothing: Avoid loose clothing, jewelry, or anything that could get snagged by the blade. Tie back long hair.
- Secure Your Workpiece: Always clamp your material firmly to a stable surface like sawhorses or a workbench. Never try to hold the material with your foot or knee.
- Check the Blade: Ensure the blade is sharp, properly installed, and the correct type for the material you are cutting. A dull blade can cause kickback.
- Inspect the Cord/Battery: For corded saws, check the power cord for any damage. For cordless saws, ensure the Ryobi power tool battery is securely in place.
- Clear the Cutting Area: Make sure there are no nails, staples, or other foreign objects in the path of the blade.
- Proper Stance: Stand in a balanced position. Don’t overreach. Position yourself so you are not directly behind the saw if kickback occurs.
- Let the Saw Work: Don’t force the saw. Let the blade do the cutting. Pushing too hard can cause the motor to overheat or lead to kickback.
- Kickback Awareness: Kickback is when the blade suddenly binds in the wood and the saw is thrown back towards the operator. This is the most common cause of circular saw injuries.
- Causes of Kickback:
- The blade pinching in the cut (e.g., if the material shifts or a cut-through kerf closes).
- Twisting the saw during the cut.
- Cutting knots or hardened wood.
- Using a dull or damaged blade.
- The blade guard malfunctioning or being held open.
- Preventing Kickback:
- Ensure the blade depth is set correctly.
- Keep the blade guard free to move and spring back.
- Always keep a firm grip on both handles.
- Don’t twist the saw while cutting.
- Cut on a stable surface.
- Use a rip fence or guide for straight cuts when needed.
- Causes of Kickback:
- Blade Guard Functionality: Never disable or tie back the blade guard. It’s there to protect you. Ensure it retracts smoothly as you begin a cut and covers the blade when you finish.
- Starting and Stopping: Start the saw and let it reach full speed before it contacts the material. Lift the saw off the material before it stops spinning completely.
- Two-Handed Operation: Always use both hands to operate the saw – one on the main handle with the trigger, and the other on the front auxiliary handle.
- Unplug When Not in Use: Always unplug corded saws or remove the battery from cordless saws when changing blades, making adjustments, or when the saw is not in use.
Making Cuts with Your Ryobi Circular Saw
Now that you’re familiar with the setup and safety, let’s talk about making cuts.
Making a Straight Cut
A straight cut is the most common type of cut.
- Mark Your Cut Line: Use your measuring tape and pencil to draw a clear, precise line on your material.
- Position the Saw:
- Place the base plate of your Ryobi circular saw flat on the material.
- Align the saw’s blade with your cut line. Most saws have an indicator on the base plate that shows the kerf (the width of the cut) and the blade’s cutting line. This is usually marked for a 0° bevel.
- Important: Ensure the blade is on the waste side of your line. This means the blade cuts away from the part of the material you want to keep.
- Secure the Material: Clamp your workpiece firmly.
- Engage the Blade: Press the trigger to start the saw and let the blade reach full speed.
- Begin the Cut: Gently feed the saw forward into the material, keeping the base plate flat on the surface. Let the blade do the work.
- Complete the Cut: Continue cutting smoothly along your line.
- Finish the Cut: Once you reach the end of the material, lift the saw away from the workpiece while the blade is still spinning.
- Release the Trigger: Release the trigger and wait for the blade to stop spinning completely before setting the saw down.
Making a Crosscut
A crosscut is a cut made across the grain of the wood. The process is the same as making a straight cut.
Making a Rip Cut
A rip cut is a cut made along the grain of the wood. For long rip cuts, using a rip fence is highly recommended for accuracy and safety.
- What is a Rip Fence? A rip fence is an attachment that mounts to the base plate and guides the saw parallel to the edge of the workpiece. It helps ensure a perfectly straight rip cut.
- Installing the Rip Fence: Your Ryobi circular saw will likely come with a rip fence. It usually slides into slots on the base plate and is secured with a screw or knob. Consult your manual for specific instructions.
- Setting the Rip Fence:
- Measure the distance from the edge of your workpiece to where you want to make the cut.
- Measure the same distance from the blade to the edge of the rip fence. Adjust the rip fence to match this measurement.
- Ensure the rip fence is held firmly against the edge of the workpiece as you cut.
Making a Bevel Cut
As discussed in the setup section, making a bevel cut involves setting your saw to the desired angle.
- Set the Bevel: Adjust and lock the bevel angle as described earlier.
- Mark Your Line: Mark your cut line on the material. Remember that the bevel will slightly change the effective cutting line compared to a straight cut.
- Position the Saw: Align the blade with your marked line, considering the bevel.
- Secure and Cut: Clamp the material and proceed with the cut as you would a straight cut, maintaining a steady feed rate and keeping the base plate flat against the material.
Ryobi Saw Dust Collection
Circular saws create a lot of sawdust. Effective Ryobi saw dust collection not only keeps your workspace cleaner but also improves visibility of your cut line and reduces airborne particles.
- Dust Port: Most Ryobi circular saws have a dust port, usually located at the rear of the saw, near the blade guard.
- Connecting a Vacuum: You can attach a shop vacuum or a dust collection system to this port. Many vacuums have universal adapters, or you might need a specific Ryobi accessory for a perfect fit.
- Dust Bags: Some models come with a small fabric dust bag. While less effective than a vacuum, they can catch a portion of the dust.
- Visibility: A clean cut line is essential for accuracy. Good dust collection helps you see exactly where you’re cutting.
- Health: Inhaling fine wood dust can be harmful. Always wear a dust mask, even with a dust collection system.
Ryobi Saw Maintenance
Proper Ryobi saw maintenance will extend the life of your tool and ensure it operates safely and effectively.
Cleaning Your Saw
- After Each Use:
- Unplug the saw or remove the battery.
- Use a brush or compressed air to remove sawdust from the motor vents, base plate, and blade guard.
- Wipe down the exterior of the saw with a damp cloth. Avoid getting water into the motor housing.
- Blade Area: Periodically remove the blade to clean any sawdust or debris that has accumulated around the arbor and blade guard.
Blade Care
- Sharpness: A sharp blade cuts cleaner and safer. If your cuts are rough, splintered, or require excessive force, your blade might be dull.
- Replacement: Blades wear out. You’ll know it’s time for a replacement when you notice a decrease in cutting performance or an increase in effort required. Refer to the Ryobi saw blade installation section for how to change blades.
- Storage: Store blades properly to prevent damage and rust. Keep them in their original packaging or a blade case.
Checking for Loose Parts
Periodically inspect your saw for any loose screws, bolts, or handles. Tighten them as needed.
Lubrication
Most modern Ryobi power tools, including circular saws, are factory-lubricated and do not require user lubrication. Consult your owner’s manual if you suspect a lubrication issue.
Troubleshooting Common Ryobi Circular Saw Issues
Even with proper use, you might encounter occasional issues.
| Problem | Possible Cause | Solution |
|---|---|---|
| Saw not starting | Battery not seated properly, no power | Ensure battery is fully charged and properly inserted; check power outlet/cord. |
| Burning smell | Dull blade, forcing the saw, motor issue | Sharpen or replace blade, let the saw work at its own pace, check motor vents for blockage. |
| Rough cuts/tear-out | Dull blade, wrong blade type, saw vibrating | Replace blade, use appropriate blade for material, ensure blade is tight and no loose parts. |
| Saw bouncing/vibrating | Loose blade, motor imbalance, warped base | Tighten blade, inspect for visible damage, check base plate for flatness. |
| Blade binds | Incorrect depth setting, material shifts | Adjust depth to 1/8″ below material, clamp material securely, avoid cutting warped or twisted wood. |
| Kickback | Blade pinching, twisting saw, dull blade | Follow all Ryobi saw safety tips, especially regarding stance, grip, and blade maintenance. |
Beyond the Basics: Ryobi Miter Saw Replacement Parts and Other Saws
While this guide focuses on the circular saw, it’s worth noting Ryobi’s wider range of tools. If you also own a Ryobi miter saw, you might eventually need Ryobi miter saw replacement parts like blades, dust bags, or even replacement fences. Ryobi offers a good selection of parts and accessories to keep their tools running smoothly.
Ryobi Cordless Circular Saw Advantages
If you have a Ryobi cordless circular saw, you enjoy the freedom of movement without being tethered by a power cord. This is especially beneficial for large projects or working in areas without easy access to power outlets. Remember the importance of having a good Ryobi power tool battery charged and ready to go.
Frequently Asked Questions (FAQ)
Q1: What is the best blade for cutting plywood with my Ryobi circular saw?
For plywood, a fine-toothed blade (60-80 teeth) is generally best. It minimizes splintering and tear-out on the veneer surface, resulting in a cleaner cut.
Q2: Can I use my Ryobi circular saw for metal cutting?
While some specialized metal-cutting blades exist for circular saws, standard wood-cutting blades are NOT designed for metal and can be dangerous if used for this purpose. Using the wrong blade for metal can cause kickback and damage to the saw. Always use a blade specifically designed for cutting metal.
Q3: How often should I replace my Ryobi saw blade?
There’s no strict time limit, as it depends on how much you use the saw and the materials you cut. If you notice your cuts are becoming rough, you’re having to force the saw more than usual, or the blade shows visible damage, it’s time for a replacement.
Q4: What is the best way to make a long, straight rip cut?
For long, straight rip cuts, use a rip fence attachment. For extremely long or demanding cuts, consider using a track saw or a table saw if available, as they offer more stability and control for these types of operations.
Q5: Is it okay to use the saw without the blade guard?
Absolutely not. The blade guard is a critical safety feature designed to protect you from the spinning blade. Never remove, bypass, or tie back the blade guard. If it’s damaged, it should be repaired or replaced immediately.
Q6: How do I make sure my Ryobi cordless circular saw battery is performing optimally?
Ensure you are using the correct Ryobi charger for your battery type and model. Avoid fully depleting the battery regularly, as this can reduce its lifespan. Store batteries in a cool, dry place away from extreme temperatures.
By following this Ryobi saw guide, you’ll be well on your way to safely and effectively using your Ryobi circular saw for a variety of projects. Remember, practice and patience are key to mastering any new tool. Always prioritize safety and enjoy your DIY adventures!