
What is a skill saw? A skill saw, more commonly known as a circular saw, is a handheld power tool that uses a rotating toothed blade to cut wood and other materials. Can I make straight cuts with a skill saw? Yes, with the right technique and possibly some guides, you can achieve very straight cuts with a skill saw. Who is this guide for? This guide is designed for beginners and DIY enthusiasts looking to master the art of cutting with a skill saw.
For anyone venturing into DIY woodworking projects, a skill saw is an indispensable tool. It’s a versatile workhorse that can tackle a wide range of tasks, from simple framing to intricate joinery. As a great alternative to a table saw for many applications, learning to use a skill saw effectively opens up a world of creative possibilities. This beginner skill saw guide will walk you through the essential steps to get you cutting with confidence and precision.
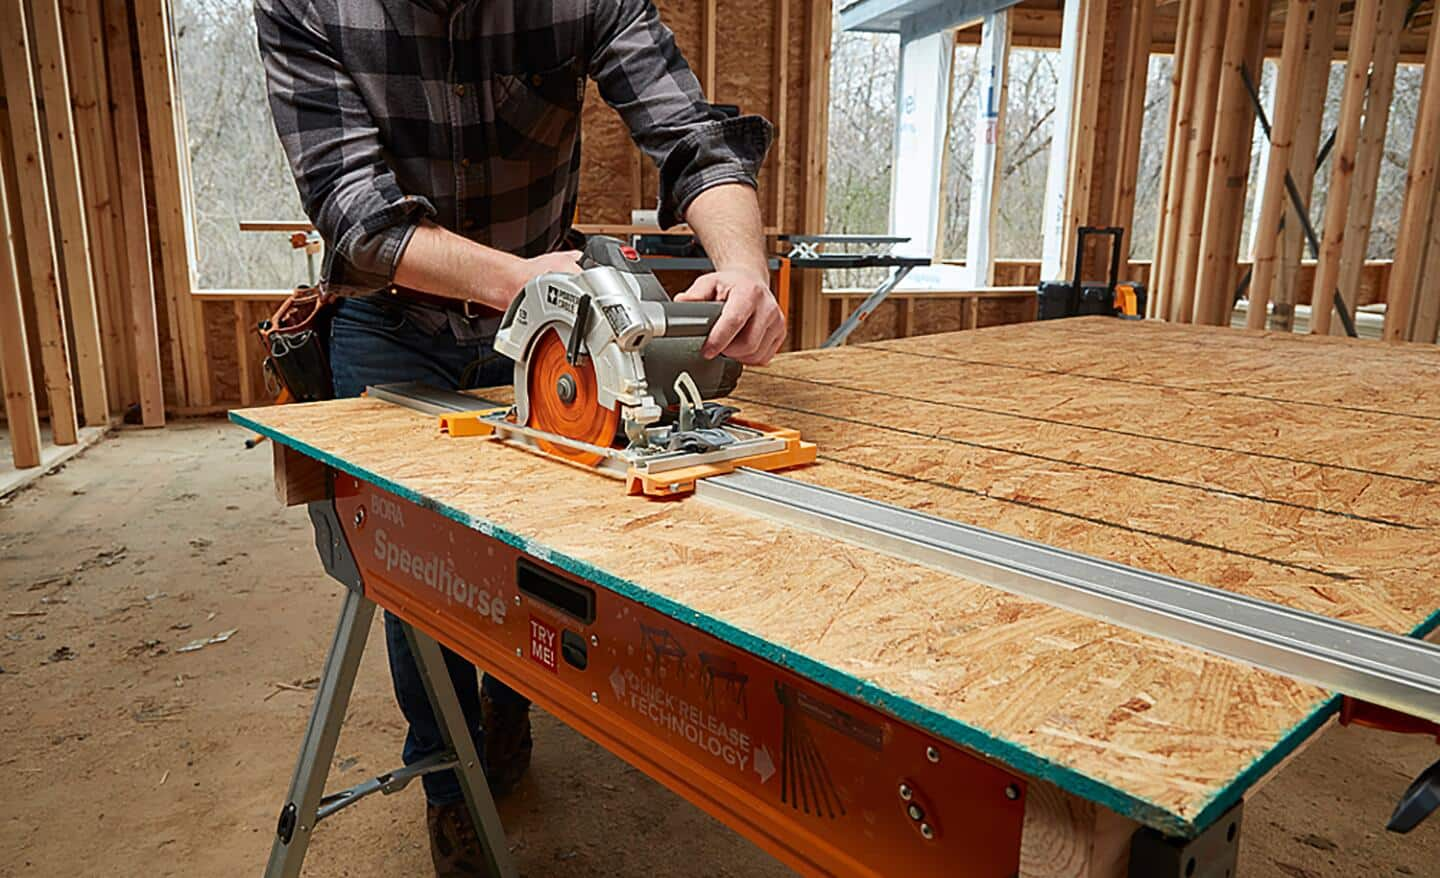
Image Source: dam.thdstatic.com
Getting Started: Knowing Your Skill Saw
Before you even plug in your skill saw, it’s crucial to familiarize yourself with its parts and how they work. This knowledge is foundational to both safety and accuracy.
Essential Skill Saw Components
- Blade: The heart of the saw, this circular metal disc with teeth cuts through material. Blades vary in tooth count and type, impacting the type and smoothness of the cut.
- Guard: A crucial safety feature, the upper guard covers the blade when it’s not engaged, and a spring-loaded lower guard retracts as the saw cuts and snaps back into place. Never disable or obstruct the guard.
- Base Plate (or Shoe): This flat metal plate sits on the material being cut, providing stability and allowing you to adjust the depth and bevel of your cut.
- Depth Adjustment Lever: This allows you to set how deep the blade will cut. For most woodworking, you’ll want the blade to extend just slightly below the material.
- Bevel Adjustment: This mechanism allows you to tilt the base plate, enabling angled or bevel cuts.
- Trigger Lock: Many saws have a safety button or lever that must be pressed before the trigger can be pulled, preventing accidental startup.
- Dust Port: A connection point for a vacuum or dust collection system, helping to keep your work area cleaner and your view of the cut line clearer.
Choosing the Right Blade
The blade you choose makes a significant difference in the quality of your cut.
Blade Types and Their Uses
| Blade Type | Tooth Count | Common Uses | Cut Quality |
|---|---|---|---|
| High Tooth Count | 60-80 | Fine finishes, plywood, laminate, melamine | Smooth |
| Medium Tooth Count | 40-50 | General purpose cutting, dimensional lumber | Good |
| Low Tooth Count | 20-24 | Ripping lumber, rough framing, fast cutting | Rough |
| Carbide-Tipped | Various | Durable, stays sharp longer, good for hardwoods | Varies |
For most beginner skill saw tasks and achieving smooth cuts, a 40-tooth or 60-tooth carbide-tipped blade is a great all-around choice.
Power Saw Safety: The Non-Negotiable First Step
Before you even think about making a cut, power saw safety is paramount. A skill saw is a powerful tool, and carelessness can lead to serious injury.
Essential Safety Gear
- Safety Glasses: Always wear safety glasses or a face shield to protect your eyes from flying sawdust and debris.
- Hearing Protection: Circular saws are loud. Use earplugs or earmuffs to prevent hearing damage.
- Dust Mask or Respirator: Fine sawdust can be harmful to your lungs. Wear a dust mask or respirator, especially when cutting MDF or particleboard.
- Gloves: While some prefer not to wear gloves for better grip, well-fitting work gloves can protect your hands from splinters.
- Sturdy Footwear: Wear closed-toe shoes to protect your feet from dropped tools or materials.
- No Loose Clothing or Jewelry: Anything that can get caught in the spinning blade must be removed. Tie back long hair.
Safe Operation Practices
- Read Your Manual: Every saw is slightly different. Familiarize yourself with your specific model’s instructions.
- Inspect the Saw: Before each use, check the blade for damage, ensure guards are functioning, and that the cord is in good condition.
- Secure Your Workpiece: Always clamp your material firmly to a stable surface. Never try to hold small pieces by hand while cutting.
- Maintain a Stable Stance: Stand in a balanced position with your feet apart.
- Keep Hands Away from the Blade: Maintain a safe distance from the blade path at all times.
- Let the Saw Reach Full Speed: Don’t start cutting until the blade is spinning at its maximum speed.
- Push Through the Cut: Apply steady, even pressure. Don’t force the saw.
- Don’t Overreach: Keep the saw close to your body for better control.
- Unplug When Changing Blades or Making Adjustments: This is a critical safety step.
- Be Aware of the Cord: Keep the power cord clear of the blade and your work area.
- Work in a Well-Lit Area: Good visibility is essential for safety and accuracy.
- Never Cut Towards Yourself: Always guide the saw away from your body.
Mastering the Cut: Step-by-Step Guide to Straight Cuts
Achieving straight cuts with a skill saw is a skill that develops with practice. Here’s how to do it.
Step 1: Planning Your Cut
- Measure Twice, Cut Once: This old adage is especially true with power tools. Double-check all your measurements.
- Mark Your Cut Line: Use a sharp pencil or marking knife to draw a clear, visible line on your material. For maximum accuracy, some prefer to use a fine-tip marker.
- Consider the Kerf: The kerf is the width of the material removed by the saw blade. Position your cut line so that the blade will cut on the waste side of the line. You can often see a small arrow or indicator on the base plate that shows the blade’s position.
Step 2: Setting Up Your Skill Saw
- Adjust Blade Depth:
- Unplug the saw.
- Place the base plate on the edge of your material.
- Adjust the depth so that the blade extends about 1/4 inch (6mm) below the material. This ensures a clean cut without exposing too much blade, which can be dangerous.
- Set Bevel (if needed): For straight cuts, ensure the bevel adjustment is set to 0 degrees (or 90 degrees, depending on how your saw is marked for a square cut).
Step 3: Positioning and Securing the Material
- Support: Ensure your workpiece is fully supported. The end of the material you are cutting off will fall away. You need to prevent this falling piece from pinching the blade, which can cause a dangerous kickback. Use sawhorses, a workbench, or scrap wood to support both the main piece and the offcut.
- Clamping: Clamp your material securely to your work surface. This prevents the wood from moving during the cut, which is essential for both safety and accuracy.
Step 4: Making the Cut
- Position the Saw:
- Place the skill saw on the material with the blade just before your cut line.
- Align the blade with your marked cut line, ensuring the blade is on the waste side of the line. Use the indicator on the base plate to help you.
- Engage the Saw:
- Hold the saw firmly with both hands.
- Press the safety trigger lock.
- Squeeze the trigger to allow the blade to reach full speed.
- Begin the Cut:
- Gently lower the blade into the material.
- Once the blade is fully engaged, slowly and steadily push the saw forward along your cut line.
- Maintain a consistent speed and pressure. Let the saw do the work; don’t force it.
- Keep the base plate flat on the material throughout the cut.
- Finishing the Cut:
- As you reach the end of the cut, maintain support for the offcut piece to prevent it from dropping and pinching the blade.
- Once the cut is complete, release the trigger.
- Allow the blade to stop spinning completely before lifting the saw from the material.
Achieving Perfect Cuts: Tips and Techniques
Making clean cuts with a skill saw involves more than just following the line. Here are some advanced wood cutting tips.
Using Guides for Straight Cuts
While freehand cutting is possible, using guides is the key to achieving truly straight cuts with a skill saw.
Methods for Guiding Your Cut
- The Rip Fence: Many skill saws come with a rip fence, a metal bar that attaches to the base plate. You set the distance of the fence from the blade, and it runs along the edge of your material, guiding the saw. This is excellent for cutting long strips of wood parallel to an edge.
- How to use:
- Loosen the rip fence.
- Measure the distance from the edge of your material to the desired cut line.
- Set the rip fence to that measurement, aligning it with the blade’s kerf.
- Tighten the rip fence securely.
- Ensure the fence slides smoothly along the edge of your workpiece.
- How to use:
- Straight Edge Guide (Clamped): This is arguably the most common and effective method for precise straight cuts, especially when the rip fence isn’t suitable or long enough.
- How to use:
- Mark your cut line on the material.
- Measure the distance from the edge of your skill saw’s base plate to the blade (accounting for the kerf). This is your offset.
- Take a straight piece of material (plywood, MDF, or a metal ruler) and measure this offset distance from your cut line.
- Clamp this straight edge guide firmly to your workpiece. Ensure the clamps are out of the way of the saw.
- Align the edge of your skill saw’s base plate with the clamped straight edge.
- Proceed with the cut, keeping the base plate pressed firmly against the guide.
- How to use:
- Speed Square or Combination Square: For shorter cuts or when you need to make a quick crosscut, these tools can be used as a makeshift guide.
- How to use:
- Mark your cut line.
- Position the square so its fence is snug against the edge of the material and the blade aligns with your cut line.
- Clamp the square in place.
- Run the base plate of your saw along the edge of the square.
- How to use:
Cutting Plywood with a Skill Saw
Cutting plywood requires a bit more care to avoid tear-out (splintering along the cut line).
Tips for Tear-Out Prevention
- Use a Fine-Tooth Blade: A high-tooth-count blade (60 teeth or more) is crucial for clean plywood cuts.
- Score the Cut Line: Before cutting, use a sharp utility knife to score the cut line. This helps create a clean edge for the blade to follow.
- Use a Straight Edge Guide: As mentioned, this is vital for control.
- Apply Painter’s Tape:
- Before making your cut, apply a strip of painter’s tape directly along your cut line.
- Draw your cut line on top of the tape. The tape acts as a barrier, helping to hold the wood fibers in place as the blade passes through.
- Cut with the “Good” Side Down: For crosscuts on plywood, place the side you want to be perfectly smooth facing down on the sawhorse or workbench. This way, any tear-out on the bottom will be less noticeable. For rip cuts, the opposite is true – place the good side up.
- Support the Offcut: Plywood sheets can be heavy. Ensure the entire piece is well-supported to prevent it from sagging and pinching the blade.
Lumber Cutting Techniques
Whether you’re ripping (cutting along the grain) or crosscutting (cutting across the grain), technique matters.
Rip Cutting
Rip cuts are typically made along the length of a board.
- Use a Rip Fence or Long Straight Edge: For parallel rip cuts, a rip fence is ideal. If you don’t have one or need a longer guide, use a clamped-on straight edge.
- Support the Workpiece: Ensure the entire length of the board is supported. The offcut piece should not be left hanging unsupported.
- Steady Pressure: Maintain consistent forward pressure.
- Beware of Blade Flex: In long rip cuts, the blade can sometimes flex, leading to an uneven cut. This is where a longer, more rigid guide is beneficial.
Crosscutting
Crosscuts are made across the width of a board.
- Use a Speed Square or Clamped Straight Edge: For accuracy, especially on shorter pieces, guides are essential.
- Support Both Ends: Ensure both the main piece and the offcut are supported. The offcut piece needs to be supported so it doesn’t fall and pinch the blade as you finish the cut.
- Cut on the Waste Side: Always mark your cut line and position the blade so it cuts on the waste side.
Advanced Skill Saw Applications
Once you’ve mastered the basics, you can explore more advanced techniques.
Making Bevel Cuts
Bevel cuts add decorative or functional angles to your projects.
- Adjust the Bevel Angle: Loosen the bevel adjustment mechanism on your saw and set it to your desired angle (commonly 45 degrees). Tighten it securely.
- Use a Guide: It’s highly recommended to use a guide for bevel cuts, as the base plate is now tilted, making freehand control more challenging. You can use the edge of your workpiece if it’s straight and you’re making a cut parallel to it, or clamp a suitable guide.
- Test Cut: Always make a test cut on scrap material to ensure your angle is correct.
Cutting Metal and Masonry
With the right blade, your skill saw can be used for more than just wood.
Using Specific Blades
- Metal Cutting Blades: These blades have a higher tooth count and are made from harder materials to cut through metal. Always wear appropriate safety gear, as metal cutting produces sparks and sharp burrs.
- Diamond Blades: These are used for cutting masonry products like tiles, concrete, or bricks. Ensure your saw is rated for this type of use, and always use water to cool the blade and suppress dust if possible.
Maintenance for Longevity and Performance
Proper maintenance ensures your skill saw operates safely and effectively for years to come.
Blade Care
- Keep Blades Clean: Sawdust and sap buildup can reduce cutting efficiency and increase friction. Clean blades with a brush or solvent.
- Sharpen or Replace: Dull blades are dangerous and produce poor cuts. Sharpen blades when they start to dull, or replace them if they are damaged or worn out.
Saw Maintenance
- Clean the Saw: Regularly brush away dust and debris from the motor housing and vents.
- Check the Cord: Inspect the power cord for any nicks or damage.
- Lubricate (if applicable): Refer to your owner’s manual for any lubrication points.
Common Problems and Solutions
Even with the best intentions, you might encounter issues.
Problem: Saw Binding or Kickback
- Cause: Blade pinching in the wood, forcing the saw, dull blade, insufficient support for the offcut.
- Solution: Ensure the blade is sharp, the cut line is accurate, and the offcut piece is well-supported. Let the saw do the work; don’t force it. Ensure the blade is set to the correct depth.
Problem: Rough Cuts or Tear-Out
- Cause: Dull blade, wrong blade for the material, pushing the saw too fast or too slow, improper support.
- Solution: Use a sharp, appropriate blade. Try cutting slower with consistent pressure. Use painter’s tape or a zero-clearance insert if your saw allows. Ensure good support.
Problem: Inaccurate Cuts
- Cause: Poorly marked line, no guide used, unstable workpiece, saw not held firmly.
- Solution: Mark lines clearly, use a reliable guide (rip fence or clamped straight edge), clamp your workpiece securely, and maintain a firm grip on the saw with both hands.
Frequently Asked Questions (FAQ)
Q1: Can I use a skill saw to cut metal?
A1: Yes, but only with a blade specifically designed for cutting metal. Using a wood blade on metal can damage the blade, the saw, and create a dangerous situation.
Q2: How deep should the blade be set on my skill saw?
A2: For most cuts, the blade should extend just about 1/4 inch (6mm) below the material being cut. This ensures a clean cut while minimizing exposed blade for safety.
Q3: What is the difference between ripping and crosscutting?
A3: Ripping is cutting wood along the grain, usually parallel to the length of a board. Crosscutting is cutting across the grain, typically across the width of a board.
Q4: How do I prevent the offcut from falling and pinching the blade?
A4: Ensure both the main piece and the offcut are well-supported by sawhorses, scrap wood, or a workbench. Don’t let the offcut hang unsupported, especially on longer cuts.
Q5: Is a skill saw a good alternative to a table saw for DIY woodworking projects?
A5: For many DIY projects, a skill saw with proper guides can be an excellent and more portable alternative to a table saw, especially for straight cuts and crosscuts. A table saw offers more precision for ripping long boards and making repeatable cuts.
Learning to use a skill saw effectively is a rewarding part of any DIY woodworking journey. By prioritizing safety, practicing with guides, and choosing the right blades, you’ll be making perfect cuts in no time, opening up a vast array of possibilities for your creative projects. Happy cutting!