
What is a scroll saw and can I use it for intricate cutting? Yes, a scroll saw is a power tool designed for making precise, curved cuts, often in wood, plastic, or thin metal, making it ideal for detailed scrollwork and intricate designs. Who is a scroll saw for? It’s perfect for hobbyists, crafters, woodworkers, and anyone who enjoys detailed projects.
This guide will cover everything you need to know to start using a scroll saw, from scroll saw setup to scroll saw techniques and essential scroll saw safety practices. We’ll delve into choosing the right scroll saw blades, understanding scroll saw speed, and keeping your tool in top condition with scroll saw maintenance. You’ll also find tips for successful scroll saw cutting and inspiration for scroll saw projects. Plus, we’ll address common scroll saw troubleshooting issues.
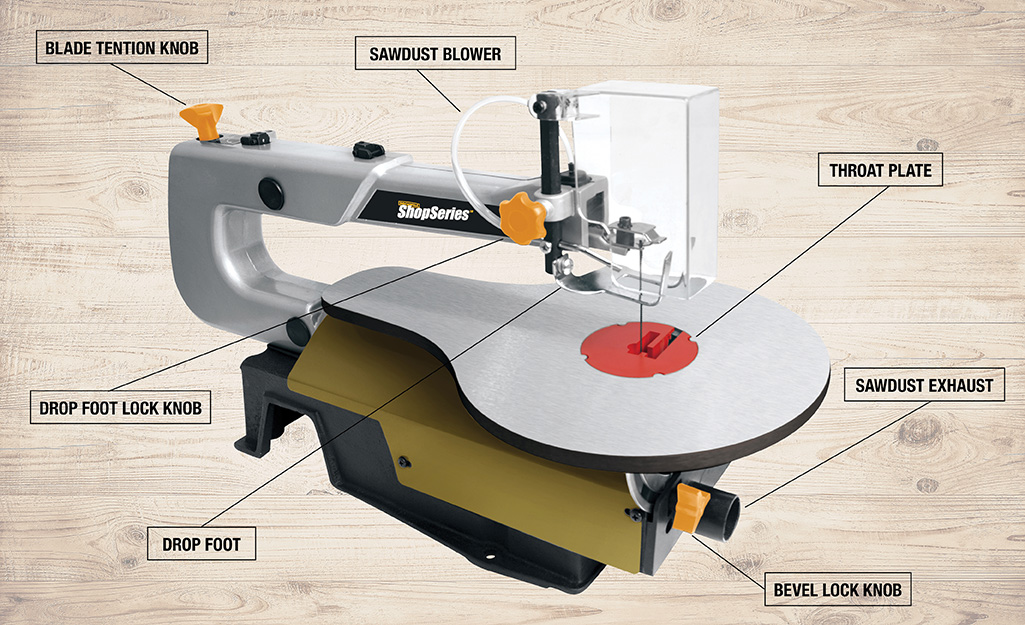
Image Source: contentgrid.homedepot-static.com
The Heart of Intricate Cuts: Getting to Know Your Scroll Saw
A scroll saw is a versatile tool that lets you create beautiful, detailed pieces. Think of it as a high-tech coping saw. It has a thin, reciprocating blade that moves up and down very quickly. This action allows for incredibly fine cuts and tight turns that other saws simply can’t manage. Whether you’re making decorative signs, intricate inlays, or small wooden toys, a scroll saw is your best friend.
What Makes a Scroll Saw Special?
- Precision: The fine blade and controlled movement allow for very accurate cuts.
- Versatility: You can cut curves, shapes, and even make internal cuts.
- Detail: It’s the go-to tool for delicate scrollwork and intricate patterns.
Setting Up Your Scroll Saw for Success
Before you make your first cut, proper scroll saw setup is crucial for both safety and achieving good results.
Choosing the Right Spot
- Stable Surface: Place your scroll saw on a sturdy workbench or table that won’t wobble.
- Power Source: Ensure you have easy access to a grounded electrical outlet.
- Lighting: Good lighting is essential for seeing your work clearly and avoiding mistakes.
- Dust Collection: Consider where dust will go. Many scroll saws have dust ports for vacuums.
Table and Fence Adjustments
- Table Tilt: Most scroll saws have a tilting table. For straight cuts, ensure the table is perfectly flat (0 degrees). For bevel cuts, you can tilt the table to your desired angle. Always lock it securely.
- Fence (if applicable): Some models have an adjustable fence for making repetitive straight or angled cuts. Make sure it’s set correctly and locked in place.
Blade Installation: The Crucial First Step
This is one of the most important parts of scroll saw setup. Using the correct scroll saw blades and installing them properly ensures clean cuts and prevents accidents.
Types of Scroll Saw Blades
Scroll saw blades come in many varieties, each suited for different materials and types of cuts. The key factors are:
-
Tooth Count (TPI – Teeth Per Inch):
- Low TPI (e.g., 6-10 TPI): Fewer, larger teeth. Good for faster cutting in thicker materials, but can leave a rougher edge.
- Medium TPI (e.g., 10-18 TPI): A good all-around choice for general wood cutting.
- High TPI (e.g., 18-32 TPI): More, smaller teeth. Ideal for fine detail work, thin materials, and smooth finishes. They cut slower but cleaner.
-
Blade Type:
- Plain-end Blades: These require blade clamps on both the upper and lower holders. They are versatile but can be a bit trickier to install.
- Pin-end Blades: These have small pins at each end that fit into corresponding holes on the blade holders. They are easier to install but can be more fragile.
-
Blade Width: Thinner blades are for tighter curves, while thicker blades are better for straighter cuts or faster removal of material.
Installing the Blade Correctly
- Disconnect Power: Always unplug the saw before changing the blade.
- Loosen Blade Clamps: Locate the tensioning lever and the blade clamps. Loosen them to release any tension.
- Insert Blade:
- For plain-end blades, insert the end with the teeth facing down into the lower clamp. Ensure it’s seated firmly.
- For pin-end blades, insert the pin into the hole on the lower holder.
- Raise Blade to Upper Holder: Pull the upper arm of the scroll saw down and insert the other end of the blade into the upper clamp (or pin hole), again with teeth facing down.
- Apply Tension: Gently release the tensioning lever. Then, adjust the tension knob until the blade is taut. A properly tensioned blade should make a “ping” sound when flicked. Too loose, and it will wander; too tight, and it might break.
- Check Alignment: Ensure the blade is perfectly perpendicular to the table.
- Reconnect Power: Plug the saw back in.
Table 1: Common Scroll Saw Blade Selections
| Material | Project Type | Recommended TPI | Blade Type | Notes |
|---|---|---|---|---|
| Softwood (Pine) | General cutting | 10-14 | Plain-end | Good balance of speed and finish |
| Hardwood (Oak) | General cutting | 12-16 | Plain-end | Slightly higher TPI for cleaner cuts |
| Plywood | Intricate designs | 16-20 | Plain-end | Avoids tear-out |
| Thin Plastic | Craft projects | 20-32 | Plain-end | Smooth finish, slower cutting |
| Metal (Thin) | Small metal parts | 24-32 | Metal-cutting | Slower speeds are essential |
| Cork | Gaskets, crafts | 10-12 | Plain-end | Cushions for cleaner cuts |
| Delicate patterns | Fine detail work | 20-32 | Skip-tooth | Fewer gullets to prevent clogging |
Setting the Scroll Saw Speed
Scroll saw speed is controlled by a dial, usually located on the motor housing or control panel. The ideal speed depends on the material you’re cutting and the type of blade.
- Thicker Materials & Larger Blades: Use slower speeds. This gives the blade more time to clear sawdust and prevents overheating.
- Thinner Materials & Fine Blades: Higher speeds can be beneficial for faster cutting and a smoother finish.
- Metals and Plastics: Always use very slow speeds to prevent melting or excessive heat buildup.
Experimentation is key. Start at a moderate speed and adjust as needed. Listen to the saw and observe the cut. If the blade is burning the wood, slow down. If it’s bogging down, increase speed or use a coarser blade.
Mastering Scroll Saw Techniques
Once your saw is set up, you can begin exploring various scroll saw techniques.
The Basics of Scroll Saw Cutting
- Feed Rate: Guide the workpiece into the blade smoothly. Don’t force it. Let the saw do the work.
- Following the Line: Keep your eyes on the cutting line, slightly ahead of the blade. Use your other hand to guide the workpiece.
- Turning: To make a curve, gently rotate the workpiece as it moves through the blade. The tighter the curve, the smaller the blade you’ll need.
- Relief Cuts: For very tight turns or internal cuts, make a relief cut from the edge of the material to your cutting line. This allows you to remove waste material in stages.
- Internal Cuts:
- Drill a small hole within the waste area of your design.
- Loosen the blade tension.
- Thread the blade through the drilled hole.
- Re-tension the blade and make your cut.
- Once done, loosen the blade again to remove it.
Advanced Cutting Methods
- Double Bevel Cuts: Some scroll saws allow the table to tilt in both directions. This is useful for creating complex 3D designs.
- Stack Cutting: This involves gluing two or more pieces of material together and cutting them simultaneously. Ensure the glue is completely dry before cutting. This is great for creating thicker pieces or identical components.
- Veneer Cutting: For very fine work, you can cut multiple thin veneers and then reassemble them for intricate patterns.
Cutting Different Materials
- Wood: The most common material. Pay attention to grain direction. For delicate work, use finer blades. For faster cuts, use coarser blades.
- Plastic: Plastics can melt if cut too fast. Use slow speeds and sharper blades. Keep a dust collection system handy as plastic dust can be irritating.
- Metal: Only attempt with specialized metal-cutting blades and very slow speeds. Always wear safety glasses and consider a coolant if cutting thicker metal.
Scroll Saw Safety: Your Top Priority
Scroll saw safety is paramount. This powerful tool can cause serious injury if not used correctly.
Personal Protective Equipment (PPE)
- Safety Glasses: Always wear safety glasses or a full face shield. The blade can break, sending small pieces flying.
- Hearing Protection: While not as loud as some tools, prolonged use can be tiring for your ears. Earplugs or earmuffs are recommended.
- Dust Mask: Wood and plastic dust can be harmful to your lungs. Wear a dust mask, especially during extended cutting sessions.
- No Loose Clothing or Jewelry: Tie back long hair, remove rings, bracelets, and necklaces. These can get caught in the moving blade.
Safe Operating Practices
- Read the Manual: Familiarize yourself with your specific scroll saw model.
- Never Reach Over the Blade: Keep your hands away from the blade’s path.
- Use Both Hands for Guidance: One hand to push the material, the other to guide it.
- Keep the Work Area Clean: Clutter can be a tripping hazard and can interfere with your work.
- Never Leave the Saw Running Unattended: Always turn off and unplug the saw when you step away.
- Be Aware of Blade Tension: Ensure the blade is properly tensioned before starting. If it feels loose, stop and re-tension.
- Proper Blade Disposal: Broken blades are sharp. Dispose of them safely.
- Disconnect Power When Changing Blades or Making Adjustments: This is a non-negotiable rule.
Scroll Saw Maintenance: Keeping Your Tool in Shape
Regular scroll saw maintenance ensures your tool runs smoothly, lasts longer, and operates safely.
Daily Checks (Before Each Use)
- Blade Tension: Check and adjust as needed.
- Blade Alignment: Ensure the blade is perpendicular to the table.
- Table Surface: Wipe down the table to remove dust and debris.
- Dust Port: Check if it’s clear.
Weekly/Monthly Checks
- Blade Holders/Clamps: Clean any accumulated dust or debris from the blade holders. Ensure they are tight.
- Lubrication: Some scroll saws have grease points. Refer to your manual for lubrication schedules and locations. Use appropriate lubricants.
- Motor Housing: Clean the exterior of the saw. Ensure ventilation slots are clear of dust to prevent overheating.
- Belts (if applicable): Check for wear or damage on any drive belts.
Blade Storage
- Store scroll saw blades in a safe place, like a dedicated blade organizer or a sturdy box, to prevent them from bending or breaking and to avoid accidental cuts.
Troubleshooting Common Scroll Saw Problems
Even with careful use, you might encounter issues. Here’s a guide to scroll saw troubleshooting.
| Problem | Possible Cause | Solution |
|---|---|---|
| Blade Breaking | Blade too thin for the material | Use a thicker blade or a blade with a higher TPI. |
| Blade tension too high | Reduce blade tension. Listen for the “ping” sound when flicking the blade. | |
| Forcing the material | Let the saw do the work. Reduce your feed rate. | |
| Tight radius cut with a too-wide blade | Use a narrower blade for tighter curves. Make relief cuts to ease stress on the blade. | |
| Blade installed incorrectly (e.g., backward) | Ensure the teeth are facing down. | |
| Rough Cuts/Tear-out | Blade is dull | Replace the blade. |
| Blade tension too low | Increase blade tension. | |
| Wrong blade for the material | Use a blade with a higher TPI for a smoother finish. For delicate woods or veneers, consider skip-tooth or double-skip-tooth blades. | |
| Forcing the material | Reduce feed rate. | |
| Cutting with the grain on certain woods | Be mindful of grain direction; sometimes cutting slightly against the grain helps. | |
| Blade Wanders | Blade tension too low | Increase blade tension. This is the most common cause. |
| Blade is not properly aligned perpendicular to table | Adjust the blade clamps or table angle to ensure the blade is square to the table. | |
| Using a very fine blade for thick material | Use a coarser blade or slow down your feed rate. | |
| Saw Overheating | Dust clogging ventilation ports | Clean the dust from the motor housing and ventilation slots. |
| Sawing for too long without a break | Allow the motor to cool down periodically. | |
| Using inappropriate speeds for the material | Adjust scroll saw speed. Slow down for thicker materials or if the motor sounds strained. | |
| Excessive Vibration | Saw not on a stable surface | Secure the saw to a stable workbench. |
| Blade tension incorrect | Check and adjust blade tension. | |
| Blade is dull or bent | Replace the blade. | |
| Internal wear or damage | If problems persist, consult the owner’s manual or contact the manufacturer. |
Inspiring Scroll Saw Projects
The possibilities are nearly endless when it comes to scroll saw projects. Here are a few ideas to get you started:
- Decorative Signs: Create custom signs for your home, business, or as gifts. You can cut out letters, add decorative borders, or create intricate imagery.
- Ornaments: Perfect for holidays or year-round decoration, scroll saws excel at creating detailed Christmas ornaments, snowflakes, or other festive designs.
- Puzzles: Design and cut your own wooden jigsaw puzzles. This is a fantastic way to challenge your skills and create personalized gifts.
- Inlays: Use the precision of the scroll saw to cut intricate patterns that can be inlaid into larger pieces of wood or furniture.
- Jewelry: Create wooden pendants, earrings, or other small, delicate jewelry pieces.
- Toys: From small animals to intricate dollhouse furniture, scroll saws are great for making wooden toys with smooth edges.
- Silhouettes: Cut out detailed silhouettes of people, animals, or scenes.
- Lace Wood: Use extremely fine blades to cut intricate, lace-like patterns in thin wood.
Tips for Project Success
- Start Simple: Begin with basic shapes and gradually move to more complex patterns.
- Use Good Patterns: Find reliable patterns online or in woodworking magazines. Trace them accurately onto your material.
- Consider Material Thickness: Choose a material thickness appropriate for your chosen pattern and blade.
- Practice Makes Perfect: Don’t be discouraged if your first few projects aren’t perfect. Each cut is a learning experience.
Frequently Asked Questions (FAQ)
Q1: What is the difference between a scroll saw and a jigsaw?
A: A jigsaw has a larger, thicker blade that moves more slowly and is generally used for rougher cuts or cutting thicker materials. A scroll saw has a much thinner blade that reciprocates rapidly, allowing for incredibly precise, intricate curves and internal cuts.
Q2: Can I cut metal with a scroll saw?
A: Yes, but only thin metals like brass, copper, or thin aluminum, and you must use specialized metal-cutting scroll saw blades and very slow scroll saw speed. Always prioritize scroll saw safety and wear appropriate PPE.
Q3: How do I prevent my blade from breaking?
A: Ensure proper blade tension, use the correct blade for your material and the tightness of your curve, avoid forcing the material, and make sure the blade is installed correctly with teeth facing down.
Q4: What is the best type of blade for intricate scroll work?
A: For intricate scroll work, you’ll want thinner blades with a higher TPI (e.g., 18-32 TPI). Skip-tooth blades are also excellent as they have fewer gullets, reducing the chance of clogging and burning on fine details.
Q5: How often should I change my scroll saw blade?
A: Blades should be changed when they become dull, bent, or when you notice a significant decrease in cut quality or an increase in burning. For frequent use, blades may need replacement every few hours of cutting.
Q6: What does “TPI” mean for scroll saw blades?
A: TPI stands for “Teeth Per Inch.” A higher TPI means more teeth in an inch of blade, resulting in cleaner, smoother cuts but slower cutting speed. A lower TPI means fewer, larger teeth for faster cutting but a rougher finish.
By following this guide, you’ll be well on your way to mastering the art of using a scroll saw. Enjoy creating beautiful, detailed scroll saw projects!