
Can you drill a cylinder lock out? Yes, you can drill a cylinder lock out to bypass a locked door or mechanism when a key is lost or the lock is malfunctioning. This guide will walk you through the process of drilling a cylinder lock, a common method among locksmith bypass techniques. We’ll cover everything from the tools you’ll need to the actual drilling steps, focusing on pin tumbler lock destruction and creating a key bypass.
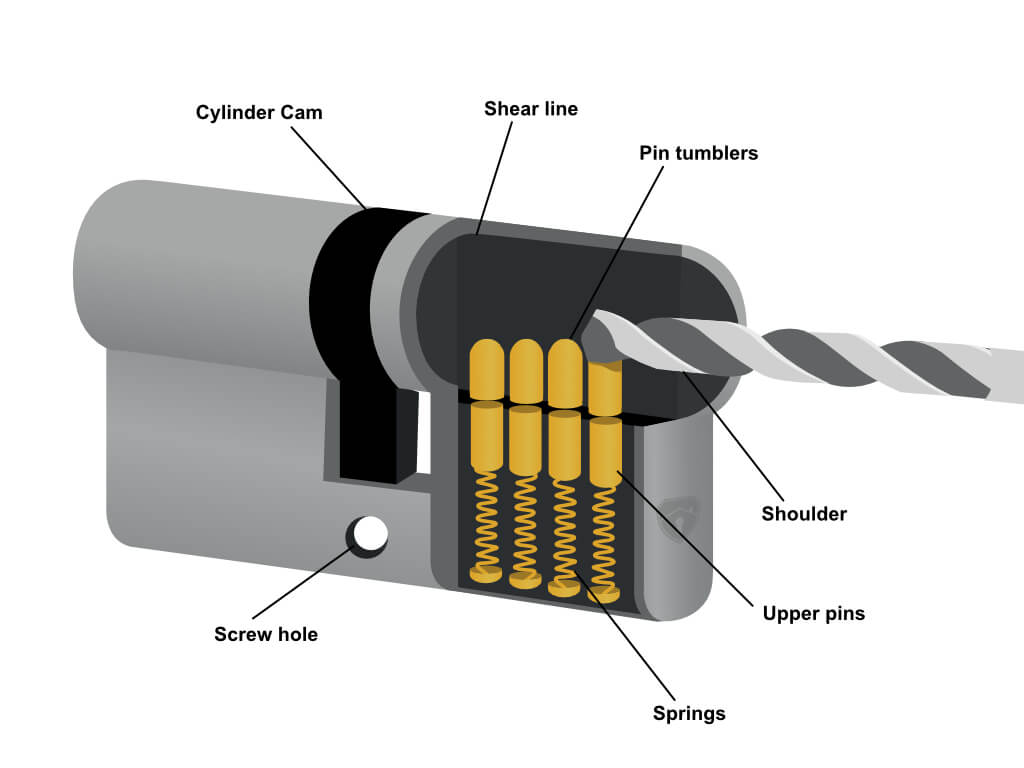
Image Source: www.lathamshardware.co.uk
Gathering Your Tools for Lock Defeat Strategies
Before you begin any lock defeat strategies, it’s crucial to have the right tools. Using incorrect tools can damage the lock beyond repair or lead to injury. Here’s a list of essential equipment for cylinder lock removal and lock drilling methods:
- Drill: A variable-speed cordless or corded drill is ideal. Ensure it has enough power for drilling metal.
- Drill Bits:
- Pilot Bit: A small, sharp bit (around 1/8 inch) to create a starting point.
- Drilling Bits: You’ll need a set of high-speed steel (HSS) bits. The size will depend on the lock, but starting with bits in the 1/4 inch to 1/2 inch range is common. You’ll want bits that can handle drilling metal.
- Step Bits: These are excellent for drilling progressively larger holes and can be very useful for drilling through different metal thicknesses.
- Center Punch: To mark the precise spot for drilling, preventing the drill bit from wandering.
- Hammer: To strike the center punch.
- Safety Glasses: Non-negotiable! Metal shavings can fly during drilling.
- Gloves: To protect your hands from sharp edges.
- Pliers: To grip and remove broken lock parts.
- Screwdriver: To remove the lock cylinder from its housing after drilling.
- Lubricant (e.g., WD-40): To ease drilling and prevent bit overheating.
- Rag or Cloth: To clean up.
- Optional: Lock Picking Tools: While this guide focuses on drilling, knowing lock picking techniques can sometimes offer a non-destructive alternative.
Preparing the Lock Cylinder for Drilling
Proper preparation is key to a successful and safe drilling operation. This stage involves identifying the critical points on the lock cylinder where drilling will be most effective. This is where you’ll be attempting to bypass lock mechanisms.
Identifying Key Components
A standard pin tumbler lock cylinder has several key components that make it secure. When drilling, we aim to disrupt these components.
- Keyway: The opening where the key is inserted.
- Pin Chamber: The small holes drilled vertically through the cylinder plug and the cylinder housing. Each chamber contains a driver pin and a key pin.
- Shear Line: An imaginary line that separates the cylinder plug from the cylinder housing. When the correct key is inserted, it aligns the tops of the key pins with this shear line, allowing the plug to turn.
- Plug: The part of the cylinder that rotates when the correct key is used.
- Cylinder Housing (or Bible): The stationary outer part of the lock cylinder.
Locating the Drilling Point
The most effective place to drill a pin tumbler lock cylinder is generally along the shear line, at the top of the pin chambers. This is where the pins are located, and by drilling here, you can destroy the pins and the mechanisms that prevent the plug from turning.
- Alignment: Visually locate the seam between the cylinder plug and the housing. This is the shear line.
- Pin Chamber Alignment: Pin chambers are typically spaced evenly. You want to drill into the chambers that contain the pins. A common approach is to drill directly into the keyway, or slightly above it, along the shear line.
Step-by-Step Guide to Drilling a Cylinder Lock Out
This section details the practical steps involved in drilling a cylinder lock. Remember, this is a destructive method, and the lock will likely be rendered unusable after this process. Always prioritize safety.
Step 1: Secure the Lock and Mark the Drilling Point
- Stability: If the lock is still on a door, ensure the door is stable and won’t move. If you’re practicing on a loose cylinder, secure it in a vise.
- Center Punching:
- Place the tip of the center punch directly on the intended drilling spot along the shear line.
- Gently tap the end of the center punch with a hammer. This creates a small indentation.
- This indentation serves as a guide for your drill bit, preventing it from slipping. You might need to make a few light taps to create a sufficient divot.
Step 2: Start with a Pilot Hole
- Small Bit: Insert a small pilot drill bit (e.g., 1/8 inch) into your drill.
- Low Speed: Set your drill to a low speed setting.
- Drill: Place the tip of the pilot bit into the indentation created by the center punch.
- Drill Slowly: Apply steady, firm pressure. Let the drill bit do the work. Drill down just far enough to create a clear starting hole. This makes it easier for the larger bits to enter the metal cleanly.
Step 3: Progressively Drill Through the Cylinder
This is where you’ll employ specific lock drilling methods to defeat the pin tumbler lock destruction.
- Choose the Next Bit: Select a slightly larger drill bit. A common progression is to go from 1/8 inch to 1/4 inch, then to 3/8 inch, or using a step bit.
- Lubricate: Apply a small amount of lubricant to the tip of the drill bit. This reduces friction, heat, and extends the life of your drill bit.
- Drill with Steady Pressure:
- Place the larger drill bit into the pilot hole.
- Maintain a low to medium drill speed.
- Apply consistent, firm pressure. Avoid pushing too hard, which can break the bit or overheat the drill.
- Drill down through the cylinder housing and into the plug. You are aiming to destroy the pins.
- Feel for the Pins: As you drill, you might feel some resistance when you hit the pins. This is normal. Continue drilling steadily until you pass through the entire pin chamber.
- Repeat for Each Chamber: Ideally, you will drill into each pin chamber. For a standard 5-pin lock, you might drill 5 distinct holes along the shear line. However, a common and often effective strategy is to drill a few holes strategically placed along the shear line to destroy enough pins. Drilling one or two holes directly above the keyway, at the shear line, is often sufficient.
- Using a Step Bit: If using a step bit, you can start with a smaller diameter and gradually increase the size by drilling deeper with the same bit. This is an efficient way to create a larger hole or to clear out multiple pin chambers with one tool.
Step 4: Clearing the Pins and Manipulating the Cylinder
Once you’ve drilled through the necessary pin chambers, the goal is to break the connection between the plug and the housing.
- Visual Inspection: After drilling, you might see metal shavings or broken pin fragments.
- Gently Probe: Use a small screwdriver or a pick to gently probe into the drilled holes. You are trying to dislodge any remaining pins or springs.
- Apply Turning Pressure:
- Insert a flathead screwdriver into the keyway (if accessible and not completely destroyed by drilling).
- Alternatively, insert a screwdriver or a specialized tool into the drilled holes where the pins used to be.
- Apply gentle turning pressure. You are essentially trying to act as a makeshift key or to turn the plug by pushing on where the pins would have been.
- If you’ve successfully destroyed enough pins, the plug should now rotate. You may need to jiggle it or apply pressure from different angles.
Step 5: Cylinder Removal
If the plug turns, you can often remove the cylinder from its housing.
- Remove Retaining Screw: Many locks have a retaining screw on the side or back of the lock cylinder that holds it in place. Once the plug can turn freely, locate and remove this screw.
- Pull Out the Cylinder: With the retaining screw removed and the plug turned, you should be able to pull the cylinder straight out. You might need to use pliers to grip and gently twist or pull it free.
Alternative Lock Bypass Techniques and Considerations
While drilling is a direct method, other locksmith bypass techniques exist. Some situations might call for different approaches, especially if preserving the lock mechanism is a secondary concern or if the lock type differs.
Lock Picking Techniques
Lock picking involves using specialized tools to manipulate the pins inside the lock cylinder to the shear line, mimicking the action of a key. This is a non-destructive method and is a core skill for locksmiths. It requires practice and a good feel for the lock mechanism.
Creating a Key Bypass
In some cases, if a key is lost but not broken off in the lock, and if the lock is simple, it might be possible to create a temporary key bypass. This is less common for standard cylinder locks and more applicable to simpler mechanisms where one might be able to fashion a crude tool to align the pins. This is a more advanced technique and often less reliable than drilling or proper picking.
Understanding Different Lock Types
The methods described above are primarily for pin tumbler locks. Other lock types, like wafer locks or lever locks, have different internal mechanisms and require different lock defeat strategies. For instance, wafer locks are generally easier to pick or bypass than pin tumbler locks because they have simpler wafer tumblers. Lever locks often require specific tools to manipulate the levers.
When to Call a Professional Locksmith
Drilling a lock is a drastic measure. If you’re not comfortable performing these steps, or if the lock is part of a valuable door or a high-security system, it’s always best to call a professional locksmith. They have the expertise and specialized tools for various lock bypass techniques, including non-destructive entry methods, and can often resolve the issue without resorting to drilling.
- High-Security Locks: Many high-security locks are designed to resist drilling and may require specialized techniques or tools.
- Valuable Property: If the lock protects valuable items or is part of an expensive door, professional intervention is recommended to avoid further damage.
- Lack of Experience: If you’ve never performed lock drilling before, the risk of damaging the surrounding door or mechanism is higher.
- Legal Considerations: In certain situations, unauthorized tampering with locks can have legal implications.
Safety First: Essential Precautions
Before you begin any lock drilling, safety is paramount. Metal shavings, sharp edges, and spinning drill bits are hazardous.
- Eye Protection: Always wear safety glasses. Metal fragments can fly with considerable force.
- Hand Protection: Wear sturdy gloves to protect your hands from sharp metal edges.
- Secure Work Area: Ensure the area around the lock is clear of flammable materials and that you have good lighting.
- Proper Drill Handling: Maintain a firm grip on the drill. Be aware of kickback if the drill bit binds.
- Ventilation: If drilling in an enclosed space, ensure adequate ventilation, as metal dust can be produced.
- Fire Hazard: Be mindful that drilling can generate heat. Avoid drilling near combustible materials.
Frequently Asked Questions (FAQ)
Q1: Will drilling damage the door?
A: Yes, drilling a lock cylinder is a destructive process. While the goal is to remove the cylinder itself, there is a risk of minor cosmetic damage to the door or its surrounding frame if not done carefully. Precision is key to minimizing collateral damage.
Q2: What kind of drill bits should I use?
A: High-speed steel (HSS) drill bits are recommended because they are durable enough to cut through metal. Titanium-coated bits can also offer increased longevity and efficiency. For drilling through the hardened pins, you might need cobalt bits for particularly tough locks.
Q3: How many holes do I need to drill?
A: The number of holes depends on the lock’s design and where you are drilling. For standard pin tumbler locks, drilling into the pin chambers along the shear line is most effective. Often, drilling 2-3 strategically placed holes along the shear line can break enough pins to allow the plug to turn. Targeting each pin chamber is ideal but not always necessary for successful bypass.
Q4: What if the drill bit breaks?
A: If a drill bit breaks off in the lock, it can make the situation more complicated. You may need to try to extract the broken bit using pliers or an extractor tool. In severe cases, it might necessitate professional intervention or a more aggressive approach to remove the entire lock assembly. Using lubricant and appropriate speeds can help prevent bit breakage.
Q5: Can I drill any type of lock?
A: While drilling is effective against many common locks, high-security locks are often designed with hardened steel components and drill-resistant features that make them much harder to defeat by simple drilling. For these, specialized tools and techniques are usually required, and it’s generally best left to professionals.
Q6: Is lock drilling legal?
A: Lock drilling is a locksmith technique used for legitimate purposes, such as gaining access when a key is lost or a lock fails. However, using these methods on locks you do not own or have permission to access can have legal consequences. Ensure you have the legal right to access and manipulate the lock before proceeding.
This comprehensive guide provides detailed steps and important considerations for drilling out a cylinder lock, a critical skill in the locksmith’s toolkit for performing cylinder lock removal and implementing effective lock defeat strategies.