
Can you drill out a lock cylinder? Yes, you can drill out a lock cylinder, but it’s a destructive method typically used when a key is lost or a lock is malfunctioning and other bypass methods like lock picking have failed. This guide will walk you through the process of drilling a pin tumbler lock safely and effectively. We will cover everything from choosing the right tools to the step-by-step procedure for cylinder disassembly and lock cylinder removal.
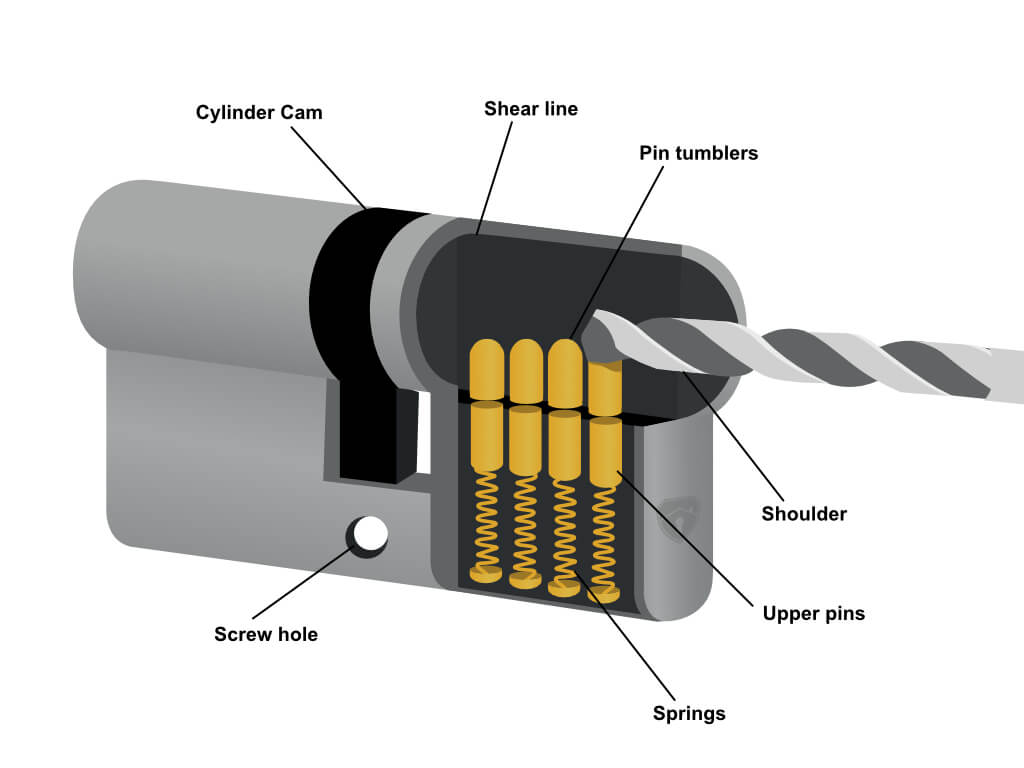
Image Source: www.lathamshardware.co.uk
Why Drill Out a Lock Cylinder?
There are several reasons why someone might need to drill out a lock cylinder. The most common is a lost key. When you can’t find the key to your door, car, or padlock, and lock picking or other non-destructive lock bypass techniques are not an option or have been unsuccessful, drilling becomes a necessary option. Another reason is a jammed or broken lock mechanism. If the tumblers are damaged or the cylinder is seized, you won’t be able to operate it with a key. In such cases, destructive entry through drilling is often the quickest way to regain access. This method is also employed in emergency situations or by locksmiths when a quick lock cylinder removal is required. It’s important to note that drilling out a deadbolt follows similar principles.
Situations Requiring Drilling:
- Lost or stolen keys
- Malfunctioning lock mechanisms
- Broken or jammed keys inside the lock
- Emergency access required
- When other bypass methods fail
Tools You’ll Need for Lock Cylinder Drilling
Before you start drilling out a lock cylinder, gather all the necessary tools. Using the wrong tools can damage the surrounding area or make the job more difficult.
Essential Tools:
- Drill: A variable-speed electric drill is ideal. A cordless drill offers more flexibility.
- Drill Bits: You will need a set of high-speed steel (HSS) drill bits. Start with smaller bits and progressively move to larger ones. Specific bit sizes depend on the lock type.
- Center Punch: To create a small indent for the drill bit to start accurately.
- Hammer: To strike the center punch.
- Safety Glasses: Crucial for protecting your eyes from metal shavings.
- Gloves: To protect your hands.
- Pliers (Lock Pliers/Vise Grips): To grip and turn the drilled cylinder for removal.
- Screwdriver: To remove any set screws or retaining clips holding the lock in place.
- Lubricant (e.g., WD-40): Can sometimes help if the lock is stiff, though it won’t solve a jammed mechanism.
- Rag or Compressed Air: To clean away metal shavings.
Preparing to Drill the Lock Cylinder
Proper preparation is key to a successful and safe drilling operation. This involves identifying the lock type, understanding its internal components, and setting up your workspace.
Identifying the Lock Type:
Most common household locks are pin tumbler locks. Drilling a pin tumbler lock involves targeting the shear line where the pins are located. Knowing the type of lock you’re dealing with is crucial.
Locating the Shear Line:
The shear line is the critical point inside the lock cylinder. It’s the line where the bottom pin (key pin) and the top pin (driver pin) meet when the correct key is inserted. Drilling through this line severs the pins, allowing the cylinder to turn. For most pin tumbler locks, the shear line is located slightly above the center of the cylinder.
Marking the Drilling Point:
Once you’ve located the shear line, use a center punch and hammer to make a small indentation. This will guide the drill bit and prevent it from wandering. Aim for the center of the keyway at the shear line.
The Step-by-Step Drilling Process
This is the core of lock cylinder drilling. Follow these steps carefully to effectively drill out the lock cylinder.
Step 1: Secure the Lock
If possible, secure the lock to prevent it from moving during drilling. For a door, this might mean ensuring the door is braced or that you have a firm grip. If you’re removing the lock from its housing first, use a vise.
Step 2: Start with a Small Drill Bit
Begin with a small drill bit, typically around 1/16 inch or 3/32 inch. Place the tip of the drill bit on the indentation made by the center punch.
Step 3: Drill Through the Shear Line
Apply steady, moderate pressure and drill slowly. The goal is to penetrate the cylinder at the shear line, cutting through the pins. You’ll likely feel resistance, then a sudden release of pressure as you break through the pins.
Step 4: Clear Debris
Periodically remove the drill bit and use compressed air or a rag to clear out metal shavings and debris. This helps you see your progress and prevents the drill from overheating.
Step 5: Progress to Larger Drill Bits
Once you’ve gone through the shear line with the smaller bit, you’ll need to enlarge the hole. Use progressively larger drill bits, continuing to drill at the shear line. The size of the bits will depend on the lock. For many standard pin tumbler locks, you might need to go up to 1/4 inch or 3/8 inch. The aim is to destroy the pins, allowing the cylinder to turn.
Typical Drill Bit Progression (Example for a Standard Pin Tumbler Lock):
| Initial Bit Size | Subsequent Bit Sizes |
|---|---|
| 1/16 inch | 3/32 inch |
| 3/32 inch | 1/8 inch |
| 1/8 inch | 3/16 inch |
| 3/16 inch | 1/4 inch |
| 1/4 inch | 3/8 inch |
Important Note: The exact size of the bits needed can vary based on the manufacturer and model of the lock. For drilling out a deadbolt, you might need larger bits or a more powerful drill.
Step 6: Test for Cylinder Rotation
After drilling to an appropriate size, insert a screwdriver into the keyway. Try to turn the cylinder. If the pins have been sufficiently destroyed, the cylinder should rotate.
Step 7: Remove the Lock Cylinder
Once the cylinder can turn, you can proceed with lock cylinder removal. This might involve:
- Using Pliers: Grip the exposed part of the cylinder with pliers or vise grips and twist it counter-clockwise to unscrew it from the lock housing.
- Removing Retaining Clips/Screws: Some locks have a retaining clip or screw on the side or back that holds the cylinder in place. Once the pins are destroyed, you might be able to remove these and pull the cylinder out.
Methods for Cylinder Removal Post-Drilling:
- Twisting with Pliers: Apply rotational force until the cylinder unscrews.
- Prying: Gently pry the cylinder out if it’s loose.
- Removing Retaining Mechanisms: Locate and remove any clips or screws holding the cylinder.
Drilling Specific Lock Types
While the general principle of drilling a pin tumbler lock remains the same, some specific lock types might require slight variations in technique.
Drilling Out a Deadbolt
Drilling out a deadbolt is a common scenario, especially for exterior doors. The process is similar, but deadbolts are typically more robust.
Key Considerations for Deadbolts:
- Location of the Sheer Line: This is usually in the same spot as a standard deadbolt.
- Drill Bit Size: You might need larger drill bits (up to 1/2 inch or more) to effectively destroy all the pins in a heavy-duty deadbolt.
- Drilling Through the Bolt Mechanism: In some cases, you might need to drill not just the cylinder but also through the bolt mechanism itself to disengage it.
Drilling Padlocks
Padlocks can also be drilled, especially when the key is lost or the shackle is rusted shut.
Padlock Drilling Tips:
- Locate the Shear Line: This is typically where the shackle enters the body of the padlock.
- Drill Bit Size: Smaller padlocks might require smaller bits, while larger ones might need progressively larger ones.
- Body Material: Consider the material of the padlock body (brass, steel, etc.) as this can affect drilling speed and bit wear.
Safety Precautions During Drilling
Safety should always be your top priority when performing destructive entry.
Eye Protection:
Always wear safety glasses to protect your eyes from flying metal fragments and shavings.
Hand Protection:
Wear sturdy gloves to prevent cuts from sharp metal edges.
Ventilation:
Ensure you are in a well-ventilated area, as drilling can create fine metal dust.
Secure Workpiece:
If you are not drilling a lock in place, secure it firmly in a vise to prevent it from moving unpredictably.
Coolant:
For prolonged drilling or harder metals, consider using a cutting fluid or lubricant to cool the drill bit and the workpiece, which can prolong the life of your bits and make drilling smoother.
What to Do After Drilling
Once the lock cylinder has been successfully drilled and removed, you’ll need to address the aftermath.
Replacing the Lock:
After lock cylinder removal, the lock itself is usually compromised and needs to be replaced. Purchase a new lock cylinder or an entirely new lock assembly.
Cleaning Up:
Thoroughly clean the area of any metal shavings or debris. This is important for safety and to prevent damage to new components.
Disposal:
Dispose of the old lock cylinder properly.
Alternatives to Drilling
While drilling out a lock cylinder is an effective method for lock bypass in certain situations, it’s important to consider alternatives that don’t involve destructive entry.
Lock Picking:
This is the most common non-destructive method. It involves manipulating the pins within the lock cylinder using specialized tools to align them at the shear line, effectively mimicking the action of a key. If you have the patience and the right tools, lock picking can often bypass a lock without any damage.
Bumping:
A lock pick gun or a specially cut “bump key” can be used to quickly jiggle the pins in a lock, potentially setting them at the shear line and allowing the cylinder to turn. This is a quick form of lock bypass that can work on many pin tumbler locks.
Other Lock Bypass Techniques:
Depending on the lock type, other methods like shimming or using specialized bypass tools might be applicable. These are often employed by locksmiths.
When to Call a Professional Locksmith
While this guide provides a step-by-step process for drilling a pin tumbler lock, it’s important to recognize when professional help is needed.
Situations Warranting a Locksmith:
- Unfamiliarity with the Process: If you are not comfortable or experienced with using power tools or this type of task.
- High-Security Locks: Many high-security locks are designed to resist drilling and may require specialized techniques or tools. Attempting to drill these without expertise could damage the lock beyond repair and might not even work.
- Valuable or Antique Locks: If the lock is part of an antique piece of furniture or a valuable item, you may want to preserve its integrity and consider non-destructive entry methods or consult a professional who specializes in antique locks.
- Emergency Situations: While drilling can be a solution, a locksmith can often provide faster and more efficient service, especially in emergencies.
- Car Ignition Locks: Drilling car ignition locks is particularly tricky and can easily damage the electrical components. This is best left to automotive locksmiths.
A professional locksmith has the knowledge, experience, and specialized tools to perform lock cylinder removal and other lock bypass operations with minimal damage. They can also advise on the best course of action and provide replacement locks.
Frequently Asked Questions (FAQ)
Q1: Will drilling out a lock cylinder damage my door?
A1: If done carefully, drilling out the lock cylinder itself should not damage the door. However, if the drill slips or you use excessive force, you could scratch or dent the door. It’s also important to be mindful of the surrounding door hardware.
Q2: What is the smallest drill bit I can use to drill out a lock?
A2: You typically start with a small drill bit, around 1/16 inch or 3/32 inch, to penetrate the shear line. You then progressively use larger bits up to about 3/8 inch or 1/2 inch, depending on the lock’s construction, to destroy the pins.
Q3: How do I know where to drill on the lock cylinder?
A3: You need to locate the shear line. For a pin tumbler lock, this is the line where the key pins and driver pins meet. It’s typically located just above the center of the keyway. Using a center punch to mark this spot helps guide your drill.
Q4: Can I drill out any type of lock?
A4: You can drill out most standard pin tumbler locks. However, high-security locks with hardened steel pins or security features specifically designed to resist drilling may be much more difficult or impossible to drill with standard tools and techniques.
Q5: Is it legal to drill out a lock?
A5: It is legal to drill out a lock on your own property or if you have explicit permission from the property owner. However, drilling out a lock on someone else’s property without authorization is illegal and considered property damage.
Q6: What happens to the pins after drilling?
A6: When you drill through the shear line, you are cutting the pins into pieces. This allows the cylinder to rotate freely, as the pins no longer block its movement. The remnants of the pins will be mixed with metal shavings.
Q7: How long does it take to drill out a lock cylinder?
A7: The time it takes can vary greatly depending on the type of lock, the quality of your drill, the sharpness of your drill bits, and your experience. It can take anywhere from a few minutes to over an hour for tougher locks.
Q8: Can I reuse the lock after drilling?
A8: No, drilling out a lock cylinder is a destructive process. The cylinder is destroyed and cannot be reused. You will need to replace the lock cylinder or the entire lock.