
Can you drill a cylinder lock? Yes, you can drill a cylinder lock, typically to bypass its mechanism when it’s jammed, lost key, or as a last resort for entry. Drilling a lock cylinder is a destructive entry lock method that requires careful execution to avoid damaging the surrounding door or frame. While it’s a method often employed by professionals for lock repair drilling or lock cylinder replacement, understanding the process is crucial for anyone needing to remove a lock cylinder or achieve bypass methods for locks without the key. This guide will walk you through the steps and considerations for drilling a cylinder lock safely and effectively.
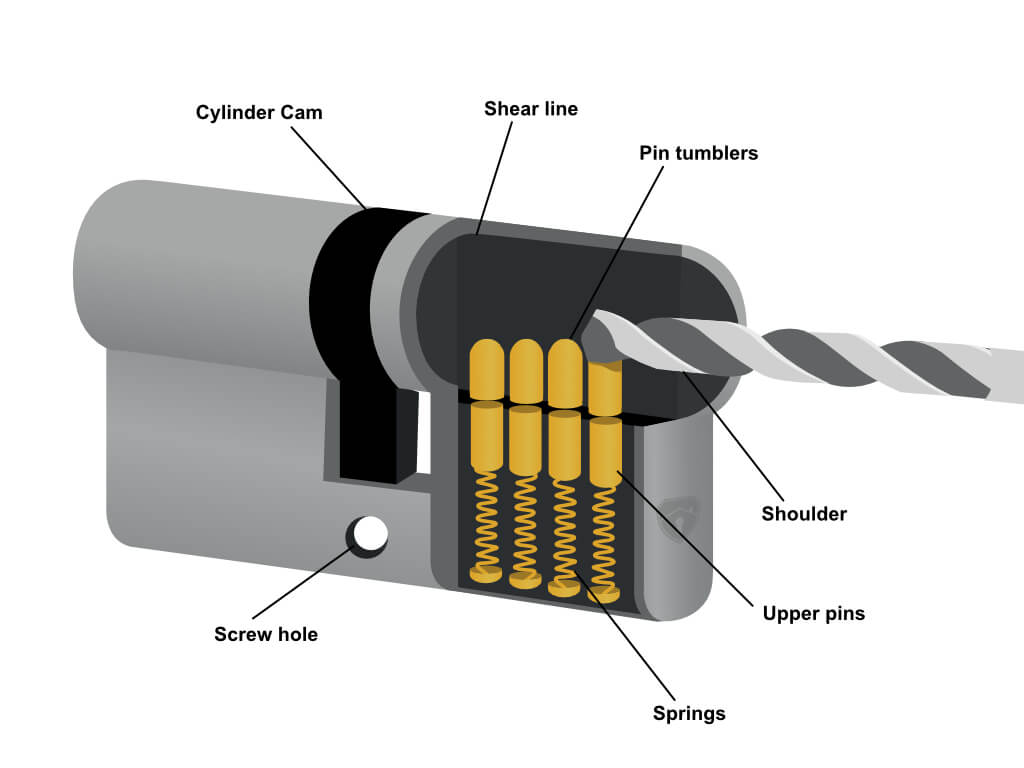
Image Source: www.lathamshardware.co.uk
When is Drilling a Cylinder Lock Necessary?
There are several scenarios where drilling a cylinder lock becomes a viable or necessary option.
Lost Keys and Immobilization
The most common reason for drilling a lock cylinder is when keys are lost, and there’s no other immediate way to gain access. If you’re locked out of your home or business and locksmiths are unavailable or too expensive, drilling can be a temporary solution.
Jammed or Broken Locks
Sometimes, locks can jam due to wear and tear, damage, or foreign objects lodged inside. If a lock is no longer functional and cannot be picked or bypassed through other means, drilling becomes the way to remove it. This is especially true for older or low-quality locks that are more susceptible to this type of failure.
Emergency Situations
In critical situations, such as a fire or medical emergency, immediate access is paramount. Drilling a lock cylinder is a rapid method for destructive entry to ensure safety and prevent harm.
Lock Repair Drilling
When a lock is beyond simple repair, locksmith drilling techniques might be used to access the internal mechanisms for replacement or salvageable parts. This is a controlled process focused on disabling the lock for subsequent removal and replacement.
Lock Cylinder Replacement
If a lock cylinder is faulty or needs upgrading, drilling can be part of the process to remove the old cylinder, paving the way for a new lock cylinder replacement.
Safety First: Essential Precautions
Before you pick up a drill, safety must be your absolute priority. Drilling a lock cylinder involves sharp tools and potential debris.
Personal Protective Equipment (PPE)
Always wear safety glasses or goggles to protect your eyes from flying metal shavings and dust. Gloves are also recommended to prevent cuts and provide a better grip on your tools.
Ventilation
Ensure the area is well-ventilated, especially if you’re drilling indoors. Metal dust can be harmful if inhaled.
Awareness of Surroundings
Be mindful of what’s behind the lock. Drilling into electrical wires or plumbing is a serious hazard. If you’re unsure, consult a professional or at least have a general idea of the door’s construction.
Tool Quality
Use sharp, good-quality drill bits. Dull bits will make the job harder, produce more heat, and can slip, causing injury or damage.
Tools and Materials Needed
Gathering the right tools is crucial for a successful and safe drilling operation.
Drill
A variable-speed power drill is ideal. The variable speed allows for better control, especially when starting the hole. Cordless drills are convenient, but ensure they are fully charged.
Drill Bits
- HSS (High-Speed Steel) Bits: These are essential for drilling metal. You’ll need a set of bits in various sizes, typically ranging from small pilot bits to larger ones.
- Cobalt Bits: For particularly tough metals, cobalt bits offer superior hardness and heat resistance.
- Step Bits (Optional): These can be very useful for widening holes gradually, providing a cleaner finish.
Center Punch and Hammer
A center punch is used to create a small indentation on the lock cylinder. This prevents the drill bit from wandering when you start drilling.
Lubricant/Cutting Fluid
Applying a lubricant or cutting fluid to the drill bit and the drilling area helps reduce friction, prevent overheating, and prolongs the life of your drill bits.
Pliers or Vise Grips
Once the cylinder is drilled, you’ll need these to grip and twist the damaged cylinder out.
Screwdriver
A flathead screwdriver might be useful for prying or manipulating parts of the lock after drilling.
Lock Picking Tools (Optional but Recommended)
While drilling is a destructive method, having basic lock picking tools can sometimes help you manipulate the pins slightly before drilling, making the process easier. This relates to understanding bypass methods for locks.
Deciphering the Cylinder: Identifying Key Pins
The core of most cylinder locks, particularly pin tumbler locks, relies on a series of pins that must be aligned correctly to allow the cylinder to turn. When drilling a cylinder lock, the goal is usually to destroy these pins.
Pin Tumbler Mechanism
A pin tumbler lock contains two sets of pins: the key pins and the driver pins. The key pins rest on the key, and the driver pins sit above them. When the correct key is inserted, the key pins lift, pushing the driver pins up so that the shear line – the point where the cylinder meets the housing – is cleared.
Locating the Shear Line
The shear line is the critical area. Drilling accurately at the shear line is the most efficient way to disable the lock. For most standard cylinder locks, the shear line is located at the front of the cylinder, where the plug meets the outer casing.
Locksmith Drilling Techniques: Step-by-Step Guide
This section details the precise methods used by locksmiths for drilling lock cylinders.
Step 1: Prepare the Lock Cylinder
- Locate the Sheer Line: As mentioned, this is typically at the front of the cylinder, where the plug (the part that turns with the key) meets the outer housing. You might see a slight seam or discoloration indicating this area.
- Mark the Drilling Point: Use the center punch to create a small mark directly on the shear line. This is where you will begin drilling. Aim for a spot slightly above the center of the cylinder bore. For many standard locks, this is about 1/4 inch up from the bottom edge of the cylinder.
Step 2: Start Drilling
- Use a Small Pilot Bit: Begin with a small HSS drill bit (e.g., 1/16 inch or 3/32 inch). This bit will create a pilot hole.
- Apply Steady Pressure: Place the tip of the pilot bit on your center punch mark. Apply steady, consistent downward pressure.
- Control the Speed: Use a slow to moderate drill speed. Too fast, and you risk overheating the bit and causing it to dull quickly.
- Use Lubricant: Apply cutting fluid or a light oil to the drill bit and the drilling area as you go. This helps dissipate heat and makes drilling smoother.
Step 3: Progress to Larger Bits
- Gradually Increase Size: Once the pilot hole is established, you’ll need to enlarge it. Move to slightly larger drill bits. The size of the bits you use will depend on the lock you are drilling.
- Targeting the Pins: The goal is to drill through the pin chambers. For standard pin tumbler locks, drilling through the first few pin stacks is often enough to bypass the lock. You’ll typically be drilling through the housing and into the plug, hitting the pins.
- Common Drilling Points for Pin Tumbler Locks:
- Shear Line Drilling: This is the most common technique. You drill horizontally along the shear line, destroying the pins. For a standard Kwikset or Schlage lock, you might drill from the front, targeting the shear line.
- Drilling the Plug: Sometimes, the plug itself is drilled to destroy the pins within it. This often involves drilling through the keyway.
- Drilling the Bible (Cylinder Housing): Less common for simple bypass, but sometimes necessary for removing the entire cylinder.
Step 4: Drilling the Pins
- Drilling the Shear Line:
- Start with your pilot bit at the marked shear line.
- Drill slowly, applying firm pressure.
- As you drill, you may feel resistance change as you encounter the pins.
- Gradually increase the drill bit size. Aim to drill through the pin stacks. For many common locks, drilling up to a 1/4-inch or 3/8-inch diameter hole along the shear line will disable the pins.
- You might need to drill multiple holes slightly offset along the shear line to ensure all pins are compromised.
- Drilling the Plug:
- If drilling the plug, you would aim for the keyway.
- Start with a small bit and drill down the center of the keyway.
- Increase bit size gradually. The aim is to break apart the pins inside the plug.
Step 5: Removing the Lock Cylinder
- Test for Movement: After drilling, try to turn the plug with a screwdriver. If the pins were successfully destroyed, the cylinder should turn freely or allow you to manipulate it with tools.
- Use Pliers/Vise Grips: If the cylinder doesn’t turn easily, use pliers or vise grips to grab the plug and twist. You may need to apply significant force.
- Prying: In some cases, you might need to use a flathead screwdriver to pry the plug or housing once the pins are broken.
Step 6: Final Removal and Replacement
- Remove Damaged Cylinder: Once the cylinder is turned or loosened, you should be able to slide it out of its housing.
- Clean Up: Remove any metal shavings or debris from the door and the lock opening.
- Install New Cylinder: Prepare for the lock cylinder replacement. Insert the new cylinder and secure it according to the manufacturer’s instructions. This is crucial for lock repair drilling scenarios where the goal is functionality.
Specific Drilling Strategies for Different Lock Types
While the general principles apply, certain lock types have specific drilling points.
Standard Pin Tumbler Locks (e.g., Kwikset, Schlage)
- Best Practice: Drill along the shear line at the front of the cylinder, typically about 1/4 inch to 3/8 inch up from the bottom. The goal is to sever the pins at the shear line.
- Drill Bit Sizes: Start with a 1/16-inch bit and gradually increase to 1/4-inch or 5/16-inch.
Mortise Cylinders
Mortise cylinders are often found in commercial buildings and older homes. They have a slightly different construction.
- Drilling Point: Similar to standard cylinders, targeting the shear line is effective. However, some mortise cylinders have a retaining clip or screw that might need to be bypassed first, or drilling directly into the plug might be more effective.
- Drill Bit Sizes: May require slightly larger bits, up to 3/8 inch or 1/2 inch, depending on the cylinder’s size and construction.
Key-in-Knob and Key-in-Lever Locks
These integrated locksets have the cylinder built into the knob or lever.
- Drilling Point: For these, you often drill into the neck of the knob or lever, just below the opening where the key enters. This area typically contains the pin tumblers.
- Drill Bit Sizes: Similar to standard cylinders, starting small and increasing to about 1/4 inch.
High-Security Locks
High-security locks often have hardened steel pins, anti-drill pins, or complex internal mechanisms designed to resist drilling.
- Difficulty: Drilling high-security locks is significantly more challenging and often requires specialized tools and knowledge.
- Techniques: May involve multiple drilling points, specialized bits (like carbide or diamond-tipped), and often a combination of drilling and other bypass methods for locks. Attempting to drill these without proper expertise can damage your tools and the door.
Troubleshooting Common Drilling Issues
Even with preparation, you might encounter problems.
Drill Bit Slipping
- Solution: Ensure you have a good center punch mark. Use a sharp bit. If it continues, try applying more downward pressure initially to seat the bit.
Overheating Drill Bits
- Solution: Use cutting fluid consistently. Slow down the drill speed. Take breaks to allow the bit and lock to cool.
Stuck Cylinder After Drilling
- Solution: You may not have drilled enough or in the correct spot. Try drilling slightly to the side of your original hole along the shear line. Ensure you are using enough force with pliers or vise grips to turn the plug. Sometimes, the lock’s cam mechanism can jam; you may need to use a screwdriver to manipulate this cam.
Damaging the Door or Frame
- Solution: This is why precise drilling is essential. If you’ve gone too deep or at the wrong angle, stop and reassess. For significant damage, professional repair or replacement might be necessary.
When to Call a Professional Locksmith
While this guide provides information on how to drill a cylinder lock, it’s important to know when to step back and seek professional help.
Lack of Experience or Tools
If you don’t have the necessary tools, confidence, or experience, attempting to drill a lock can lead to more damage and frustration.
High-Security Locks
As mentioned, high-security locks are designed to resist drilling. A professional locksmith has specialized tools and techniques for these situations.
Valuable or Antique Locks
If the lock is on a valuable piece of furniture, an antique door, or has significant historical value, you might want to explore non-destructive bypass methods for locks first or consult a specialist.
Uncertainty About Surroundings
If you are unsure about what lies behind the lock (e.g., wiring, plumbing), it’s safer to call a professional than risk injury or costly damage.
Lock Repair Drilling vs. Destructive Entry
A professional locksmith can differentiate between needing to drill for lock repair drilling (a more targeted approach) versus simply needing destructive entry. They can also advise on lock cylinder replacement or if the entire lock needs changing.
Frequently Asked Questions (FAQ)
Q1: Will drilling a lock always work?
A1: Drilling a lock is usually effective for standard pin tumbler locks, but high-security locks may have features to prevent drilling. It also depends on the accuracy of your drilling.
Q2: Can I drill a deadbolt lock?
A2: Yes, the principle is the same, but deadbolts often have thicker casings and stronger mechanisms, which might require more robust tools and precise drilling at the shear line.
Q3: What is the smallest drill bit I can use?
A3: You typically start with a very small pilot bit, around 1/16 inch, and gradually increase the size. The final size depends on the lock, but often around 1/4 inch to 3/8 inch is sufficient to disable the pins.
Q4: How do I know where to drill?
A4: The most effective spot is usually the shear line, the point where the cylinder plug meets the housing. Mark this line with a center punch before drilling.
Q5: Is drilling a lock a form of lock picking bypass?
A5: Yes, drilling is a form of destructive entry that bypasses the intended key mechanism. It’s considered a last resort when lock picking bypass methods are not feasible or successful.
Q6: What’s the difference between drilling for lock repair and destructive entry?
A6: Lock repair drilling might be more precise, aiming to access specific components for repair. Destructive entry, like drilling a cylinder lock, is about forcing access by breaking the mechanism, often leading to lock cylinder replacement.
This comprehensive guide aims to provide you with the knowledge to approach drilling a cylinder lock safely and effectively. Remember, patience and precision are key. If at any point you feel unsure or encounter difficulties, seeking assistance from a qualified locksmith is always the wisest course of action.