
Can you drill sea glass? Yes, you absolutely can drill sea glass, and it’s a fantastic way to transform these ocean treasures into beautiful sea glass jewelry. Drilling sea glass requires patience, the right tools, and a bit of know-how to ensure a smooth, safe process. This guide will walk you through everything you need to know.
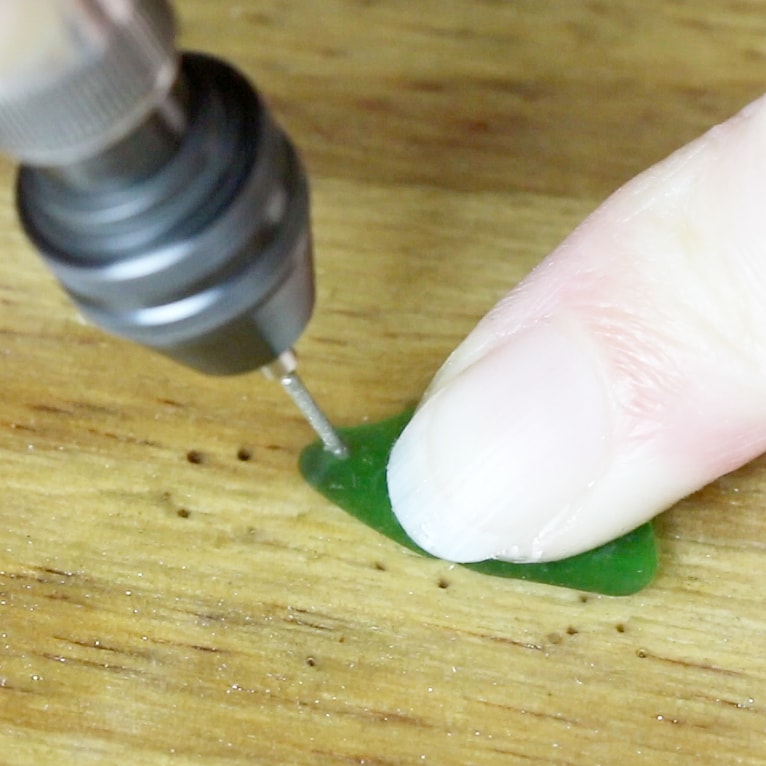
Image Source: img.kernowcraft.com
Gathering Your Sea Glass Drilling Essentials
Before you begin drilling sea glass, it’s crucial to have the correct equipment. This isn’t just about having the right tools; it’s about safety and achieving the best results for your sea glass jewelry projects.
The Best Tools for Sea Glass Drilling
When it comes to drilling sea glass, the tools you choose significantly impact the outcome. Here’s a breakdown of the essential equipment:
- Rotary Tool: A versatile rotary tool is your best friend for drilling sea glass. Brands like Dremel are popular for their reliability and range of accessories. These tools offer precision and control, which are vital when working with delicate glass.
- Diamond Drill Bits: These are non-negotiable. Standard drill bits will not work on glass. Diamond drill bits have a diamond-coated tip that grinds away the glass rather than cutting it. They come in various sizes, so having a small assortment is ideal for different jewelry designs. Look for bits specifically designed for glass or tile.
- Water Source: Water is essential for keeping the drill bit and the sea glass cool. This prevents overheating, which can cause the glass to crack or shatter. It also helps to flush away the glass dust created during drilling.
- Safety Gear:
- Safety Glasses: Always wear safety glasses to protect your eyes from flying glass shards.
- Gloves: While not always mandatory, gloves can provide a better grip and protect your hands.
- Dust Mask: Drilling glass creates fine dust that can be harmful if inhaled. A dust mask is highly recommended.
- Stabilizing Materials:
- Pliers with Rubber Grips or Small Vise: To hold the sea glass securely without damaging it.
- Piece of Wood or Foam: To place under the sea glass to prevent it from rolling and to absorb vibrations.
- Optional but Helpful:
- Drill Press Attachment: For rotary tools, a drill press attachment provides even more stability and accuracy, especially for consistent hole placement.
- Lubricant/Coolant: While water is the primary coolant, some crafters use specialized glass drilling lubricants for an extra layer of protection against breakage.
Preparing Your Workspace
A well-prepared workspace is key to a safe and efficient drilling experience.
- Ventilation: Ensure your workspace is well-ventilated, especially if you’re not using a dust mask.
- Protection: Cover your work surface with a towel or old cloth to catch water and glass dust.
- Lighting: Good lighting will help you see exactly where you are drilling.
Mastering Sea Glass Drilling Techniques
Drilling sea glass isn’t difficult, but it requires a gentle touch and a methodical approach. The goal is to create a clean hole without damaging the precious piece of glass.
Step-by-Step Guide to Drilling Sea Glass
Here’s how to drill sea glass smoothly and safely:
-
Secure the Sea Glass:
- Place your piece of sea glass on a stable surface, like a block of wood or thick foam. This will prevent it from moving around.
- Use pliers with rubber grips or a small vise to hold the sea glass firmly. Make sure the pliers or vise are not gripping too tightly, as this could also cause the glass to break. You want it stable, not crushed.
- Position the sea glass so the area you want to drill is accessible and stable.
-
Set Up Your Rotary Tool:
- Insert the appropriate size diamond drill bit into your rotary tool. Ensure it’s securely fastened.
- Adjust the speed of your rotary tool. Start with a low to medium speed. High speeds can generate too much heat and increase the risk of breakage.
-
Start the Drill:
- Dip the diamond drill bit and the sea glass in water. Keep both wet throughout the process. You can use a shallow dish of water or have someone dribble water onto the drilling area.
- Hold the rotary tool at a slight angle (around 45 degrees) to the surface of the sea glass. This helps the bit to start grinding and prevents it from skating across the surface.
- Apply gentle, consistent pressure. Let the diamond bit do the work. Do not force it. Pushing too hard is the quickest way to break your sea glass.
-
Drilling the Hole:
- Once you’ve created a small divot, gradually move the drill bit to a 90-degree angle to the glass.
- Continue drilling with gentle pressure, keeping the bit and glass constantly wet. Periodically lift the drill bit slightly to allow water to flush out the glass dust and cool the bit.
- Listen to the tool. If it sounds like it’s struggling, you might be applying too much pressure or the bit is getting too hot. Back off and add more water.
-
Completing the Hole:
- You’ll feel a slight give when the drill bit is about to break through the other side. Ease up on the pressure significantly as you approach the exit point.
- Continue drilling with extreme care until the bit just passes through. This prevents chipping or snagging on the exit.
- Once the hole is complete, keep the bit running as you gently lift it away from the sea glass while still under water.
-
Cleaning and Inspecting:
- Rinse the sea glass thoroughly to remove all glass dust and debris.
- Inspect the hole for any rough edges or chips.
Tips for Smoother Drilling
- Patience is Key: Rushing the process is your biggest enemy. Take your time.
- Constant Lubrication: Never let the drill bit or the sea glass run dry. Water is your best friend.
- Gentle Pressure: The diamond tip is designed to grind. Let it grind.
- Steady Hand: A steady hand or a drill press attachment will ensure a clean, straight hole.
- Start Small: If you’re nervous, practice on a less precious or broken piece of sea glass first.
Smoothing Sea Glass After Drilling
Even with the best techniques, drilling can sometimes leave slightly rough edges around the hole. Smoothing these edges is crucial for creating safe and attractive sea glass jewelry.
Methods for Smoothing Sea Glass Holes
- Rotary Tool with a Grinding Bit:
- Use a small diamond grinding bit or a felt polishing bit attached to your rotary tool.
- Dip the bit in water.
- Apply very gentle pressure to the edges of the hole, both inside and out, to smooth them down.
- Work slowly and check your progress frequently.
- Sanding:
- Waterproof Sandpaper: You can use fine-grit, waterproof sandpaper (e.g., 400 grit and higher).
- Wrap the sandpaper around a small, pointed object (like a toothpick or a small metal rod) to get inside the hole.
- Wet the sandpaper and gently sand the edges of the hole.
- Rinse and repeat with even finer grits for a smoother finish.
- Diamond Files:
- Small diamond files are excellent for precisely smoothing the edges of drilled holes.
- Work the file gently in a circular motion inside and around the hole.
- Keep the area wet.
Important Note on Smoothing: When smoothing, your goal is to remove any sharp edges, not to enlarge the hole significantly. Be conservative with your smoothing efforts.
Troubleshooting Common Sea Glass Drilling Issues
Even with preparation, you might encounter some challenges. Here are common problems and how to address them:
| Problem | Cause | Solution |
|---|---|---|
| Glass Cracks/Shatters | Too much pressure, overheating, unstable glass. | Apply less pressure, ensure constant water flow, use a slower speed, secure the glass firmly but gently, start at an angle. |
| Drill Bit Skates | Starting on a flat surface without a divot. | Start drilling at a 45-degree angle to create a small notch before moving to a 90-degree angle. |
| Hole is Rough or Jagged | Not enough water, too much pressure, worn bit. | Increase water flow, reduce pressure, use a new diamond bit, gently smooth the edges after drilling. |
| Drill Bit Gets Stuck | Excessive heat causing glass to expand slightly. | Stop drilling, add plenty of water, let it cool, then try again with gentle pressure. |
| Drilling Takes Too Long | Low speed, not enough pressure, dull bit. | Ensure the bit is new and suitable for glass. Gradually increase speed if the bit isn’t working. Apply consistent, gentle pressure. |
Creating Beautiful Sea Glass Jewelry
Once your sea glass is drilled and smoothed, the possibilities for sea glass jewelry are endless!
Design Ideas for Drilled Sea Glass
- Pendants: Drill a hole near the top of a beautiful piece of sea glass and string it onto a chain or cord.
- Earrings: Drill two matching pieces of sea glass for dangling earrings.
- Bracelets: Incorporate drilled sea glass as focal beads in a beaded bracelet.
- Charms: Attach a jump ring through the hole to create a charm for a bracelet or necklace.
Finishing Touches
- Jump Rings: Use sturdy jump rings to connect your drilled sea glass to chains or earring findings.
- Beads and Findings: Combine your sea glass with other beads, wire wrapping, or metal findings to create unique designs.
- Cements and Adhesives: For securing findings in a more complex way, jewelry-grade adhesives can be used, but ensure they are compatible with glass.
Safety First: Paramount Concerns When Drilling Sea Glass
Your safety and the integrity of your sea glass are paramount. Always prioritize safe practices.
Essential Safety Tips for Sea Glass Drilling
- Eye Protection is Non-Negotiable: Always wear safety glasses. Even small chips can fly with surprising force.
- Minimize Dust Inhalation: Use a dust mask. Glass dust is harmful to your lungs.
- Secure Your Work: Ensure the sea glass is stable. A moving piece is a dangerous piece.
- Keep Water Accessible: Have a continuous water supply ready. Never drill dry.
- Use the Right Tools: Only use diamond drill bits designed for glass.
- Controlled Speed: Avoid high speeds on your rotary tool.
- No Force: Let the tool and the bit do the work. Force leads to breakage.
- Take Breaks: If you’re working on multiple pieces, take short breaks to avoid fatigue, which can lead to mistakes.
- Clean Up Safely: Dispose of glass dust and shards carefully.
Environmental Considerations
- Water Management: While water is essential for cooling, be mindful of where you dispose of it. It will contain glass dust. It’s best to strain it through a fine mesh or coffee filter to catch the dust before discarding the water.
- Dust Disposal: Collect all glass dust and dispose of it in a way that won’t create airborne hazards.
Frequently Asked Questions About Drilling Sea Glass
Q1: What is the best way to drill sea glass?
The best way to drill sea glass involves using a rotary tool with a diamond drill bit, keeping the glass and bit constantly lubricated with water, applying gentle, consistent pressure, and starting the drill at an angle before going straight on. Patience and safety gear are also crucial.
Q2: Can I drill sea glass with a regular drill bit?
No, you cannot drill sea glass with a regular drill bit. Regular drill bits are designed for wood, metal, or plastic and will not cut through glass. You must use diamond-tipped drill bits specifically designed for drilling glass or tile.
Q3: How do I prevent sea glass from breaking when drilling?
To prevent sea glass from breaking, always use a diamond drill bit, keep the glass and bit constantly wet with water for cooling, apply gentle pressure, secure the sea glass firmly but not too tightly, and start drilling at a slight angle to create a notch before drilling perpendicularly. Avoid excessive speed and vibrations.
Q4: What size drill bit should I use for sea glass jewelry?
The size of the drill bit depends on your jewelry design. For small holes for jump rings or wire, bits as small as 0.8mm or 1mm are common. For larger holes or more substantial findings, you might use 1.5mm, 2mm, or larger. It’s good to have a variety of sizes.
Q5: How long does it take to drill a piece of sea glass?
The time it takes can vary greatly depending on the size and thickness of the sea glass, the size of the drill bit, and the power of your rotary tool. A small hole in thin sea glass might take only a minute or two, while a larger hole in thicker glass could take 5-10 minutes or more. Patience is key, and rushing will likely lead to breakage.
Q6: What if my sea glass piece is very small or delicate?
For very small or delicate pieces, consider using a drill press attachment for your rotary tool for maximum stability. You might also want to try holding the piece with fine-tipped tweezers or a specialized mini vise, always ensuring the glass is well-supported and kept moist. Practice on slightly larger pieces first if you are new to this.
Q7: Can I use a diamond hole saw instead of a drill bit for sea glass?
Diamond hole saws are typically used for larger diameter holes in glass or tile, often for creating clean, round openings in flat surfaces. For most sea glass jewelry applications where small holes are needed for jump rings or wire, standard diamond drill bits are more appropriate and offer better control for smaller pieces of glass.
Q8: My drilled hole has sharp edges. How do I smooth them?
You can smooth sharp edges using a small diamond grinding bit on your rotary tool with water, or by using fine-grit waterproof sandpaper (400 grit and higher). Gently work the sandpaper or grinding bit around the inside and outside edges of the hole. Diamond files are also very effective for this purpose. Always keep the area wet and work slowly.
By following these detailed steps and safety guidelines, you can confidently drill sea glass and create stunning pieces of sea glass jewelry that you’ll be proud to wear or share. Happy crafting!