
Can you drill a well yourself? While DIY well drilling is technically possible, it’s a complex, highly regulated, and potentially dangerous undertaking that requires specialized knowledge, equipment, and permits. For most homeowners, hiring a licensed well drilling contractor is the safest, most efficient, and legally compliant path to securing a private water source.
Accessing your own groundwater exploration for a reliable water supply is a significant step for any property owner. This guide will walk you through the essential aspects of well drilling, from initial planning to water well installation, helping you make informed decisions whether you decide to undertake aspects of the process or, more commonly, work with professionals.
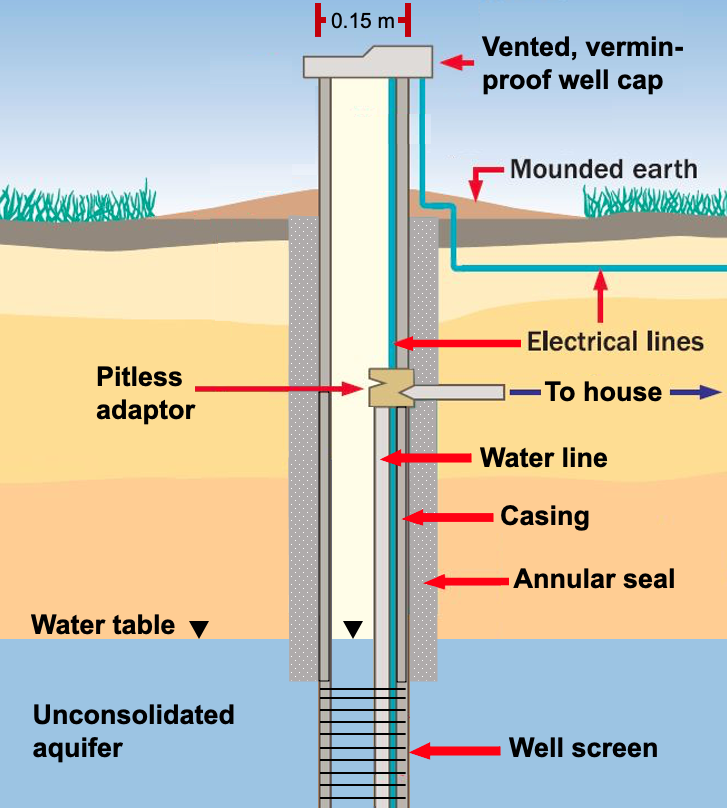
Image Source: books.gw-project.org
Planning Your Well Project
Before any drilling begins, thorough planning is crucial. This phase involves understanding regulations, assessing your property, and estimating costs.
H3: Legal and Regulatory Requirements
Who issues permits for drilling a well? Typically, local or state health departments, environmental agencies, or water resource boards are responsible for issuing permits for well drilling. These regulations ensure wells are sited and constructed to protect groundwater quality and public health.
- Permit Acquisition: You’ll need to apply for a well drilling permit from the relevant authorities in your area. This process usually involves submitting a site plan, detailing proposed well location, construction methods, and materials.
- Zoning Laws: Check local zoning ordinances. Some areas have restrictions on where wells can be drilled, especially in relation to property lines, septic systems, or other water sources.
- Water Rights: In some regions, especially those with limited water resources, water rights are a critical consideration. You may need to ensure you have the legal right to extract groundwater.
- Contractor Licensing: Ensure any contractor you hire is properly licensed and insured according to state and local requirements.
H3: Site Assessment and Selection
Choosing the right location for your well is paramount for water quality, quantity, and ease of access.
H4: Hydrogeological Surveys
- Aquifer Identification: The first step in groundwater exploration is identifying a suitable aquifer access point. This involves researching local geological conditions and the presence of underground water-bearing rock or soil formations.
- Water Table Depth: Understanding the depth of the water table is crucial. Deeper wells generally cost more to drill.
- Water Quality: Consider potential contaminants in the area. Proximity to agricultural fields, industrial sites, or landfills can impact water quality and may necessitate additional treatment.
- Geological Formations: Different rock types and soil layers affect drilling methods and costs. Some formations are easier to penetrate than others.
H4: Proximity Considerations
- Distance to Structures: Wells should be sited a safe distance from your home, septic systems, drain fields, and property lines to prevent contamination and comply with regulations. Typical setback distances vary by location but are often 50-100 feet or more from septic tanks and 10-50 feet from property lines.
- Accessibility for Equipment: The well site must be accessible for large drilling rigs and delivery trucks. Consider overhead power lines, trees, and terrain.
- Power Source: Proximity to an existing power source will simplify well pump installation. If not readily available, the cost of running electricity to the well site will be an additional expense.
H3: Budgeting for Your Well
The cost of drilling a well can vary significantly based on depth, geological conditions, location, and the type of equipment used.
- Drilling Fees: This is usually charged per foot drilled.
- Materials: Costs for well casing, gravel pack, screen, and grout.
- Pump and Pressure Tank: The cost of the pump system and associated hardware.
- Plumbing: Connecting the well to your home’s water system.
- Permits and Inspections: Fees associated with regulatory compliance.
- Ancillary Costs: Site preparation, potential water treatment systems, and electrical hookups.
The Drilling Process: Step-by-Step
Well drilling is a specialized process that involves significant machinery and expertise. Understanding the steps involved can help you communicate effectively with your drilling contractor.
H3: Drilling Rig Operation
The heart of well drilling is the drilling rig operation. These massive machines use various methods to bore through the earth’s surface.
- Rig Types:
- Rotary Rigs: The most common type, these rigs use a rotating drill bit to cut through rock and soil. They employ circulating drilling fluid (mud) to cool the bit, lubricate the hole, and carry cuttings to the surface.
- Cable Tool Rigs: These older rigs use a heavy reciprocating bit that pounds and chips away at the rock. The debris is then bailed out of the hole. They are slower but can be effective in certain geological conditions.
- Drilling Fluids (Mud): A carefully engineered mixture of clay, water, and additives is circulated down the drill pipe and up the annulus (space between the drill string and the borehole wall). It serves multiple functions:
- Cooling and Lubrication: Keeps the drill bit and drill string from overheating.
- Cuttings Removal: Carries rock and soil fragments to the surface for analysis and disposal.
- Borehole Stabilization: The mud cake formed on the borehole walls helps prevent collapse, especially in unconsolidated formations.
- Pressure Control: Helps manage the pressure within the borehole to prevent blowouts.
H3: Borehole Construction
Once the drilling is complete, the borehole needs to be prepared to receive the well casing.
- Borehole Cleaning: After reaching the target depth, the borehole is thoroughly cleaned of loose sediment and drilling fluid.
- Development: This process involves a series of steps to remove drilling mud and fine particles from the aquifer formation, improving water flow into the well. Techniques include surging, pumping, and chemical treatments.
H3: Installing Well Casing and Screen
Well casing is the structural lining that prevents the borehole walls from collapsing and seals off shallow aquifers that might be contaminated.
- Casing Material: Typically made of steel, PVC, or high-density polyethylene (HDPE). The material choice depends on local regulations, depth, and water chemistry. Steel is strong but can corrode, while PVC is cost-effective and resistant to corrosion but less rigid.
- Installation: The casing is lowered into the borehole. For deeper wells, multiple strings of casing might be used, with progressively smaller diameters, cemented in place to ensure a secure and sealed borehole.
- Well Screen: The well screen is a perforated section of casing installed at the aquifer access level. Its primary function is to allow water to enter the well while preventing sand and gravel from entering. The size and type of screen are chosen based on the characteristics of the aquifer material.
H3: Grouting and Sealing
A critical step to protect groundwater is sealing the space between the casing and the borehole wall.
- Grout: A cement-like mixture (typically bentonite or cement grout) is pumped into the annulus from the bottom up. This creates a watertight barrier, preventing surface water and shallow, potentially contaminated groundwater from entering the well.
- Surface Seal: A sanitary seal is applied at the surface around the wellhead to prevent contaminants from entering the well.
Post-Drilling: Pump Installation and System Setup
With the well structure complete, the focus shifts to getting water to your home.
H3: Choosing the Right Well Pump
The pump is the heart of your water system, responsible for bringing water from the aquifer to your taps.
H4: Submersible Pumps
- Description: Submersible pump setup involves placing the pump directly down in the well, submerged in the water. These are the most common type for domestic wells.
- Advantages: Efficient, quiet, and powerful, ideal for deeper wells. They push water up rather than pull it, which is more efficient for greater depths.
- Components: The submersible pump itself, a motor, a pitless adapter (or well seal), drop pipe, wiring, and a pressure switch.
H4: Jet Pumps
- Description: Jet pumps are typically located above ground, either in a basement or an outdoor enclosure. They use a jet assembly (ejector) within the well to create suction.
- Advantages: Can be less expensive initially than submersible pumps for shallow wells.
- Disadvantages: Less efficient for deep wells, can be noisy, and require priming.
H3: Well Pump Installation and Setup
Proper well pump installation is crucial for optimal performance and longevity.
- Pump Placement: The submersible pump is attached to the drop pipe and lowered into the well to a depth that ensures it remains submerged even during periods of low water levels. The exact depth is determined by the pump’s intake specifications and the static water level.
- Electrical Connections: The pump motor is connected to waterproof electrical wiring that runs to the surface and connects to the power supply and control system.
- Pressure Tank: A pressure tank is essential for maintaining consistent water pressure and reducing the on/off cycles of the pump. When you open a tap, water is drawn from the tank. As the pressure drops, the pressure switch activates the pump to refill the tank.
- Pitless Adapter: This underground fitting connects the well casing to the buried water line leading to the house. It allows the water line to exit the well below the frost line and prevents freezing, eliminating the need for a frostproof hydrant inside the wellhead.
H3: Water Quality Testing and Treatment
Once water is flowing, it’s vital to test its quality.
- Testing: Samples should be sent to a certified laboratory to check for common contaminants like bacteria (coliform), nitrates, lead, arsenic, and hardness.
- Treatment: Based on the test results, you may need to install a water treatment system. Common systems include:
- Water Softeners: For hard water.
- Filtration Systems: To remove sediment, iron, or other particulates.
- UV Sterilizers: To kill bacteria and viruses.
- Reverse Osmosis: For removing a wide range of contaminants, including dissolved solids.
Maintaining Your Well and Pump
A properly maintained well system will provide reliable water for many years.
H3: Regular Inspections
- Visual Checks: Periodically inspect the wellhead, cap, and surrounding area for any signs of damage, cracks, or contamination.
- Pump Performance: Listen for unusual noises from the pump or pressure fluctuations.
- Water Quality: Retest your water annually, or more frequently if you notice any changes in taste, odor, or appearance.
H3: Preventative Maintenance
- Pump Servicing: Follow the manufacturer’s recommendations for pump maintenance. Some pumps require periodic servicing.
- Pressure Tank Check: Ensure the air charge in the pressure tank is at the recommended level. This is typically checked by disconnecting power and draining the tank.
- Wellhead Protection: Keep the area around the wellhead clear of debris, vegetation, and potential contaminants.
H3: Troubleshooting Common Issues
- Low Water Pressure: Can be caused by a failing pump, clogged screen, low water table, or issues with the pressure tank.
- Pump Cycling Frequently: Often indicates a problem with the pressure tank’s air bladder or the pressure switch setting.
- Cloudy or Discolored Water: May point to sediment issues, iron bacteria, or a problem with the well casing or seal.
Frequently Asked Questions (FAQ)
H3: How deep do wells typically need to be?
The depth of a well varies greatly depending on your location and the geological formations that hold water. Some wells might be as shallow as 50 feet, while others can exceed 500 feet or more. A groundwater exploration phase with a professional will help determine the expected depth.
H3: What is the average cost of drilling a well?
The average cost can range from $5,000 to $15,000 or more. Factors influencing cost include the depth of the well, the type of rock or soil encountered, the complexity of the water well installation, the type of pump system, and local labor rates. Always get detailed quotes from multiple licensed contractors.
H3: How long does it take to drill a well?
Drilling a well can typically take anywhere from a few days to a week or more. This depends on the depth, geological conditions, weather, and the drilling crew’s efficiency. The entire water well installation process, including pump setup and testing, can take longer.
H3: Can I use my neighbor’s well?
Generally, no. A well is typically intended for the property it is drilled on. Sharing a well would require a formal agreement, potentially involving easements and shared maintenance costs, and may be subject to regulatory approval.
H3: What are the signs of a failing well pump?
Signs of a failing pump include:
* Sudden drops in water pressure.
* The pump running constantly or cycling on and off rapidly.
* Strange noises coming from the well or pump.
* Discolored or gritty water.
* No water at all.
By following this guide and partnering with qualified professionals, you can successfully achieve your goal of securing a reliable private water source through well drilling.