
Yes, you can drill a hole through porcelain tile safely and effectively. While porcelain is a very hard material, with the right tools and techniques, drilling into it is a manageable DIY task.
Porcelain tile is known for its durability and beauty, making it a popular choice for floors, walls, and backsplashes. However, when it comes to installing fixtures, shelves, or even just decorative items, you’ll often need to drill a hole. Drilling through porcelain tile might seem intimidating due to its hardness, but with the correct approach, it’s a straightforward process. This guide will walk you through everything you need to know for successful porcelain tile drilling.
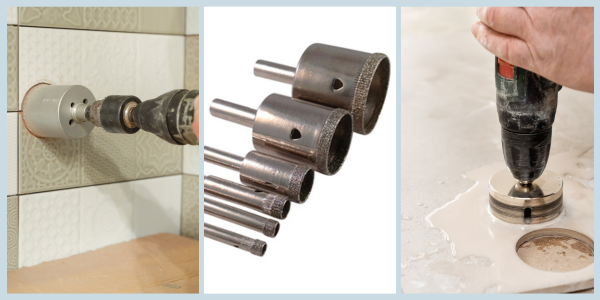
Image Source: cdn.ecommercedns.uk
Preparing for Porcelain Tile Drilling
Before you even pick up a drill, proper preparation is key to a clean, successful hole and to prevent your tile from cracking or chipping.
Gathering Your Tools and Materials
Having the right equipment makes all the difference. Here’s what you’ll need:
- Drill: A cordless or corded drill with variable speed settings is essential.
- Diamond Drill Bit or Tile Drill Bit: This is the most crucial tool. For porcelain, a diamond drill bit or a specialized tile drill bit designed for glass and tile is non-negotiable. These bits have diamond grit on the tip that grinds through the hard surface rather than cutting it. A hole saw for tile can also be used for larger diameter holes.
- Safety Glasses: Always protect your eyes from dust and debris.
- Gloves: To protect your hands and improve grip.
- Mask: To avoid inhaling fine tile dust.
- Water or Cooling Fluid: Essential for keeping the drill bit cool, preventing it from overheating and losing its effectiveness. A spray bottle filled with water works well.
- Masking Tape or Painter’s Tape: To help prevent the drill bit from wandering when you start drilling.
- Center Punch or Nail: To create a small indentation where you want to drill. This helps guide the drill bit.
- Measuring Tape and Pencil: For accurate placement of your hole.
- Drill Stop Collar (Optional): To control drilling depth.
- Shop Vacuum or Dust Collection System: For dust collection tile and immediate cleanup.
- Bucket or Container: To catch water if doing wet drilling.
- Sponge or Rags: For wiping up water.
Understanding Your Tile and Drill Bit
Different types of tile require slightly different approaches, but porcelain is among the hardest. Ensure your drill bit is specifically rated for porcelain or hard ceramics. A standard masonry bit will likely fail and damage your tile.
Table 1: Drill Bit Types for Tile
| Drill Bit Type | Best For | Porcelain Suitability | Notes |
|---|---|---|---|
| Diamond Drill Bit | Glass, ceramic, porcelain, stone, tile | Excellent | Grinds through material. Requires water for cooling. |
| Tile Drill Bit | Ceramic tile, softer porcelain | Good | Often has a spear-shaped carbide tip. Can overheat on very dense porcelain. |
| Carbide-Tipped Masonry Bit | Brick, concrete, mortar | Poor | Not designed for hard, dense materials like porcelain. Will likely dull or break. |
| Hole Saw for Tile | Larger diameter holes in tile, glass, ceramic, stone | Good | Diamond-grit edge. Requires water and can be slower. More suited for specific sizes. |
Marking the Drilling Location
Accuracy is crucial. Measure twice, drill once!
- Measure and Mark: Use your measuring tape and pencil to mark the exact center point of your desired hole on the tile.
- Create a Pilot Indentation: Place the tip of a center punch porcelain or a sharp nail on your marked spot. Gently tap it with a hammer to create a small indentation. This indentation will help the drill bit stay in place and prevent it from “walking” across the tile surface when you start.
Taping the Area
To further secure the drill bit’s starting point and protect the tile surface from potential scratches, apply a piece of masking tape or painter’s tape over your marked spot.
- Apply Tape: Place a strip of tape firmly over the marked area.
- Re-mark the Spot: Use your pencil to re-mark the drilling point precisely in the center of the tape.
The Drilling Process: Step-by-Step
Now that you’re prepared, let’s get drilling. Patience and a gentle touch are key here.
Setting Up Your Drill
- Select the Right Bit: Ensure your diamond drill bit or tile drill bit is securely attached to your drill.
- Set the Drill Speed: This is vital for porcelain tile drilling. You need a slow drill speed. High speeds generate excessive heat, which can damage the bit and the tile. Aim for the lowest speed setting on your drill. Many drills have a variable speed trigger; use it to maintain a slow, consistent rotation.
- Drill Mode: Make sure your drill is set to the “drill” mode, not “hammer” or “impact” mode. The hammering action will shatter the tile.
Starting the Hole
- Position the Drill: Hold the drill perpendicular (straight up and down) to the tile surface.
- Engage the Indentation: Place the tip of the drill bit directly into the indentation you created with the center punch.
- Start Slowly: Begin drilling at a very slow drill speed. Let the bit bite into the tile. You should feel it start to grind away at the surface.
- Maintain Angle: Continue to hold the drill perfectly straight.
Drilling Through the Porcelain Tile
This is where wet drilling and cooling become critical.
The Importance of Cooling
Porcelain is very dense and hard. Friction during drilling generates significant heat. If the bit overheats, it can lose its diamond coating or carbide tip, rendering it useless. Overheating can also cause thermal shock, leading to cracks in the tile.
Techniques for Cooling
- Water Spray: The most common method is to continuously spray water onto the drilling area using a spray bottle. This acts as a cooling fluid and also helps wash away debris, improving visibility.
- Water Dams: For vertical surfaces or areas where spraying is difficult, you can create a small dam around the drilling area using plumber’s putty or a similar moldable material. Fill this dam with water to create a pool for the bit to run in. This is a form of wet drilling.
- Dipping the Bit: Periodically, you can withdraw the drill bit and dip it into a container of water to cool it down. Be careful not to drip water onto the drill motor.
The Drilling Action
- Apply Gentle, Consistent Pressure: Let the drill bit do the work. You don’t need to force it. Apply steady, light pressure.
- Drill in Pulses: Drill for short bursts, then back the bit out slightly to allow water to flush the hole and cool the bit. This also helps remove the dust and slurry created.
- Clear Debris: As you drill, the combination of water and the spinning bit will create a slurry. Periodically pull the bit out of the hole to clear this slurry. This is essential for effective dust collection tile and to prevent the bit from binding.
- Maintain a Slow Drill Speed: Keep the drill speed low throughout the process. This is perhaps the most important rule for porcelain tile drilling.
Using a Tile Drilling Guide
For precise placement and to ensure the drill stays perpendicular, a tile drilling guide is a highly recommended accessory.
- How it Works: A tile drilling guide typically has a suction cup base to hold it in place and a sleeve that guides your drill bit. You insert the bit into the sleeve, and it prevents the bit from wandering and maintains a straight angle.
- Benefits: Using a guide reduces the risk of the bit slipping, making the drilling process much easier and safer, especially for beginners.
Drilling Through the Entire Tile
- Nearing Completion: As you approach the back of the tile, you’ll notice the resistance decrease.
- Reduce Pressure Further: Ease up on the pressure considerably to avoid blowout on the exit side. A piece of scrap wood placed on the back of the tile can help minimize chipping if you’re drilling through a fixture.
- Complete the Hole: Once the bit breaks through, continue for just a moment to ensure the hole is clean.
- Withdraw the Bit: Slowly withdraw the drill bit from the hole while it’s still spinning slowly.
Cleaning Up
- Flush the Hole: Once the drilling is complete, use water to flush out any remaining slurry from the hole.
- Wipe Down: Clean the tile surface with a sponge or rag.
- Vacuum: Use your shop vacuum for thorough dust collection tile from the surrounding area and the hole itself. This is crucial for a clean workspace and to prevent the fine dust from becoming airborne.
Advanced Techniques and Tips
For those looking to refine their porcelain tile drilling skills or tackle more challenging situations.
Drilling Larger Holes with a Hole Saw for Tile
If you need a larger diameter hole (e.g., for plumbing pipes or electrical boxes), a hole saw for tile is the tool of choice.
- Selection: Choose a diamond-grit hole saw designed for tile.
- Lubrication: Wet drilling is absolutely essential with hole saws. Ensure a continuous flow of water.
- Starting: Start at a slow drill speed and at an angle to create a kerf, then gradually bring the hole saw to a perpendicular position.
- Patience: Hole saws work by grinding a larger circle. This process is slower than using a standard drill bit and requires significant patience and continuous cooling.
Drilling Mounted Tile
If you’re drilling into tile that is already installed on a wall or floor, you have fewer options for water containment and scrap wood backing.
- Focus on Spraying: A spray bottle is your primary cooling method. You might need someone to help you spray water consistently.
- Catch Water: Place a bucket or container beneath the drilling area to catch excess water.
- Control Dust: A vacuum cleaner held close to the drilling area can help with immediate dust collection tile, but it won’t be as effective as a dedicated system for wet dust.
Dealing with Grout Lines
If your hole location is on a grout line, this can actually be a slight advantage, as grout is softer. However, be mindful of the drill bit potentially wandering into the grout if not perfectly centered.
What If the Tile Cracks?
Even with the best preparation, sometimes tiles can crack.
- Prevention is Key: The most common reasons for cracking are too high a drill speed, too much pressure, using the wrong drill bit, or not cooling the bit sufficiently.
- Salvage: If a crack occurs, but the hole is still usable for your purpose, you might be able to use it. If not, you’ll need to replace the tile.
Safety First!
Working with power tools and hard materials demands attention to safety.
- Eye Protection: Always wear safety glasses.
- Hand Protection: Wear gloves for better grip and to protect your hands from sharp edges or dust.
- Respiratory Protection: Use a mask to avoid inhaling tile dust, which can be harmful.
- Secure Workpiece: If drilling loose tiles, ensure they are on a stable, flat surface.
- Electrical Safety: Keep water away from the drill motor and electrical connections.
Frequently Asked Questions (FAQ)
Can I use a regular drill bit on porcelain tile?
No, it is strongly advised against using a regular masonry or metal drill bit on porcelain tile. These bits are not designed for the extreme hardness of porcelain and will either fail to make a hole, overheat and be destroyed, or cause the tile to crack. Always use a specialized diamond drill bit or tile drill bit.
How do I prevent the tile from cracking while drilling?
Preventing cracks involves several factors: using a diamond drill bit or tile drill bit, drilling at a slow drill speed, applying consistent but not excessive pressure, using wet drilling techniques with cooling fluid, and starting the hole accurately with a center punch porcelain mark and tape.
What is the best speed to drill porcelain tile?
The best speed for porcelain tile drilling is a slow drill speed. High speeds generate heat, which is the enemy of both your drill bit and your tile. Aim for the lowest setting on your variable speed drill and let the bit grind through the material.
Do I need to use water when drilling porcelain tile?
Yes, absolutely. Water serves as a crucial cooling fluid for the drill bit and the tile, preventing overheating and cracking. It also helps to flush away debris and lubricate the cutting action. This practice is known as wet drilling.
What’s the difference between a diamond drill bit and a tile drill bit for porcelain?
While both are designed for hard materials, diamond drill bits have diamond particles bonded to their tips, which grind through the porcelain. Specialized tile drill bits often have a spear-shaped carbide tip, which can also work but may wear out faster on very dense porcelain than a diamond bit. For guaranteed results on porcelain, a diamond bit is generally preferred.
Can I use a hole saw for tile?
Yes, a hole saw for tile can be used for larger diameter holes. Ensure it has a diamond grit edge and remember that wet drilling and a slow drill speed are even more critical when using a hole saw to prevent overheating and breakage.
How do I get a clean start for drilling?
To get a clean start and prevent the drill bit from “walking” on the surface, use a center punch porcelain to create a small indentation at your mark. Applying masking tape over the spot before marking and drilling further helps secure the bit’s initial contact.
What is dust collection tile?
Dust collection tile refers to the process of managing the fine dust generated when cutting or drilling tile. Using a shop vacuum to immediately collect dust at the source, especially during wet drilling, helps keep the air clean and the workspace tidy.
How deep should I drill?
Drill only as deep as necessary for your application. If you’re installing a screw or anchor, mark the required depth on your drill bit using tape or a drill stop collar. This prevents drilling too deep and potentially damaging what’s behind the tile.
By following these detailed steps and safety precautions, you can confidently drill holes through porcelain tile, achieving professional-looking results for your home improvement projects.