
Can I drill a larger hole in wood if I’ve already made a smaller one? Yes, absolutely! This guide will show you how to successfully drill a larger hole in wood, whether you’re starting from scratch or need to enlarge an existing opening. We’ll cover various tools and techniques for drilling bigger holes cleanly and efficiently.
When a standard drill bit won’t cut it, knowing how to expand or enlarge wood holes is a valuable skill for any woodworker. From furniture making to home repairs, the need to create precise, larger openings is common. This article will guide you through the best methods for hole widening, ensuring you can tackle any project with confidence.
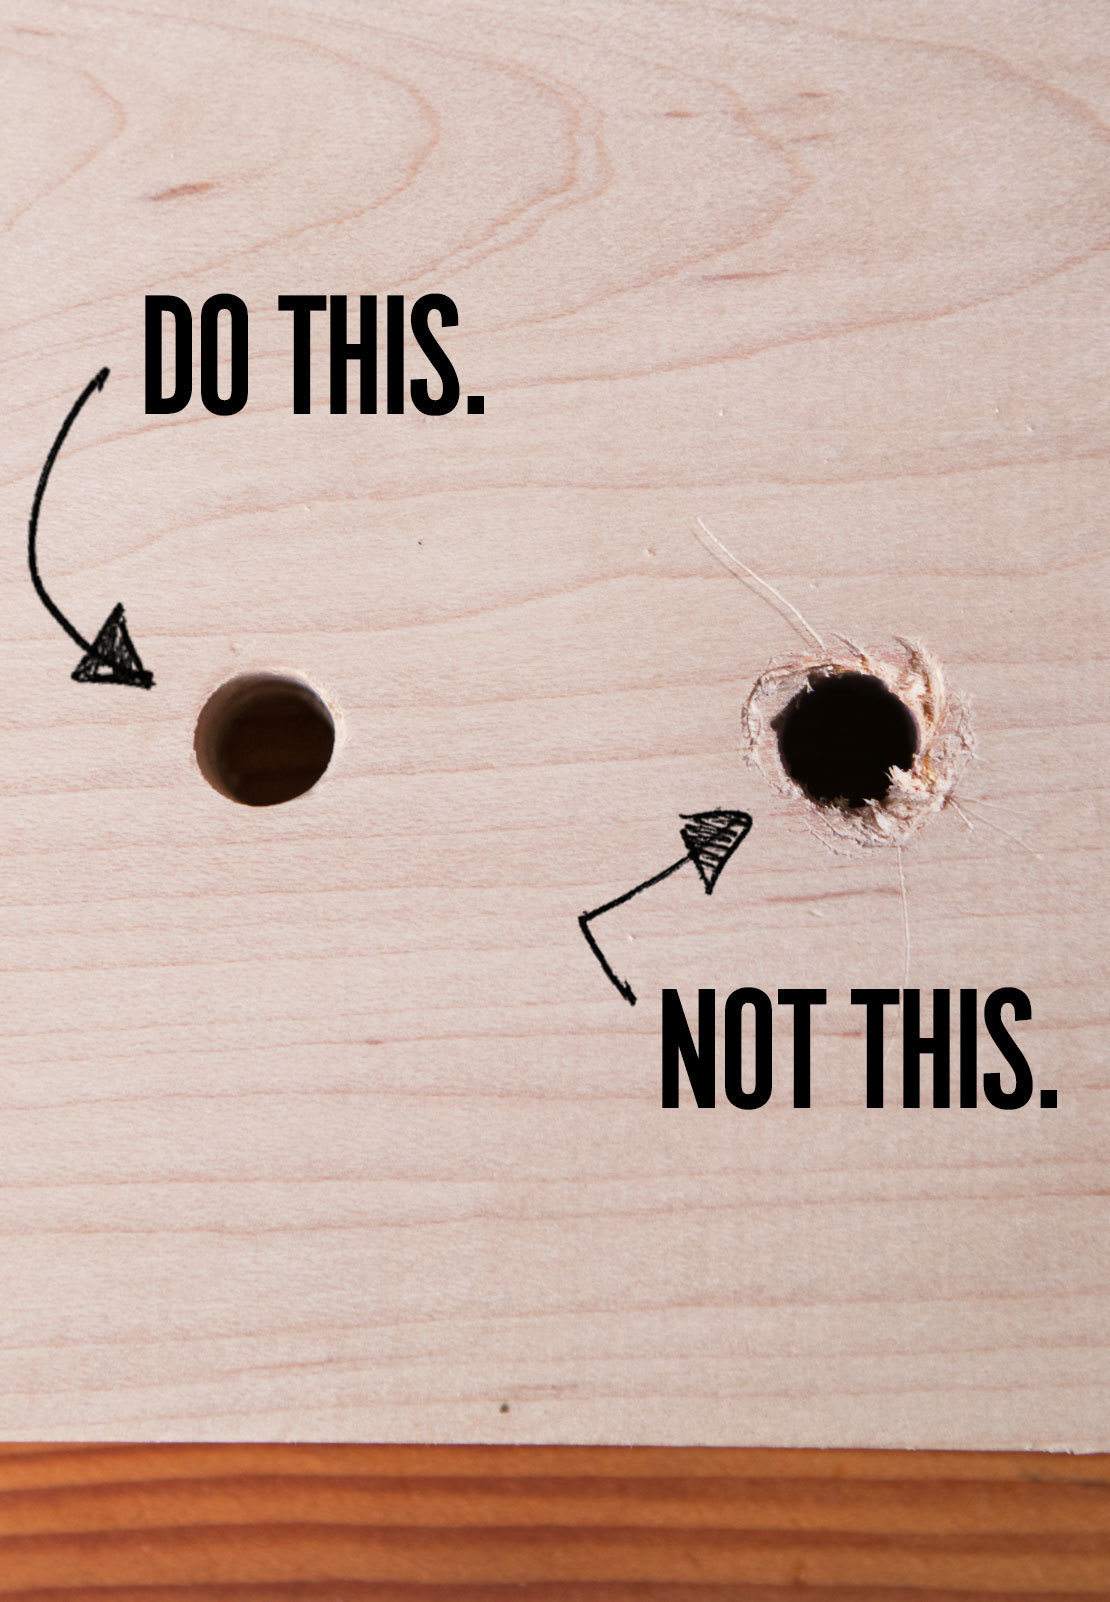
Image Source: www.manmadediy.com
Why Enlarge a Wood Hole?
There are many reasons you might need to create a larger hole in wood. Perhaps you drilled a pilot hole that’s too small for a screw, or you need to fit a larger dowel, bolt, or pipe through a piece of lumber. Sometimes, a mistake happens, and you need to correct a hole that’s the wrong size. Whatever the reason, a few key tools and techniques can make hole expansion methods straightforward.
Here are some common scenarios:
- Fastener Size: You need to fit a larger bolt, screw, or anchor.
- Hardware Installation: Mounting hinges, drawer slides, or other hardware that requires specific-sized openings.
- Decorative Elements: Creating openings for pipes, wires, or decorative plugs.
- Joinery: Preparing for dowels, mortises, or other wood joinery techniques.
- Correction: Enlarging an existing hole that was drilled incorrectly.
Choosing the Right Tool for the Job
The best way to drill a larger hole depends on the size of the hole you need and the type of wood you’re working with. Different tools offer unique advantages for drilling bigger holes.
1. Spade Bits: For Quick, Large Holes
Spade bits, also known as paddle bits, are excellent for drilling fast, clean, larger holes in wood. They have a sharp point that helps center the bit and two cutting spurs that slice through the wood fibers, creating a clean edge.
Spade Bit Usage:
- Best For: Holes ranging from 1/4 inch to 1 1/2 inches or larger. Ideal for general-purpose drilling where precision isn’t paramount.
- How to Use:
- Mark Your Spot: Use a pencil to mark the center of the hole.
- Pilot Hole (Optional but Recommended): Drill a small pilot hole with a standard drill bit to guide the spade bit and prevent wandering.
- Position the Bit: Place the tip of the spade bit directly on your mark or in the pilot hole.
- Start Slow: Begin drilling at a low speed. Apply steady pressure.
- Clear Debris: Periodically pull the bit out slightly to clear wood shavings and prevent overheating.
- Full Speed: Once the bit is cutting cleanly, you can increase the speed slightly.
- Exit Strategy: When you’re about to break through the other side, reduce pressure and speed to minimize tear-out on the exit surface. You can also drill halfway through from one side, then flip the wood and finish from the other side to get a cleaner hole.
Pros of Spade Bits:
- Inexpensive.
- Fast drilling.
- Available in a wide range of sizes.
Cons of Spade Bits:
- Can cause tear-out on the exit side.
- Not ideal for very precise holes.
- Can be difficult to control on thin material.
2. Forstner Bits: For Clean, Flat-Bottomed Holes
Forstner bits are the go-to for clean, precise, flat-bottomed holes. They have a sharp outer rim that scores the wood fibers, preventing tear-out, and a central point that guides the bit. The design allows them to cut a full circle without the bit needing to pass completely through the material.
Forstner Bit Technique:
- Best For: Precise, clean holes, especially for cabinet hardware, dowel joinery, or when you need a perfectly flat bottom. Sizes range from 1/4 inch to several inches in diameter.
- How to Use:
- Mark the Center: Precisely mark the center point for your hole.
- Use a Drill Press (Highly Recommended): For the best results and accuracy, use a drill press. Clamp the wood securely.
- Handheld Drill: If using a handheld drill, ensure the wood is firmly clamped. Start with the drill held perfectly perpendicular to the wood surface.
- Start Slowly: Begin drilling at a slow speed. Let the center point guide the bit.
- Apply Steady Pressure: Apply consistent, even pressure.
- Clear Chips: The design allows for efficient chip removal, but you may still want to back the bit out occasionally, especially in deep holes, to clear sawdust.
- Smooth Entry and Exit: The scoring rim will help create a very clean entry. For a clean exit, you can place a sacrificial piece of wood underneath your workpiece.
Pros of Forstner Bits:
- Very clean holes with flat bottoms.
- Excellent for starting a hole anywhere on the surface, not just on an edge.
- Minimal tear-out.
- Can bore partially through wood without exiting.
Cons of Forstner Bits:
- More expensive than spade bits.
- Require more power from the drill.
- Can be slower than spade bits for simple, large holes.
3. Hole Saws: For Very Large Diameter Holes
Hole saws are designed to cut very large, clean holes. They consist of a pilot drill bit in the center and a cylindrical saw blade attached to an arbor. They’re perfect for cutting through thicker materials or when you need openings for plumbing, electrical conduits, or large ventilation.
Hole Saw Application:
- Best For: Cutting holes from 3/4 inch up to 6 inches or more in diameter. Great for creating openings for pipes, vents, or larger fixtures.
- How to Use:
- Select the Right Saw: Choose a hole saw appropriate for wood. Different teeth configurations exist for various materials.
- Mark Your Center: Accurately mark the center of your desired hole.
- Insert Pilot Bit: Ensure the pilot bit is securely in place and sharp.
- Position the Saw: Place the pilot bit’s tip on your mark.
- Start at Low Speed: Begin drilling slowly. Keep the drill motor perpendicular to the wood.
- Apply Steady Pressure: Let the saw do the work. Don’t force it.
- Clear Debris: As the saw cuts, wood chips will be ejected. You may need to pause and clear them, especially in deeper cuts.
- Patience is Key: For larger diameters, this process takes time. Maintain steady speed and pressure.
- Exit Strategy: As you near the end of the cut, reduce pressure to prevent the saw from catching and tearing out the wood. Support the cut-out piece to prevent it from falling through prematurely.
Pros of Hole Saws:
- Can cut very large diameter holes.
- Produce clean circular cuts.
- Available for various materials.
Cons of Hole Saws:
- Can be difficult to control, especially on uneven surfaces.
- Requires a powerful drill.
- Risk of binding or kickback if not used carefully.
- Can cause significant tear-out if not managed properly on exit.
4. Step Drill Bits: For Small to Medium Enlargements and Precise Sizing
Step drill bits are unique drill bits with multiple cutting edges at increasing diameters along the shaft. They are incredibly versatile for drilling bigger holes in thin materials and for precisely enlarging existing holes without needing multiple bits.
Step Drill Bit for Wood Usage:
- Best For: Enlarging existing holes, creating a series of holes with progressively larger diameters, and drilling clean holes in thin metal and plastic, but they can also work effectively in wood. Great for precision work where you need exact hole sizes for fasteners or small fittings.
- How to Use:
- Mark Your Hole: Mark the center of the existing hole or where you want the new hole.
- Select the Step: Identify the step on the bit that matches your desired hole diameter.
- Position the Bit: Center the smallest tip of the step bit in the existing hole or on your mark.
- Start Slowly: Begin drilling at a slow to medium speed.
- Apply Steady Pressure: Let each step cut its portion of the hole. The bit will naturally advance to the next diameter as you apply pressure.
- Lubrication (Optional for Wood): While more common for metal, a bit of cutting fluid or even water can sometimes help with smoother cuts in wood, though it’s usually unnecessary.
- Clean Up: The bit creates a very clean hole as it progresses.
Pros of Step Drill Bits:
- Versatile – one bit can drill many hole sizes.
- Excellent for enlarging existing holes.
- Creates very clean holes.
- Good for thin materials and precise sizing.
Cons of Step Drill Bits:
- Not suitable for very large diameter holes (typically up to 1-1/2 inches).
- Can be prone to chipping or breaking if forced or used at high speeds.
- Can be more expensive than basic drill bits.
5. Wood Plug Cutters: For Creating Matching Plugs
A wood plug cutter is a specialized tool that cuts a cylindrical plug of wood, which can then be used to fill a hole or as a decorative element. They can also be used to enlarge a hole to a specific diameter for a perfectly fitting plug.
Wood Plug Cutter Technique:
- Best For: Creating perfectly sized plugs to fill holes, or for making larger holes for decorative plugs or dowels.
- How to Use:
- Mark Your Hole: Precisely mark the center.
- Select the Cutter Size: Choose a plug cutter that matches the diameter of the plug you want.
- Use a Drill Press: This is highly recommended for a straight cut and to ensure the plug is the correct diameter. Clamp the wood.
- Position the Cutter: Place the cutter’s pilot tip on your mark.
- Drill Slowly: Start at a slow speed.
- Cut to Depth: The cutter will form a cylindrical plug. You can control the depth of the cut.
- To Enlarge a Hole: If you want to enlarge an existing hole for a plug, you would use the plug cutter to create a perfectly cylindrical recess for the plug to fit into.
Pros of Wood Plug Cutters:
- Creates perfect, matching plugs.
- Can be used to make decorative plugs.
- Ensures a precise fit for dowels or plugs.
Cons of Wood Plug Cutters:
- Specialized tool, not for general drilling.
- Requires a drill press for best results.
- Can be slower for simple hole enlargement.
6. Reaming Wood Holes: For Fine Adjustments
Reaming is a process of smoothing and slightly enlarging an existing hole. While not a primary method for drilling a significantly larger hole from scratch, it’s excellent for reaming wood holes to achieve a perfect fit for dowels, tenons, or tight-tolerance fasteners. Specialized reaming bits are available, or you can carefully use a larger drill bit or even a rasp.
Reaming Wood Holes Techniques:
- Best For: Slightly enlarging and smoothing an existing hole to achieve a precise fit.
- How to Use:
- Use a Reaming Bit: These bits are designed for slow speeds and have cutting edges that shave rather than cut aggressively.
- Careful Use of Larger Bits: If using a slightly larger drill bit (like a spade or Forstner bit), drill at a very low speed with minimal pressure, just enough to smooth the walls.
- Rasps or Files: For very fine adjustments, a round wood rasp or file can be used, carefully turning it within the hole. This is slow but allows for maximum control.
- Always Go Slow: The key to reaming is slow speed and light pressure to avoid widening the hole too much.
Pros of Reaming:
- Provides a very smooth, precise finish.
- Ideal for fine-tuning hole sizes.
Cons of Reaming:
- Not for creating significantly larger holes.
- Requires patience and control.
How to Enlarge an Existing Hole
So, you’ve made a hole, but it’s too small. How do you go about hole widening or enlarging wood holes?
Method 1: Using a Larger Spade Bit or Forstner Bit
This is the most straightforward method if the new hole size is significantly larger than the existing one.
- Secure the Wood: Clamp the wood firmly in place.
- Align with Existing Hole: Place the point of your larger spade or Forstner bit into the existing hole.
- Drill Slowly: Start the drill at a very low speed. Let the existing hole guide the bit to ensure it stays centered.
- Steady Pressure: Apply steady pressure as the new bit cuts the larger diameter.
- Watch for Centering: If the bit starts to wander, ease up pressure slightly and try to guide it back to center.
- Clear Debris: Periodically lift the bit to clear wood dust.
- Finish the Cut: Continue until you achieve the desired depth or pass through the material.
Method 2: Using a Step Drill Bit
Step drill bits are exceptionally good for enlarging wood holes, especially if you need to increase the size incrementally or want a very clean result.
- Secure the Wood: Ensure the workpiece is stable.
- Select the Correct Step: Choose the step on the bit that matches your desired final hole diameter.
- Position the Bit: Place the tip of the step drill bit into the existing hole.
- Drill with Steady Pressure: Start at a moderate speed and apply consistent pressure. The bit will progressively cut to the larger diameter.
- Listen to the Drill: If the drill bogs down, you might be applying too much pressure or need to back out to clear debris.
Method 3: Using a Rasp or File (For Small Adjustments)
If you only need to enlarge a hole by a tiny amount or smooth rough edges after drilling, a round wood rasp or file is a good option.
- Insert the Rasp/File: Place the tip of a round rasp or file into the hole.
- Rotate Carefully: Gently rotate the rasp or file within the hole, working your way around.
- Check Frequently: Periodically check the hole size with your gauge or the part you intend to fit.
- Be Patient: This method is slow and requires patience but offers maximum control for fine adjustments.
Method 4: Using a Hole Saw (For Significant Enlargement)
If you need to go from a small hole to a very large one, a hole saw can work, but it requires extra care to center it precisely in the existing hole.
- Secure the Wood: Clamp the workpiece firmly.
- Center the Pilot Bit: This is the trickiest part. You need to get the pilot bit of the hole saw perfectly aligned with the center of the existing hole. You might need to create a small jig or use extreme care.
- Drill Slowly: Start at a very low speed, allowing the pilot bit to engage the existing hole.
- Maintain Perpendicularity: Keep the hole saw absolutely perpendicular to the wood surface.
- Steady Pressure: Apply even pressure and let the saw cut.
Important Considerations for Drilling Bigger Holes
Regardless of the tool you choose, several factors will ensure your success when drilling bigger holes.
1. Drill Speed and Power
Larger drill bits require more power and lower speeds. A powerful drill (corded is often better for larger bits) is essential. Using a drill press provides the most stability and control, which is highly beneficial for larger diameter bits.
- Too Fast: Can cause overheating, bit damage, excessive tear-out, and loss of control.
- Too Slow: Can lead to inefficient cutting and bit loading.
General Speed Guidelines (Consult Bit Manufacturer for Specifics):
| Bit Type | Typical Speed Range (RPM) | Notes |
|---|---|---|
| Spade Bit | 400-800 | Lower end for larger bits, higher for smaller |
| Forstner Bit | 300-700 | Lower end for larger bits, higher for smaller |
| Hole Saw | 200-500 | Generally slower, especially for large sizes |
| Step Bit | 500-1000 | Higher speed possible for smaller steps |
| Plug Cutter | 300-600 | Controlled speed is key |
2. Wood Type and Grain Direction
Hardwoods (oak, maple) require more force and slower speeds than softwoods (pine, cedar). The direction of the wood grain can also affect tear-out. Drilling across end grain is more prone to splintering.
- Hardwoods: Slower speeds, more pressure, sharp bits.
- Softwoods: Higher speeds, less pressure, risk of tear-out.
- End Grain: Use a sacrificial backer board and drill slowly.
3. Preventing Tear-Out
Tear-out happens when wood fibers are ripped out rather than cleanly cut, especially on the exit side of the hole.
- Sacrificial Backer Board: Place a piece of scrap wood underneath your workpiece. Drill through your workpiece and into the backer board. This supports the fibers on the exit side.
- Slow Speed and Gentle Pressure: As you approach the exit side, reduce speed and pressure.
- Drill Halfway and Flip: For very clean holes, drill halfway through from one side, then flip the workpiece over and align the bit with the existing hole from the other side to finish the cut. This is especially effective with spade bits and hole saws.
- Forstner Bits: Their design inherently minimizes tear-out on entry and exit.
4. Safety First!
- Eye Protection: Always wear safety glasses or a face shield.
- Secure Workpiece: Clamp your wood securely. A workpiece that spins can cause serious injury.
- Proper Grip: Maintain a firm grip on your drill. Cordless drills often have auxiliary handles for better control, especially with larger bits.
- Sharp Bits: Dull bits require more force, increase the risk of binding, and produce poorer results. Keep your bits sharp.
- Clear the Area: Ensure your workspace is free of clutter and tripping hazards.
Frequently Asked Questions (FAQ)
Q: What is the easiest way to drill a large hole in wood?
A: For general purposes, a spade bit is often considered the easiest and fastest for drilling bigger holes in wood. If you need a very clean, flat-bottomed hole, a Forstner bit is excellent. For very large diameters, a hole saw is the best choice.
Q: Can I use a regular drill bit to enlarge a hole?
A: Yes, if the new hole size is only slightly larger than the existing one. You can carefully center a slightly larger drill bit (spade or Forstner) into the existing hole and drill slowly to enlarge it. For significant enlargement, dedicated tools like larger bits or hole saws are better.
Q: What is the best bit for making holes in wood for screws?
A: For pilot holes for screws, a standard twist drill bit that matches the screw’s shank diameter is best. If you need a countersink for the screw head, use a countersink bit. For decorative plugs, a wood plug cutter is ideal.
Q: How do I prevent my drill bit from wandering when starting a hole?
A: Mark the center point clearly. You can create a small starter divot with a center punch before drilling. Drilling a small pilot hole first with a thinner bit also helps guide the larger bit. Using a drill press offers the most precise starting point.
Q: My hole saw is binding in the wood. What am I doing wrong?
A: Binding often occurs if you’re drilling too fast, applying too much pressure, or the teeth are dull. Ensure you are using a slow speed, steady pressure, and keeping the drill perpendicular to the wood. Periodically backing out the hole saw to clear debris can also help. Make sure you are using a hole saw specifically designed for wood.
Q: What’s the difference between a spade bit and a Forstner bit?
A: A spade bit has a sharp point and spurs to cut quickly but can cause tear-out. A Forstner bit has a rim that scores the wood for a very clean cut and produces a flat bottom, making it ideal for precision work.
Q: Can I use a step drill bit for wood?
A: Yes, step drill bits can be used in wood, especially for enlarging existing holes or creating precise, clean holes in thinner wood. They are particularly useful for situations where you need exact hole sizes.
By employing these tools and techniques, you can confidently tackle any project requiring hole widening or the creation of larger openings in wood. Remember to choose the right tool for the job, prioritize safety, and practice to achieve the best results.