
Yes, you can drill into porcelain tile, and with the right tools and techniques, it’s a straightforward process. This guide will walk you through how to drill in porcelain, ensuring a clean and precise result every time, whether you’re mounting shelves, installing fixtures, or simply need a hole for any purpose.
Drilling into porcelain might seem daunting. It’s a hard, dense material known for its durability and low porosity, which makes it resistant to water and staining. However, this same hardness means it can chip or crack easily if not drilled correctly. The key to successful porcelain tile drilling lies in using the appropriate drill bits and employing a patient, controlled approach. We’ll cover everything from choosing the right drill bit for drilling porcelain tile to the step-by-step process, along with essential porcelain drilling tips.
This comprehensive guide aims to demystify how to drill tile, making it accessible even for beginners. We’ll explore the best tools for the job, including ceramic drill bits and specialized diamond drill bits for tile. We’ll also touch upon drilling glass tile as many of the principles apply, and discuss why standard masonry bits for tile might not be the ideal choice for porcelain. Get ready to tackle your next project with confidence!
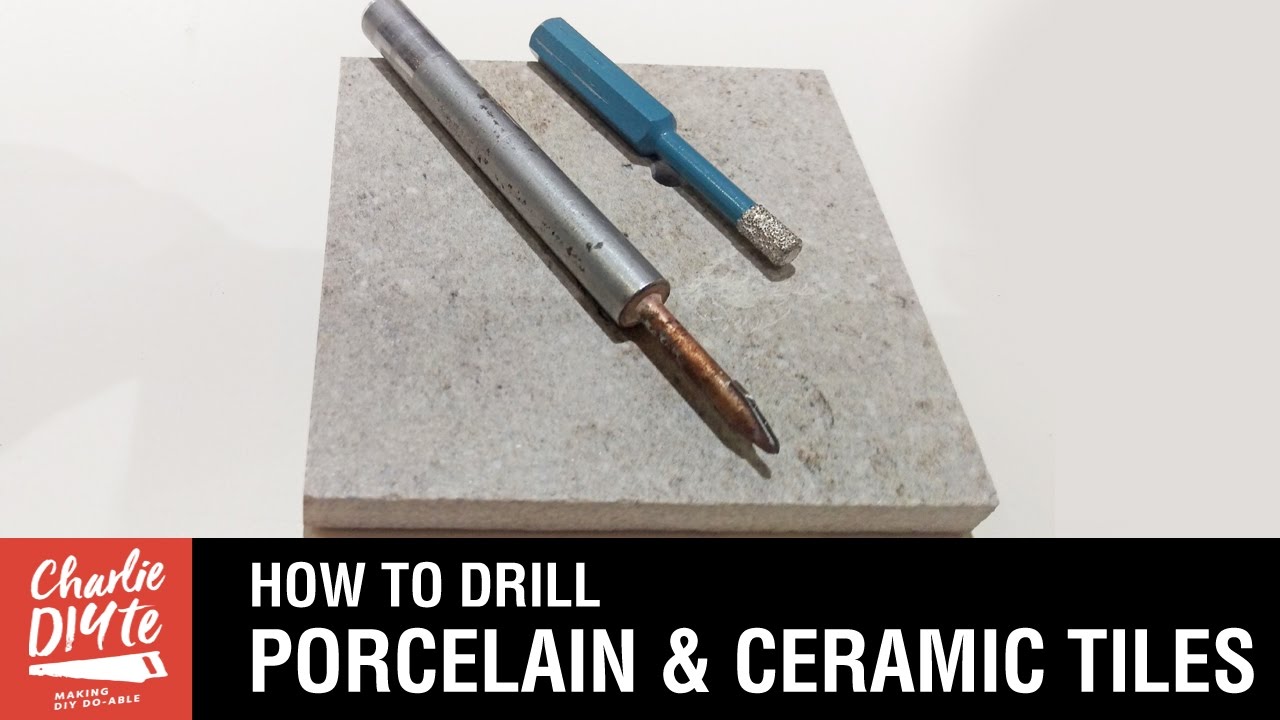
Image Source: i.ytimg.com
Choosing the Right Drill Bits for Porcelain
Selecting the correct drill bit is paramount for successfully drilling holes in ceramic and porcelain. Using the wrong type can lead to shattered tiles, dull bits, and frustration. For porcelain, you need bits designed to cut through extremely hard surfaces.
Diamond Drill Bits: The Premier Choice
When it comes to drilling porcelain tile, diamond-tipped drill bits are the undisputed champions. These bits have a coating of industrial diamonds, the hardest substance known to man, fused to the tip. This allows them to grind through very hard materials like porcelain, granite, and even tempered glass.
- How they work: Instead of cutting like a traditional bit, diamond bits essentially grind away the material. This friction creates dust and heat, which must be managed.
- Types of Diamond Bits for Tile:
- Diamond Hole Saws: These are cylindrical bits that create larger holes. They have a pilot bit in the center to help guide the cut and are excellent for larger diameter holes needed for pipes or vents.
- Diamond-Tipped Spearhead Bits: These are commonly used for smaller holes, like those for screws or wall anchors. They have a pointed tip coated with diamond grit.
- When to use them: Always use diamond bits for drilling porcelain, especially for anything beyond a very small pilot hole. They are also excellent for drilling glass tile.
Ceramic Drill Bits: A Step Up from Standard
Ceramic drill bits are another option for drilling holes in ceramic and some softer porcelain tiles. These bits are often made of hardened steel with a special carbide or diamond coating. While better than standard bits, they may not be as effective or durable on very hard porcelain as pure diamond bits.
- Composition: Typically high-speed steel (HSS) with a tungsten carbide or diamond coating.
- Performance: They can work on ceramic and softer porcelain, but expect slower drilling speeds and potentially a shorter lifespan compared to diamond bits, especially on denser porcelain.
- Consideration: If you only have a few small holes to drill in a softer ceramic tile, these might suffice, but for porcelain, especially thicker or denser varieties, diamond is highly recommended.
Why Not Standard Masonry Bits for Tile?
Standard masonry bits for tile are designed for softer materials like brick, concrete, and some types of softer stone or ceramic. They have a carbide tip that cuts by chipping away at the material.
- Limitations with Porcelain: Porcelain is significantly harder and denser than what standard masonry bits are designed for. Attempting to drill porcelain with a standard masonry bit will likely result in:
- The bit quickly becoming dull.
- Excessive heat buildup, potentially burning out your drill.
- The tile chipping or cracking around the drill point.
- Very slow progress, if any.
- When they might work (with extreme caution): In rare cases, for very small pilot holes in extremely soft, porous “porcelain” that is more akin to a basic ceramic, a masonry bit might start the hole. However, it’s a high-risk strategy, and even then, a specialized bit is far superior.
Essential Tools and Materials
Beyond the drill bits, several other tools and materials will make your porcelain tile drilling experience smoother and safer.
The Drill
- Cordless Drill: A good quality cordless drill with variable speed and torque settings is ideal. Look for one with at least 18 volts for sufficient power.
- Drill Press (Optional but Recommended): For precise, straight holes, especially on larger tiles or when making multiple holes, a drill press offers much greater stability and control than a handheld drill. This is particularly useful for drilling glass tile where accuracy is key.
- Hammer Drill Setting: Do not use the hammer drill setting when drilling porcelain or ceramic tile. This setting uses a hammering action that will shatter the tile. Always use the standard drilling setting.
Cooling and Lubrication
Heat is the enemy when drilling hard materials like porcelain. Excessive heat can:
- Damage the drill bit, reducing its lifespan.
- Cause the tile to crack or spall due to thermal stress.
- Make drilling much slower and more difficult.
To combat this, you need a cooling method.
- Water: The most effective coolant is water. This is why wet drilling porcelain is often recommended, especially for larger holes or when using diamond bits. You can use a spray bottle filled with water to continuously wet the drilling area. For larger jobs or continuous drilling, a spray mister attachment for your drill or a dedicated water feed system can be very helpful.
- Cutting Fluid/Lubricant: A specialized cutting fluid or a simple mixture of water and a few drops of dish soap can help lubricate the bit and carry away heat and debris.
Support and Stability
- Drill Guide or Jig: For precise hole placement and to prevent the bit from wandering, a drill guide or a tile drilling jig is highly recommended. These tools help keep the bit perfectly perpendicular to the tile surface.
- Masking Tape or Painter’s Tape: Applying a few layers of masking tape over the drilling area can help prevent the drill bit from “walking” across the smooth surface when you first start drilling. It also helps to catch some of the initial dust.
- Backing Material: If drilling through a tile that is not yet installed, it’s a good idea to place a piece of scrap wood or plywood underneath it. This supports the tile and prevents the drill bit from snagging and potentially causing the tile to break when it exits the other side.
Safety Gear
- Safety Glasses: Absolutely essential to protect your eyes from flying debris and dust.
- Gloves: Protect your hands from heat and sharp edges.
- Dust Mask: While water helps control dust, it’s still wise to wear a mask, especially if you’re sensitive to dust.
Step-by-Step Guide to Drilling Porcelain Tile
Now that you have your tools and bits, let’s get drilling. Follow these steps carefully for the best results.
Step 1: Preparation and Marking
- Mark the Spot: Using a pencil or a washable marker, clearly mark the exact center of where you want the hole. For precision, you can use a piece of masking tape over the spot and mark the center on the tape.
- Apply Tape: Apply a few layers of masking tape or painter’s tape over the marked spot. This provides a more grippy surface for the drill bit to start on and helps prevent it from skating across the tile.
- Prepare Your Cooling System: Have your spray bottle of water or cutting fluid ready. Ensure you have a way to manage any water runoff, especially if drilling installed tile.
Step 2: Setting Up Your Drill
- Select the Right Bit: Choose your diamond-tipped bit, ensuring it’s the correct size for the hole you need.
- Insert the Bit: Securely insert the drill bit into your drill chuck. Ensure it’s tightened properly.
- Set Drill Settings:
- Speed: Use a slow to medium speed setting. High speeds generate excessive heat and increase the risk of chipping.
- Mode: Ensure your drill is set to the standard drilling mode, NOT hammer drill mode.
Step 3: Starting the Hole
- Positioning: Place the tip of the drill bit precisely on your marked spot. If using a drill guide or jig, ensure it’s firmly in place and aligned with your mark.
- Initial Contact: Begin drilling with very light pressure. Let the bit do the work.
- Coolant Application: As soon as the bit makes contact and starts to spin, begin applying your cooling agent (water or cutting fluid) to the drilling area. Aim to keep the drilling point consistently wet. This is crucial for wet drilling porcelain.
Step 4: Drilling the Hole
- Maintain Slow Speed and Light Pressure: Continue drilling at a slow to medium speed. Apply steady, consistent, but light pressure. Do not force the drill. Forcing it will lead to overheating and potential tile breakage.
- Regularly Lift the Bit: Periodically lift the drill bit slightly out of the hole while it’s still spinning. This helps clear out debris and allows coolant to reach the cutting surface. This also helps prevent the bit from overheating and creating a “glaze” on the porcelain.
- Continue Cooling: Keep the drilling area well-lubricated with water or cutting fluid throughout the process.
- Monitor Progress: Be patient. Drilling through porcelain takes time. You’ll see dust and slurry forming.
Step 5: Exiting the Tile
- Reduce Pressure: As you feel the drill bit is about to break through the other side of the tile, significantly reduce the pressure you are applying.
- Keep Drilling: Continue drilling slowly until the bit completely passes through the tile.
- Support the Exit: If drilling an installed tile, ensure there’s no gap between the tile and the wall behind it. If drilling a loose tile, the backing material will prevent it from breaking on exit.
Step 6: Finishing and Cleanup
- Smooth the Edges: Once the hole is complete, you can use a fine-grit sandpaper or a small diamond file to gently smooth any rough edges inside the hole.
- Clean Up: Clean the tile surface and surrounding area to remove any water, dust, or debris.
- Inspect: Check the hole for any chips or cracks. If you followed the steps carefully, it should be clean and precise.
Porcelain Drilling Tips for Success
Here are some extra tips to help you achieve perfect results and avoid common pitfalls when drilling holes in ceramic and porcelain.
- Patience is Key: This cannot be stressed enough. Rushing the process is the quickest way to damage your tile.
- Start Small: If you’re unsure about your technique, practice on a spare tile or an inconspicuous area first.
- Manage Heat Proactively: Don’t wait for the bit or tile to get hot. Consistent cooling is essential.
- Variable Speed Drills: These are invaluable. Learn to control the speed for different stages of drilling.
- Clean Your Bit: Occasionally remove the bit and rinse it to remove accumulated debris.
- Diamond Hole Saws for Larger Holes: For holes larger than 1/2 inch (12mm), diamond hole saws are generally easier and more efficient than spearhead bits. They also tend to produce a cleaner edge.
- Consider the Tile Thickness: Thicker porcelain tiles will require more time and possibly more coolant.
- Drilling Mounted Tiles: If you’re drilling a tile that’s already installed on a wall or floor, be mindful of what’s behind it. Ensure adequate water containment and cleanup. You might need to place towels or a shallow pan underneath the drilling area.
- Pilot Holes: For larger diameter holes using hole saws, you might find it helpful to first drill a smaller pilot hole with a spearhead bit to guide the hole saw.
Drilling Specific Tile Types
While this guide focuses on porcelain, the principles often apply to other hard tile materials.
Drilling Glass Tile
Drilling glass tile shares many similarities with drilling porcelain, but glass can be even more brittle.
- Bit Choice: Diamond drill bits are essential. Spearhead diamond bits are typically used for glass.
- Cooling: Water cooling is critical to prevent thermal shock and cracking. You can create a small dam around the drilling area with plumber’s putty and fill it with water.
- Pressure and Speed: Use very slow speeds and extremely light pressure.
- Support: Ensure the glass tile is well-supported, especially at the exit point.
- Pilot Hole: A small pilot hole can help guide the bit.
Drilling Ceramic Tile
Ceramic tile is generally softer than porcelain. While diamond bits are still the best choice for guaranteed success and clean holes, some people have success with high-quality carbide-tipped masonry bits or specialized ceramic drill bits for smaller holes in softer ceramic tiles. However, for consistent results and to avoid chipping, diamond bits remain the top recommendation.
Troubleshooting Common Issues
Even with the best preparation, you might encounter minor problems.
Chipping
- Cause: Too much pressure, too high speed, dull bit, or no pilot hole with a hole saw.
- Solution: Reduce pressure, slow down the drill, ensure your bit is sharp, and use a pilot hole or tape for starting.
Overheating
- Cause: Insufficient cooling, drilling too fast, or drilling for too long without lifting the bit.
- Solution: Increase the amount of coolant, slow down the drill speed, and periodically lift the bit to clear debris and allow cooling.
Bit Wandering
- Cause: Starting on a smooth, slippery surface without proper grip.
- Solution: Use masking tape at the start point, or use a drill guide/jig.
Frequently Asked Questions (FAQ)
Here are some common questions people have about drilling porcelain tile.
Q1: Can I use a regular drill bit to drill porcelain tile?
A1: No, regular drill bits (like those for wood or metal) are not designed for porcelain. They will dull instantly and are unlikely to make any progress, potentially damaging both the bit and the tile.
Q2: Do I need a special drill for porcelain tile?
A2: You don’t need a special drill, but a good quality cordless drill with variable speed control is highly recommended. A hammer drill is also suitable as long as the hammer function is turned off.
Q3: How deep do I need to drill into porcelain tile?
A3: You only need to drill through the thickness of the tile itself. The hole depth will be equal to the tile’s thickness.
Q4: What if I chip the tile while drilling?
A4: Minor chipping at the entry or exit point can sometimes be filled with colored epoxy putty or grout, or masked with a decorative element. However, significant chipping usually means the tile needs to be replaced.
Q5: Is wet drilling porcelain necessary?
A5: While not strictly “necessary” for every single small hole, wet drilling porcelain is highly recommended for all drilling tasks. It significantly reduces heat, dust, and the risk of chipping or cracking, leading to cleaner holes and a longer bit life.
Q6: What size drill bit should I use for a screw anchor in porcelain tile?
A6: Check the specifications of your screw anchor. They are usually designed for specific drill bit sizes. Use a diamond-tipped spearhead bit of that exact size.
Q7: Can I drill through porcelain tile and the wall behind it at the same time?
A7: It’s generally best to drill through the tile first, then switch to a masonry bit suitable for the wall material to drill the rest of the hole. Drilling through both simultaneously can cause the drill bit to bind when it hits the wall material after passing through the tile, potentially breaking the tile.
By following these guidelines and using the right tools, you can confidently drill into porcelain tile for any project. Remember to prioritize safety, patience, and proper cooling. Happy drilling!