
Image Source: www.bandsawbladecenter.com
How To Measure A Band Saw Blade Quickly & Easy
Can you measure a band saw blade without removing it? Yes, you can get a good estimate of the band saw blade length without taking it off the saw by measuring the circumference of the wheel system. However, for an exact measurement, it’s best to remove the blade.
Getting the right measurements for your band saw blade is crucial for its performance and longevity. Whether you’re replacing an old blade or setting up a new one, knowing these dimensions ensures proper operation and prevents damage to your saw. This guide will walk you through how to measure your band saw blade quickly and easily, covering all the essential aspects you need to know.
Why Measuring Your Band Saw Blade Matters
Accurate measurements are the foundation of a well-functioning band saw. Here’s why it’s so important:
- Proper Fit: The band saw blade length must precisely match your saw’s specifications. A blade that’s too short won’t reach the drive and guide wheels, while one that’s too long can damage the saw or even be unsafe.
- Optimal Cutting Performance: The band saw blade width affects the radius of the cuts you can make. Wider blades are better for straight cuts and heavy material, while narrower blades excel at intricate curves.
- Durability: Measuring the band saw blade thickness helps ensure you’re using a blade that can handle the material and stresses of your cutting tasks.
- Safety and Efficiency: Correct band saw blade tension is vital for safe operation and clean cuts. An improperly tensioned blade can wander, break, or even snap, posing a safety risk.
- Material Compatibility: The band saw blade material (like carbon steel, bi-metal, or carbide) dictates its suitability for different types of wood, metal, or plastic.
- Blade Type Selection: Knowing your measurements helps you choose the correct band saw blade type, such as skip tooth, hook tooth, or raker tooth, each suited for different materials and cutting styles.
- Tracking and Speed: The band saw blade tracking (how the blade runs on the wheels) is influenced by its dimensions, and proper band saw blade speed depends on the blade’s characteristics and the material being cut.
Essential Band Saw Blade Measurements Explained
Let’s break down the key dimensions you’ll need to measure and why they are important.
1. Band Saw Blade Length
This is the most critical measurement. It dictates whether the blade will fit your specific band saw machine.
How to Measure:
- Direct Measurement (Blade Removed):
- Ensure the band saw is unplugged and the power is off.
- Carefully release the tension on the existing blade using the tension knob or lever.
- Gently remove the old blade from the wheels and guides.
- Lay the blade flat on a clean surface, ensuring it doesn’t twist.
- Use a measuring tape to measure the entire length of the blade from tip to tip of the teeth. Make sure you measure along the toothed edge.
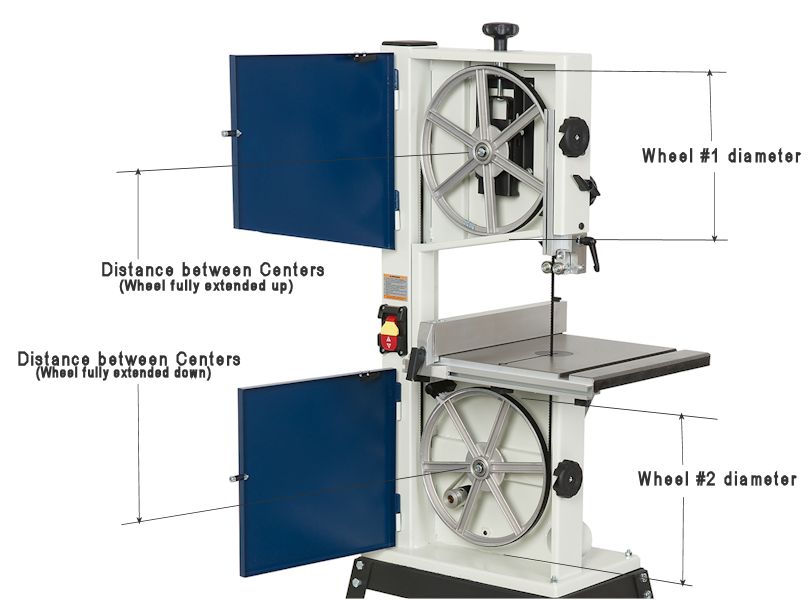
- Estimation Without Removing (Less Accurate):
- Measure the diameter of your upper and lower band saw wheels.
- Measure the distance between the centers of the upper and lower wheels.
- Use a formula: Blade Length ≈ π × (Wheel Diameter) + 2 × (Center Distance) + a few extra inches for overlap. This is a rough estimate and not recommended for purchasing a new blade.
- Consulting Your Saw’s Manual: The easiest and most accurate way is to check your band saw’s owner’s manual. It will list the required band saw blade length for your model.
Example: If your manual says your saw needs a 93.5-inch blade, that’s the length you should look for.
2. Band Saw Blade Width
The width of the blade determines its cutting capabilities, especially for curves.
How to Measure:
- Lay the blade flat on a workbench or table.
- Use a ruler or measuring tape.
- Measure the blade from the very edge of one side to the very edge of the other side, across the width of the metal. Do NOT measure across the teeth.
Table: Band Saw Blade Width Guidelines
| Blade Width (inches) | Cutting Application | Recommended for |
|---|---|---|
| 1/8″ – 1/4″ | Tight curves, intricate scrollwork | Hobbyists, model makers, detailed carving |
| 3/8″ – 1/2″ | Medium curves, general purpose | Woodworking, general cutting |
| 3/4″ – 1″ | Straight cuts, resawing, thicker materials | Cabinet making, lumber milling, heavy stock |
| 1″ and wider | Very thick materials, heavy resawing, ripping | Industrial applications, large timber |
Example: A 1/4-inch blade is great for making small circles, while a 3/4-inch blade is better for cutting a thick piece of lumber straight.
3. Band Saw Blade Thickness
Blade thickness, often referred to as gauge, relates to the blade’s rigidity and resistance to bending.
How to Measure:
- Place the blade on a flat surface.
- Use calipers or a precise ruler to measure the thickness of the metal band itself, not including the teeth.
Table: Band Saw Blade Thickness and Its Impact
| Blade Thickness (inches) | Characteristics | Use Cases |
|---|---|---|
| .020″ – .025″ | Flexible, good for tight curves | Small blades, detailed work |
| .030″ – .035″ | Standard thickness, good balance of flexibility and strength | General woodworking, moderate curves |
| .042″ – .045″ | More rigid, less prone to bending | Resawing, thicker materials, straight cuts |
Example: A thinner blade (.025″) will flex more easily around a tight curve, while a thicker blade (.042″) will stay straighter during a heavy cut.
4. Band Saw Blade Number of Teeth & Teeth Per Inch (TPI)
The number of teeth and their spacing (TPI) significantly influence the cutting speed and finish.
How to Measure TPI:
- Lay the blade flat.
- Use a ruler marked with inches.
- Count the number of teeth within a 1-inch section of the blade.
- This count is your band saw blade teeth per inch (TPI).
Table: TPI and Cutting Performance
| TPI Setting | Teeth Count (per inch) | Cut Quality | Cutting Speed | Best For |
|---|---|---|---|---|
| Low TPI (2-4) | Fewer teeth | Rougher finish, faster removal | Fast | Softwoods, resawing, thick materials, rough cutting |
| Medium TPI (6-8) | Moderate teeth | Good balance of finish and speed | Moderate | General woodworking, hardwoods, moderate thickness materials |
| High TPI (10-14) | More teeth | Smoother finish, slower removal | Slow | Thin materials, veneers, plastics, metal, fine cuts |
Example: A blade with 6 TPI will cut faster but leave a rougher surface than a blade with 14 TPI, which will cut slower but leave a very smooth finish.
5. Band Saw Blade Material
The material the blade is made from affects its durability, heat resistance, and ability to cut specific materials.
How to Identify:
- Markings on the Blade: Many blades have markings etched or printed on them indicating the band saw blade material. Look for labels like “High Carbon Steel,” “Bi-Metal,” or “Carbide Tipped.”
- Color and Appearance: Carbon steel blades are typically silver or gold. Bi-metal blades often have a distinct colored (usually brown or bronze) back and a silver or gray cutting edge. Carbide blades have visible carbide teeth brazed onto the blade.
- Consult Manufacturer Specifications: If you can identify the manufacturer, their website or product packaging will detail the material.
Table: Common Band Saw Blade Materials
| Material | Properties | Best For |
|---|---|---|
| High Carbon Steel | Flexible, affordable, sharpens easily, prone to dulling quickly | Softwoods, intermittent metal cutting, general purpose, light duty |
| Bi-Metal | Combines high-speed steel teeth with a flexible spring steel back, durable | Hardwoods, exotic woods, metal, plastics, extended use, general purpose |
| Carbide Tipped | Extremely hard and durable teeth, excellent heat resistance | Abrasive materials, very hard woods, exotic woods, high-volume production |
Example: If you’re cutting a lot of metal, a bi-metal or carbide-tipped blade is a much better choice than a standard carbon steel blade.
6. Band Saw Blade Type
The tooth configuration, or band saw blade type, is designed for specific cutting tasks.
Common Types:
- Skip Tooth: Wider gullets (space between teeth) allow for faster cutting and better chip clearance, ideal for softer woods and plastics.
- Hook Tooth: Aggressive tooth angle that “hooks” into the material, providing fast and efficient cuts in hardwoods and general woodworking.
- Raker Tooth: Alternating teeth angled left and right, with a tooth set back in the middle. This provides straighter cuts and good chip clearance, suitable for a variety of materials.
- Wood Cutting Blades: Often have a lower TPI and wider gullets.
- Metal Cutting Blades: Typically have higher TPI and are made from bi-metal or carbide for durability and heat resistance.
How to Identify: Visually inspect the tooth shape and spacing. The TPI count is also a strong indicator.
Example: A skip tooth blade is good for cutting through a lot of soft pine quickly, while a hook tooth blade will perform better when ripping hardwood.
Ensuring Correct Band Saw Blade Tension
Proper band saw blade tension is critical for both safety and cutting accuracy. An under-tensioned blade can wander, cause poor cuts, and even break. An over-tensioned blade can snap prematurely or damage the saw’s bearings and guides.
How to Check Tension:
- Visual Inspection (Guide Tension): Look at the blade when it’s running. It should run smoothly without excessive side-to-side wobble. The guides should be snug against the blade without binding it.
- Auditory Clues: A properly tensioned blade will produce a clear, ringing sound when plucked gently. An under-tensioned blade will sound dull or thud-like.
- Tension Gauge (Recommended): Many band saws have a built-in tension indicator or a dial. Refer to your saw’s manual for the recommended setting. For saws without one, a dedicated band saw blade tension gauge is available. These devices measure the force applied to the blade.
- “Hickory Stick” Method (Classic Woodworking): With the saw off and the blade under tension, gently flick the blade with your finger. A properly tensioned blade will feel stiff. You can also try bending the blade slightly with your thumb; it should spring back firmly.
Adjusting Tension:
Most band saws have a tensioning knob or lever, usually located at the top of the saw frame. Turn it clockwise to increase tension and counter-clockwise to decrease it. Always make small adjustments and re-check.
Band Saw Blade Tracking
Band saw blade tracking refers to how the blade is centered on the band saw wheels. Correct tracking ensures the blade runs straight and true.
How to Adjust Tracking:
- Loosen Guides: Slightly back off the blade guides.
- Apply Light Tension: Apply just enough tension to hold the blade in place.
- Run the Saw Slowly: Turn the wheels by hand or run the saw at a very slow speed.
- Observe Blade Position: Watch where the blade sits on the wheels.
- If the blade is running towards the front edge of the wheels, you need to adjust the upper wheel tracking towards you (usually by turning a knob or bolt on the upper guide assembly).
- If the blade is running towards the back edge of the wheels, you need to adjust the upper wheel tracking away from you.
- Center the Blade: Aim to have the blade centered on the crown of the wheels. The teeth should be just clearing the front edge of the upper wheel.
- Apply Full Tension: Once tracked, apply the proper band saw blade tension.
- Re-check Guides: Adjust the side and thrust guides to be very close to the blade (almost touching but not rubbing) to prevent wobble.
- Test Cut: Make a test cut on scrap material to confirm the blade is tracking correctly.
Understanding Band Saw Blade Speed
Band saw blade speed is measured in feet per minute (FPM) and is determined by the motor’s RPM and the diameter of the band saw wheels. The correct speed is crucial for efficient cutting and extends blade life.
General Guidelines:
- Faster Speeds: For softwoods and general cutting.
- Slower Speeds: For hardwoods, metal, and plastics.
How to Determine:
Many modern band saws have variable speed controls. Consult your band saw’s manual for recommended speeds based on the material you are cutting and the type of blade you are using. A general rule of thumb:
- Softwoods: 3000-4000 FPM
- Hardwoods: 2000-3000 FPM
- Metals: 100-300 FPM (requires specific metal-cutting blades and often coolant)
Measuring a Band Saw Blade: A Quick Summary
Here’s a concise checklist for measuring your band saw blade:
- Safety First: Always unplug the band saw before handling the blade.
- Release Tension: Loosen the blade tension.
- Remove Blade: Carefully take the blade off the wheels.
- Measure Length: Lay the blade flat and measure tip-to-tip along the teeth.
- Measure Width: Use a ruler to measure the width of the metal band.
- Measure Thickness: Use calipers or a precise ruler to measure the metal thickness.
- Determine TPI: Count the teeth in one inch.
- Identify Material: Check markings, color, or consult documentation.
- Note Blade Type: Visually inspect tooth geometry.
By following these steps, you can quickly and accurately measure your band saw blade, ensuring you select the correct replacement and maintain optimal performance from your machine. Proper maintenance and measurement are key to safe and efficient woodworking.
Frequently Asked Questions (FAQ)
Q1: How do I know if my band saw blade is dull?
A: A dull blade will require more force to push through material, leave rough or burn marks, wander off your cut line, or produce a lot of sawdust instead of chips.
Q2: Can I use a longer or shorter blade than recommended?
A: No, using a blade of the wrong band saw blade length is dangerous. Too short, and it won’t engage the wheels properly. Too long, and it could damage the saw or break. Always use the length specified in your saw’s manual.
Q3: What happens if my band saw blade tension is too loose?
A: An under-tensioned blade will wander, make inaccurate cuts, vibrate excessively, and can even come off the wheels, which is a serious safety hazard.
Q4: How often should I replace my band saw blade?
A: This depends heavily on usage, the material cut, and the band saw blade material. For general woodworking, a blade might last anywhere from several months to over a year. For heavy use or cutting abrasive materials, replacement will be more frequent. Pay attention to the blade’s sharpness and cutting performance.
Q5: Does the color of the band saw blade mean anything?
A: Yes, the color can often indicate the band saw blade material. For example, high-carbon steel blades are often silver or gold, while bi-metal blades may have a colored back (like bronze or brown) and a silvery cutting edge. Carbide-tipped blades are easily identified by the visible carbide teeth.
Q6: What is the best TPI for cutting plywood?
A: For cutting plywood, a blade with a band saw blade teeth per inch (TPI) of 8 to 10 is generally recommended. This provides a good balance between cutting speed and a smooth finish, minimizing tear-out on the veneer.
Q7: How do I clean my band saw blade?
A: You can clean a band saw blade by wiping it down with a soft cloth and a mild degreaser or solvent to remove sap and resin buildup. For tougher grime, you can soak the blade in a suitable cleaner, but always ensure it’s thoroughly dried before re-tensioning and using it.