
A band saw is a powerful tool for cutting wood, metal, and other materials. Can you resaw on a band saw? Yes, band saws are excellent for resawing lumber to create thinner boards. Who is a band saw for? It’s a versatile tool for woodworkers, metalworkers, and DIY enthusiasts. Mastering its use involves understanding band saw basics, proper band saw safety, and effective techniques.
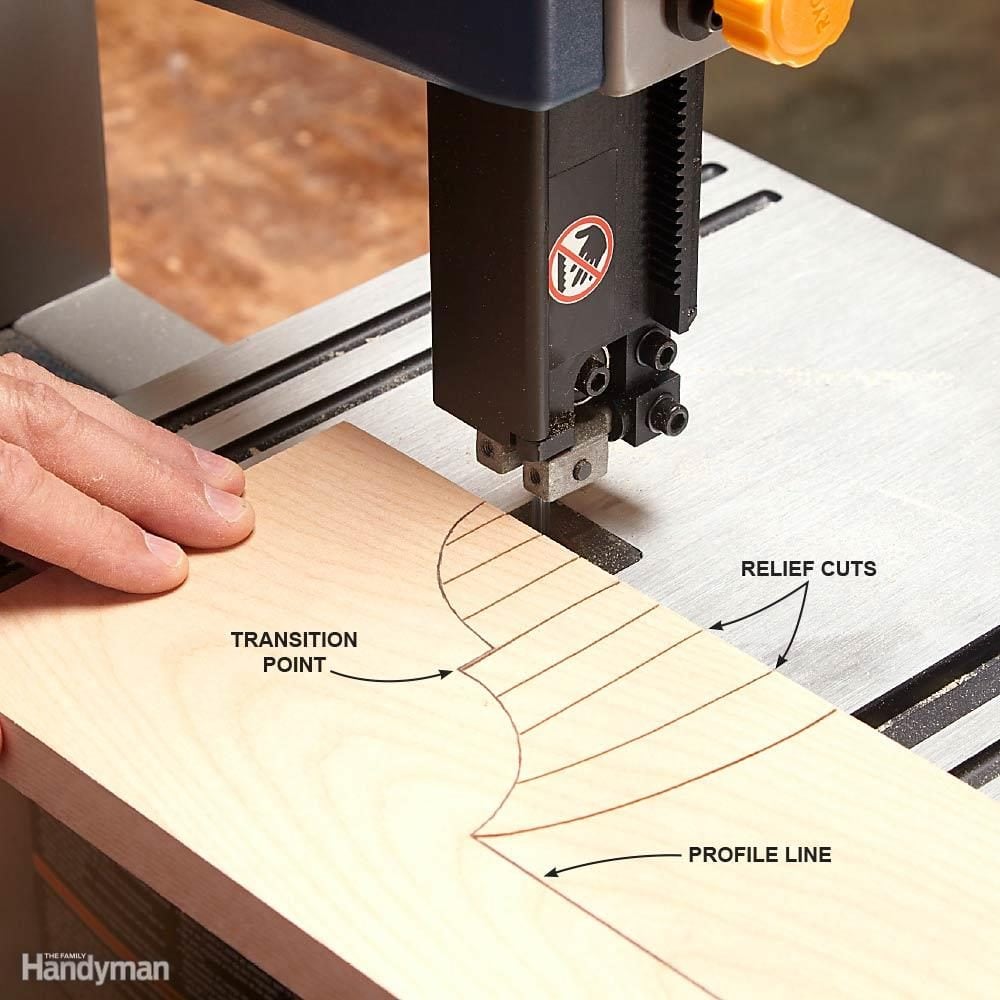
Image Source: www.familyhandyman.com
Getting Started with Your Band Saw
Before you even think about cutting, it’s crucial to get to know your band saw. This includes its parts, how they work, and what adjustments you can make.
Key Band Saw Components
- Table: This is where you place your material. It can often tilt for angled cuts.
- Blade Guides: These support the band saw blade to keep it running straight. There are usually upper and lower guides.
- Blade Tension Control: This knob adjusts how tight the band saw blade is. Proper tension is vital for accurate cuts and preventing the blade from jumping off.
- Wheels: These drive the band saw blade. They are covered with rubber tires that grip the blade.
- Motor: This powers the wheels and the blade.
- Fence: A guide attached to the table that helps you make straight, consistent cuts.
- Miter Gauge: Used for making angled cuts across the table.
- Dust Port: Connects to a dust collection system to remove sawdust.
Band Saw Safety First
Safety is paramount when operating any power tool, and a band saw is no exception. Ignoring safety can lead to serious injury.
Personal Protective Equipment (PPE)
- Safety Glasses: Always wear safety glasses or a face shield. Flying debris is a common hazard.
- Hearing Protection: Band saws can be loud. Earplugs or earmuffs protect your hearing.
- Dust Mask or Respirator: Sawdust can be harmful to inhale. Wear a mask, especially when cutting materials that produce fine dust.
- Appropriate Clothing: Avoid loose clothing, jewelry, or anything that could get caught in the blade. Tie back long hair.
- Gloves: While not always recommended for certain cutting operations where hand contact with the material near the blade is necessary, gloves can protect your hands from splinters and rough edges when handling materials. However, be cautious with gloves as they can sometimes snag.
Safe Operating Practices
- Read the Manual: Every band saw is slightly different. Familiarize yourself with your specific model’s manual.
- Keep the Area Clean: A tidy workspace reduces tripping hazards and makes it easier to focus.
- Proper Lighting: Ensure your work area is well-lit.
- Never Reach Over the Blade: Keep your hands and body away from the blade’s path.
- Turn Off When Not in Use: Always turn off the band saw and wait for the blade to stop completely before making adjustments, changing blades, or cleaning.
- Disconnect Power: For maintenance or blade changes, always unplug the tool.
- Know Your Limits: Don’t try to force the material. Let the blade do the work.
- No Distractions: Avoid talking on the phone or engaging in conversations while operating the saw.
- Blade Guard: Ensure the blade guard is in place and adjusted correctly.
Band Saw Blade Selection: The Key to Success
Choosing the right band saw blade is crucial for the type of material you’re cutting and the desired result. Different blade types and tooth configurations are designed for specific tasks.
Blade Types
- General Purpose Blades: These are the most common and are suitable for a wide range of wood cutting tasks.
- Resaw Blades: Wider blades with fewer teeth per inch (TPI) are ideal for resawing lumber. Their width provides stability for long, straight cuts, and fewer teeth reduce clogging and heat buildup.
- Scroll/Jigsaw Blades: These are very narrow blades designed for intricate curves and detailed work.
- Metal Cutting Blades: These blades have finer teeth and are designed to cut through metal. They often have specific speed requirements.
- Carbide-Tipped Blades: These blades offer superior durability and sharpness, making them ideal for cutting hardwoods, abrasive materials, and for extended resawing operations.
Tooth Configurations and TPI
- Teeth Per Inch (TPI):
- Low TPI (2-3 TPI): Best for thicker materials and faster cuts, like resawing. They remove material quickly and prevent clogging.
- Medium TPI (4-10 TPI): Good all-around for general woodworking.
- High TPI (10+ TPI): Ideal for thin materials, plywood, and smooth finish cuts. Fewer teeth mean a cleaner cut but slower progress.
- Tooth Shape:
- Hook Tooth: Aggressive tooth with a curved face, good for fast cutting and resawing.
- Skip Tooth: Wider spacing between teeth, with rounded gullets. Prevents clogging, excellent for softwoods and resawing.
- Regular Tooth: Evenly spaced teeth, good for general purpose cutting.
Blade Width and Its Impact
- Wide Blades: Offer stability and are essential for straight cuts, resawing, and ripping. They are less flexible and cannot make tight curves.
- Narrow Blades: Allow for tight turns and intricate scroll cutting band saw patterns. They are less stable for long, straight cuts.
Blade Material
- Carbon Steel: The most common and affordable. Good for general use.
- Bi-Metal: Combines a flexible steel back with hard high-speed steel (HSS) teeth. More durable and can cut harder materials.
- Carbide Tipped: The most durable and can cut very hard materials and abrasive woods. They are also the most expensive.
Making Essential Band Saw Adjustments
Before you start cutting, ensure your band saw is properly adjusted for optimal performance and safety. This involves setting up the blade guides and checking the blade tension.
Blade Tensioning
Proper band saw blade tension is critical. Too loose, and the blade can wander or even come off the wheels. Too tight, and you can break the blade or put excessive stress on the saw’s components.
- How to Check Tension: Most band saws have a tension indicator. If not, a good rule of thumb is to apply light pressure to the side of the blade at its widest point. It should deflect slightly but not bend easily.
- Tensioning Process:
- Ensure the saw is unplugged.
- Adjust the tensioning knob, typically located at the top of the saw.
- Turn the knob until the blade is taut.
- Check the indicator or use the deflection test.
- For resawing on a band saw, a slightly higher tension might be beneficial for blade stability.
Adjusting the Blade Guides
The blade guides prevent the blade from twisting or tilting during a cut. They should support the blade without rubbing against its sides.
Lower Blade Guides
- Bearing Guides: These use small bearings that the blade runs against.
- Adjustment: The guide blocks should be positioned so they are just touching the sides of the blade when the saw is running. There should be a slight gap between the back of the blade and the thrust bearing behind it.
- Process:
- With the saw unplugged, position the side guides so they are almost touching the blade.
- Adjust the thrust bearing so it is about the thickness of a piece of paper away from the back of the blade. This prevents the blade from being pushed backward.
- Repeat for the upper guides.
Upper Blade Guides
- Adjustment: Similar to the lower guides, the upper guides should support the blade without creating friction. The side guides should be set just touching the blade, and the thrust bearing should be slightly behind it.
- Height Adjustment: The upper blade guides should be positioned so the bottom of the guide assembly is about 1/4 inch above the highest point of the wood being cut. This allows for workpiece movement while still providing support.
Setting the Band Saw Fence
A band saw fence is a crucial accessory for making repetitive, straight cuts. Correct band saw fence setup ensures accuracy and safety.
- Positioning: The fence should be parallel to the blade.
- Alignment:
- Ensure the saw is unplugged.
- Place a straight piece of wood or a ruler against the blade and slide it to the fence.
- Adjust the fence so it is perfectly parallel to the blade along its entire length.
- Tighten the fence securely.
- Offset for Blade Width: For ripping or resawing, you’ll often set the fence so the waste side of the cut is on the blade’s side. This means the fence is set slightly wider than the blade.
Cutting Different Materials Band Saw Techniques
The band saw is incredibly versatile, capable of cutting a variety of materials when the correct blade and techniques are employed.
Cutting Wood
- Straight Cuts (Ripping): Use a fence to guide the wood parallel to the blade. Feed the wood smoothly and steadily.
- Crosscuts: Use a miter gauge or a homemade crosscut jig for accurate angles. Never use the fence for crosscuts, as the blade can bind.
- Curves and Circles: Use a narrow blade and feed the workpiece slowly, turning it to follow the desired curve. For perfect circles, use a circle-cutting jig. Scroll cutting band saw techniques rely on the maneuverability of narrow blades.
- Resawing: This involves cutting a board lengthwise to make it thinner.
- Use a wide blade (e.g., 1/2 inch or wider) with a lower TPI (2-3 TPI).
- Set the blade guides to support the blade firmly.
- Ensure the blade is tensioned properly.
- Feed the wood steadily, keeping it against the fence or a resaw guide.
- Let the blade do the work; don’t force it.
- Be aware of blade drift; you may need to make slight adjustments to the fence or feed angle to compensate.
Cutting Metal
- Blade Choice: Use a metal-cutting band saw blade with appropriate TPI for the metal thickness.
- Speed: Metal cutting often requires a slower blade speed. Many band saws have variable speed controls. If yours doesn’t, you might need a specialized metal-cutting band saw.
- Coolant: Use a cutting fluid or coolant to lubricate the blade and prevent overheating, which can dull the blade quickly.
- Feed Rate: Feed the metal slowly and steadily. Let the blade cut, don’t force it.
- Support: Ensure the metal is well-supported on the band saw table.
Cutting Other Materials
- Plastics: Use a sharp blade designed for plastic or a general-purpose wood blade with higher TPI. Avoid overheating, which can melt the plastic. Use a slow feed rate and consider using a cooling spray.
- Foam: Use a skip-tooth blade for a cleaner cut. Feed the foam slowly to prevent tearing.
Advanced Band Saw Techniques
Once you’re comfortable with the basics, you can explore more advanced applications.
Resawing on a Band Saw
Resawing is a primary function for many band saw users. It allows you to turn thicker lumber into thinner boards, which is economical and useful for specific projects.
Blade and Setup for Resawing
- Blade Width: The wider, the better for stability. Aim for at least 1/2 inch, with 3/4 inch or 1 inch being ideal for larger saws.
- TPI: Low TPI (2-3 TPI) is essential for resawing. This creates larger gullets to clear sawdust and reduces friction and heat buildup, preventing blade stalling.
- Blade Tension: Higher tension than for general cutting contributes to blade stability and straightness.
- Blade Guides: Set the guides snugly, with the side guides nearly touching the blade and the thrust bearing providing support behind it.
- Fence Setup: A good fence is critical. Ensure it is perfectly parallel to the blade. Consider a fence with a slight offset to account for blade drift.
Resawing Process
- Mark Your Cut: Clearly mark the desired thickness on your lumber.
- Set the Fence: Position the fence to guide the lumber. The distance from the fence to the blade should be slightly more than the thickness of your lumber if you are cutting from one edge. Alternatively, some users prefer to center the lumber under the blade and feed it through without a fence, relying on skill and practice.
- Feed the Material: Place the lumber flat on the table and against the fence (if used). Start the saw and wait for the blade to stabilize. Gently feed the lumber into the blade.
- Maintain Control: Keep the lumber firmly against the table and fence. Use push sticks or blocks for support and control, especially as the board gets thinner.
- Blade Drift: Be aware that blades can drift slightly during a cut. You may need to make small adjustments to the feed angle to keep the cut straight. Practice will help you develop a feel for this.
- Cooling and Lubrication: For hardwoods or prolonged resawing, a spray lubricant can help reduce friction and extend blade life.
Scroll Cutting Band Saw Applications
Scroll cutting is the art of making intricate curves and shapes. This is where a band saw truly shines.
Tools for Scroll Cutting
- Narrow Blades: The key to scroll cutting is a very narrow blade, typically 1/8 inch or 1/4 inch wide.
- Blade Tension: Proper tension is still important, but extremely narrow blades might require slightly less tension than wider ones.
- Blade Guides: Set the guides as close to the blade as possible without rubbing.
- No Fence: Never use the band saw fence for scroll cutting.
- Miter Gauge: Can be used for gentle curves, but freehand cutting is common.
Scroll Cutting Techniques
- Draw Your Pattern: Clearly draw your desired curve on the workpiece.
- Feed and Turn: Start the saw and feed the wood slowly. As you approach a curve, gently turn the workpiece. The narrower the blade, the tighter the curve you can make.
- Backing Out: If you need to back out of a cut, turn the saw off, wait for the blade to stop, and then carefully back the workpiece out. Trying to back out while the blade is still moving can break the blade or cause injury.
- Multiple Cuts: For tight curves, you can make a series of relief cuts from the edge of the material into the waste area of the curve. This allows you to turn the workpiece more easily.
- Blade Breakage: It’s not uncommon for very narrow blades to break, especially with aggressive turning. Always maintain good band saw safety practices and be prepared.
Band Saw Troubleshooting: Solving Common Issues
Even with proper setup and operation, you might encounter problems. Here’s how to address them.
Blade Wobble or Drift
- Cause: Insufficient blade tension, improperly adjusted blade guides, worn bearings, or using a blade that is too narrow for the cut.
- Solution:
- Increase blade tension.
- Adjust blade guides to be snug against the blade.
- Check and replace worn bearings.
- Use a wider blade for straighter cuts.
- For resawing, ensure the fence is parallel and consider a slight offset.
Blade Comes Off the Wheels
- Cause: Too much blade tension, improperly adjusted blade guides, worn tires, or the blade is not seated correctly on the wheels.
- Solution:
- Reduce blade tension.
- Ensure blade guides are properly aligned and adjusted.
- Check for wear on the rubber tires and replace if necessary.
- Make sure the blade is centered on the wheels.
Burning Wood
- Cause: Dull blade, blade tension too low, blade guides set too tight, or feeding the material too slowly.
- Solution:
- Sharpen or replace the blade.
- Increase blade tension.
- Slightly loosen the blade guides.
- Increase your feed rate.
Chattering or Rough Cuts
- Cause: Dull blade, incorrect TPI for the material, or blade guides too loose.
- Solution:
- Replace the blade.
- Use a blade with an appropriate TPI.
- Adjust blade guides to be snug.
Motor Overheating or Tripping Breaker
- Cause: Dull blade, forcing the material, or the motor is undersized for the task (especially for continuous resawing or cutting hard materials).
- Solution:
- Ensure the blade is sharp and the correct type.
- Feed the material at a proper rate; don’t force it.
- Consider a more powerful band saw if you frequently perform heavy-duty tasks.
Band Saw Maintenance: Keeping Your Tool in Top Shape
Regular maintenance is key to ensuring your band saw operates safely and efficiently and prolongs its lifespan.
Regular Cleaning
- After Each Use:
- Brush or vacuum sawdust from the table, guides, wheels, and enclosure.
- Wipe down the table to prevent rust and ensure smooth material movement.
- Deep Cleaning: Periodically, you’ll want to do a more thorough cleaning.
- Unplug the saw.
- Remove the blade.
- Clean the wheels thoroughly to remove rubber buildup and accumulated dust, which can affect tracking and performance.
- Clean the dust collection port and internal cabinet.
Blade Care
- Sharpening: While many users replace blades rather than sharpen them, if you have metal blades, professional sharpening is an option. Carbide-tipped blades can be sharpened multiple times.
- Storage: Store blades properly to prevent damage and rust.
- Inspection: Before and after each use, inspect blades for bent teeth, cracks, or missing teeth.
Tire Inspection and Replacement
- Wear: Rubber tires on the band saw wheels wear out over time. Check for cracks, nicks, or excessive wear.
- Replacement: Worn tires can cause blade slippage and poor tracking. Replace them according to the manufacturer’s instructions.
Lubrication
- Moving Parts: Periodically lubricate any moving parts, such as the trunnions (if your table tilts) or the fence locking mechanism, with a light machine oil or grease as recommended by your manual.
Electrical Checks
- Cord and Plug: Inspect the power cord and plug for any damage.
- Connections: Ensure all electrical connections are secure.
Frequently Asked Questions (FAQ)
What is the difference between a band saw and a jigsaw?
A band saw uses a continuous loop blade, while a jigsaw uses a short, reciprocating blade. Band saws are generally more powerful and stable, making them suitable for larger projects and resawing. Jigsaws are more portable and designed for intricate cutting and detail work, often in smaller pieces.
Can I cut metal with a standard wood band saw?
While some wood band saws can cut thin metal with the correct blade and slower speeds, it’s not ideal. Dedicated metal-cutting band saws have slower speed ranges and often more robust construction. Pushing a wood band saw too hard on metal can damage the motor, blade, and tires.
How do I set the blade guides correctly?
The side guides should be adjusted to be just kissing the sides of the blade. The thrust bearing behind the blade should have a tiny gap – about the thickness of a piece of paper – to prevent friction while still supporting the blade.
My band saw blade keeps drifting. What can I do?
Check your blade tension, ensure the blade guides are properly adjusted, and verify that the wheel tires are in good condition. If the problem persists, you might be using a blade that is too narrow for the task or experiencing blade drift, which is common in resawing and may require subtle feed adjustments.
How often should I replace my band saw blade?
This depends heavily on the material you’re cutting and how much you use the saw. For general woodworking, a blade might last for many hours of use. For resawing hardwoods or cutting abrasive materials, blades will dull much faster. Always replace a blade if you notice burning, rough cuts, or difficulty cutting.
Is it safe to cut small pieces on a band saw?
Cutting very small pieces on a band saw can be dangerous. Always use push sticks or specialized jigs to keep your hands away from the blade. If a piece is too small to safely guide, it’s better to find an alternative cutting method.
By following these guidelines for band saw basics, safety, blade selection, adjustments, and maintenance, you can use your band saw effectively and safely for a wide range of projects.