
Can you drill holes in sea glass for jewelry? Yes, you absolutely can drill holes in sea glass for jewelry, and with the right tools and techniques, it’s a rewarding process that unlocks a world of creative possibilities. This guide will walk you through everything you need to know to successfully and safely drill holes in your precious sea glass finds, transforming them into unique and beautiful jewelry pieces.
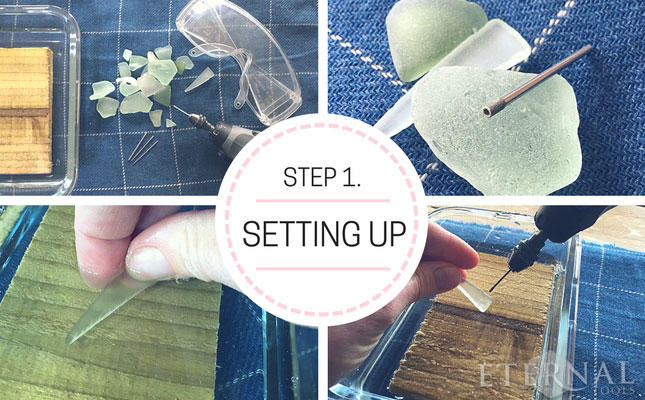
Image Source: cdn.ecommercedns.uk
Getting Started: The Essential Tools for Sea Glass Drilling
Before you begin your sea glass drilling adventure, gather the necessary equipment. Having the right tools makes all the difference, ensuring a smooth process and preventing frustration.
Choosing Your Drill Bits
The most crucial element for sea glass drilling is selecting the correct drill bits. You won’t be using standard metal drill bits for this task.
Diamond Drill Bits: The Gold Standard
For drilling into glass, especially something as delicate as sea glass, diamond drill bits are the undisputed champions. These bits have a tip coated or impregnated with diamond particles, which are incredibly hard and abrasive. This hardness allows them to grind through the glass rather than cutting it, which is essential for preventing cracks and chips.
-
Types of Diamond Drill Bits:
- Hole Saw Style: These are often cup-shaped with diamond grit along the rim. They are excellent for creating larger holes.
- Needle/Spear Point Style: These are thinner and pointed, ideal for drilling small holes, such as those needed for delicate bails or jump rings.
- Cylindrical/Ball Nose: These can be used for shaping or creating recessed areas, though less common for simple hole drilling in sea glass.
-
Diamond Drill Bit Sizes:
- For most jewelry applications, you’ll want a range of sizes. Common sizes for bails and jump rings are 1mm, 1.5mm, 2mm, and 3mm.
- Larger bits can be used for creating focal points or for incorporating multiple strands.
-
Diamond Drill Bit Quality:
- Invest in good quality diamond drill bits. Cheaper bits may have uneven diamond coating, dull quickly, or break easily, leading to damaged sea glass. Look for bits specifically designed for glass or tile.
Powering Your Drilling: Rotary Tools and More
You’ll need a way to spin your diamond drill bits. Several options are available, each with its pros and cons.
The Rotary Tool (Dremel)
A rotary tool, like a Dremel, is the most popular and versatile choice for sea glass drilling. These handheld tools offer variable speed settings, which are essential for controlling the drilling process.
-
Benefits of a Rotary Tool:
- Portability: Easy to handle and maneuver.
- Variable Speed: Crucial for preventing overheating and glass breakage. Lower speeds are generally better for glass.
- Versatility: Can be used with a wide range of accessories beyond drill bits.
-
Choosing a Rotary Tool:
- Look for a model with a comfortable grip and a good range of speed settings. Corded models generally offer more consistent power than cordless ones.
Drill Press with Glass Drilling Attachment
For a more stable and precise drilling experience, especially for larger or more numerous pieces, a drill press can be beneficial.
-
Benefits of a Drill Press:
- Stability: Holds the drill bit steady, reducing the risk of wobbling and breaking.
- Precision: Allows for consistent hole placement and depth.
- Reduced Fatigue: Takes the physical effort out of holding the tool.
-
Considerations:
- You’ll need a specific glass drilling attachment or a specialized chuck that can securely hold small drill bits.
Handheld Electric Drill (with caution)
While a standard handheld electric drill can be used, it’s generally less ideal for delicate sea glass drilling due to the difficulty in controlling speed and the tendency for the bit to wander. If you must use one, ensure it has a variable speed trigger and use the lowest setting possible.
Essential Accessories for Safe and Effective Drilling
Beyond the drill and bits, a few other items are vital for a successful and safe drilling session.
Water Lubrication System
This is arguably the second most important element after the drill bits. Water is crucial for:
- Cooling: Prevents the drill bit and the sea glass from overheating. Overheating can cause the glass to crack or the diamond coating on the bit to wear out prematurely.
- Lubrication: Reduces friction, making the drilling process smoother.
- Dust Control: Washes away glass dust and particles, keeping your workspace cleaner and safer.
Methods for Water Lubrication:
- Small Container of Water: Place the sea glass in a small container filled with water. As you drill, the glass will be submerged.
- Water Drip System: Use a plastic squeeze bottle with a narrow tip to continuously drip water onto the drilling point.
- Specialized Drill Press Setup: Drill presses can be fitted with water reservoirs and pumps for continuous lubrication.
Safety Gear: Non-Negotiable!
Working with glass and power tools demands strict adherence to safety protocols.
- Safety Glasses: ALWAYS wear safety glasses that fully cover your eyes. Tiny glass shards can fly off unexpectedly.
- Gloves: Wear sturdy gloves to protect your hands from sharp edges and potential slips.
- Dust Mask: Even with water lubrication, fine glass dust can be present. A dust mask protects your lungs.
- Stable Work Surface: Ensure your work area is stable and free of clutter.
Other Helpful Items
- Masking Tape or Painter’s Tape: Applying tape to the sea glass where you plan to drill can help prevent the drill bit from wandering and create a more stable starting point.
- Center Punch (Optional): For very smooth glass, a light tap with a center punch can create a small indentation to guide the drill bit initially, though this is rarely necessary with diamond bits.
- Towel or Paper Towels: For cleaning up water and glass particles.
- Vice or Clamps: To hold the sea glass securely, especially if you’re not using a drill press.
Mastering the Drilling Techniques
Now that you have your tools, let’s dive into the actual drilling techniques for sea glass. Patience and a gentle touch are key.
Step-by-Step Drilling Process
-
Prepare Your Workspace:
- Set up your rotary tool or drill press.
- Fill your water container or prepare your drip system.
- Ensure good lighting.
- Put on all your safety gear.
-
Secure the Sea Glass:
- If using a handheld tool, place the sea glass in a small container of water. You can also use a small vice or clamps to hold the glass, but ensure the jaws are padded to prevent damage.
- If using a drill press, secure the sea glass firmly on the base plate, ensuring it’s stable.
-
Mark Your Hole Location (Optional but Recommended):
- For precise placement, you can lightly mark the desired spot with a permanent marker. For very smooth glass, a small piece of masking tape can help the bit grip.
-
Set Up Your Drill Bit and Speed:
- Securely attach the chosen diamond drill bit to your rotary tool or drill press.
- Set your rotary tool to a low to medium speed. A good starting point is around 10,000-15,000 RPM for most sea glass drilling tasks. Avoid the highest speeds, which generate more heat and friction.
-
Begin Drilling:
- Lubrication is Key: Ensure the area where you are drilling is well-lubricated with water.
- Gentle Pressure: Bring the spinning drill bit to the surface of the sea glass. Apply very gentle, consistent pressure. Let the diamond grit do the work. Do not force the bit.
- Start at an Angle (for small holes): For drilling small holes, it can be helpful to start drilling at a slight angle (around 45 degrees) to create a small divot, then gradually bring the bit to a perpendicular position once a small groove is established. This helps prevent the bit from “walking” across the surface.
- Up-and-Down Motion: Periodically lift the drill bit slightly out of the hole and then re-enter it. This action helps clear out glass dust and allows fresh water to reach the drilling point, improving cooling and lubrication.
-
Monitor and Adjust:
- Watch for Heat: If you see steam or the glass feels hot, stop immediately and add more water. Let it cool completely before continuing.
- Listen: The sound of the drill will change as it cuts through. A smooth grinding sound is good; a high-pitched screech might indicate too much pressure or lack of lubrication.
- Check Progress: Occasionally pause to check your progress.
-
Completing the Hole:
- As you approach the other side of the sea glass, reduce pressure significantly. Continue with the gentle up-and-down motion.
- When the drill bit breaks through the other side, be extra careful. Remove the bit slowly and with the drill still spinning to help clear any remaining debris.
-
Clean and Inspect:
- Rinse the sea glass thoroughly to remove all dust and debris.
- Inspect the hole for any rough edges or cracks. You can use a slightly larger diamond bit with very light pressure to smooth any rough spots, but be cautious not to enlarge the hole too much.
Specific Considerations for Sea Glass
- Thickness and Size: Thicker pieces of sea glass will take longer to drill. Larger pieces might require more stable securing methods.
- Shape and Texture: Smooth, flat surfaces are easiest. Irregularly shaped or frosted pieces require more attention to stability and bit placement.
- Hole Placement: Consider the final jewelry design. Where will the jump ring or bail attach? Ensure the hole is placed strategically to allow the piece to hang correctly and to avoid weakening the glass too much. Drilling too close to an edge significantly increases the risk of breakage. Aim for at least 3-5mm from the nearest edge.
- Drilling Small Holes: For very small holes, use fine-point diamond bits and very gentle pressure. Starting with a slightly larger, fine-point bit to create a small indentation before switching to the ultra-fine bit can be beneficial.
Troubleshooting Common Drilling Issues
Even with the best preparation, you might encounter a few hiccups. Here’s how to address them.
| Problem | Cause | Solution |
|---|---|---|
| Glass Cracks/Breaks | Too much pressure, overheating, drilling too close to edge, bit wandering. | Reduce pressure, ensure ample water lubrication, let glass cool, reinforce edge with tape, start at an angle. |
| Drill Bit Not Cutting | Bit is dull, insufficient water, wrong speed. | Try a new bit, increase water flow, lower speed slightly, ensure the bit is properly seated. |
| Bit Wanders on Surface | Smooth glass surface, starting too fast. | Apply masking tape to the surface, start at a 45-degree angle to create a divot, use gentle pressure. |
| Overheating | Insufficient water, too much pressure, high speed. | Increase water flow, reduce pressure, slow down the drill speed, allow glass to cool. |
| Rough Hole Edges | Drilling too fast, residual glass dust. | Polish gently with a larger diamond bit or a fine grit diamond file, clean thoroughly. |
Maintaining Your Tools
Proper maintenance ensures your diamond drill bits and rotary tool last longer and perform optimally.
- Diamond Drill Bits: After use, rinse them thoroughly to remove any glass residue. Store them safely to prevent damage to the diamond coating. Periodically, you can “sharpen” them by drilling into a piece of coarse-grit sandpaper or a pumice stone for a few seconds.
- Rotary Tool: Keep the ventilation slots clean. Ensure the chuck is free of dust and debris. Store your rotary tool in its case when not in use.
Safety Precautions: A Deeper Dive
Let’s reiterate the importance of safety precautions when performing sea glass drilling. This is not just about protecting yourself; it’s about ensuring a successful outcome.
- Eye Protection: Never, ever skip your safety glasses. Even a tiny speck of glass can cause serious injury.
- Ventilation: While water helps control dust, ensure you are in a well-ventilated area or wear a good quality dust mask.
- Securing Work: A loose piece of sea glass can easily fly out of your grasp, leading to injury or breakage. Use appropriate vices, clamps, or containers for stability.
- Electrical Safety: Keep water away from the motor of your rotary tool or drill. Ensure cords are in good condition and not frayed.
- Breaks: Take regular breaks, especially when working on multiple pieces. Fatigue can lead to mistakes and accidents.
Advanced Tips for Jewelers
For those looking to integrate sea glass drilling into their jewelry making business, here are some advanced considerations.
- Consistency: Developing a consistent technique is crucial for producing professional results. Practice on scrap glass first if you have it.
- Batch Drilling: For larger projects, consider how to efficiently drill multiple pieces. A drill press setup with a jig can significantly speed up the process.
- Hole Finishing: Beyond smoothing, some jewelers use very fine grit diamond files or even polishing compounds on small felt bits to achieve a perfectly smooth inner edge for the hole.
- Designing Around the Glass: Sometimes, the natural imperfections of sea glass might suggest the best placement for a hole. Embrace the unique character of each piece.
Frequently Asked Questions (FAQ)
Q: What is the best speed to drill sea glass?
A: For most rotary tools and diamond drill bits, a speed between 10,000 and 15,000 RPM is a good starting point. It’s important to use variable speed and adjust based on the glass thickness and the bit size, always prioritizing low speeds and gentle pressure to avoid heat buildup and breakage.
Q: Can I drill holes in sea glass with a regular drill bit?
A: No, you should not use regular metal drill bits. They are not designed for glass and will likely shatter the glass or wear out instantly without making any progress. Always use diamond drill bits specifically designed for glass or tile.
Q: How do I prevent the drill bit from slipping on smooth sea glass?
A: Applying a small piece of masking tape or painter’s tape to the spot where you intend to drill can create a better grip for the bit and prevent it from “walking.” Starting at a slight angle (around 45 degrees) to create a small indentation before returning the bit to a perpendicular position is also very effective.
Q: How deep should I drill?
A: For typical jewelry findings like jump rings or bails, you only need to drill completely through the glass. The depth required will simply be the thickness of your sea glass piece. Be extra gentle as you feel the bit about to break through the other side.
Q: What if my sea glass is very thin or brittle?
A: For thin or brittle pieces, extreme caution is needed. Use your lowest speed setting, the gentlest pressure, and ensure maximum water lubrication. Consider using masking tape for grip and starting at an angle. It might be best to practice on thicker pieces first.
Q: How do I clean the holes after drilling?
A: Rinse the sea glass thoroughly under running water to remove all glass dust and debris. You can use a soft brush or a toothpick (gently) to help clear any particles from within the hole itself.
By following these detailed instructions and prioritizing safety, you can confidently drill holes in sea glass and create beautiful, unique jewelry that showcases the natural beauty of your ocean treasures. Happy drilling!