
Sawhorses are essential tools for any DIY enthusiast, woodworker, or builder. What are sawhorses used for? They provide stable and adjustable work surfaces for cutting, assembling, sanding, painting, and a multitude of other tasks. Can I use sawhorses for any project? Yes, with proper setup and understanding of their capabilities, sawhorses can support a wide range of projects, from delicate woodworking to heavy-duty framing. Who is a sawhorse for? Anyone who needs a reliable and portable work surface.
This in-depth guide will walk you through everything you need to know about using sawhorses safely and effectively, covering everything from initial sawhorse setup to choosing the right type for your needs. We’ll explore how to make the most of portable sawhorses, the benefits of DIY sawhorses, and how to turn them into versatile workbench sawhorses. Whether you’re looking for sawhorses for cutting, sawhorses for woodworking, sawhorses for framing, or sawhorses for painting, this guide has you covered. We’ll also delve into the world of heavy duty sawhorses and convenient folding sawhorses.
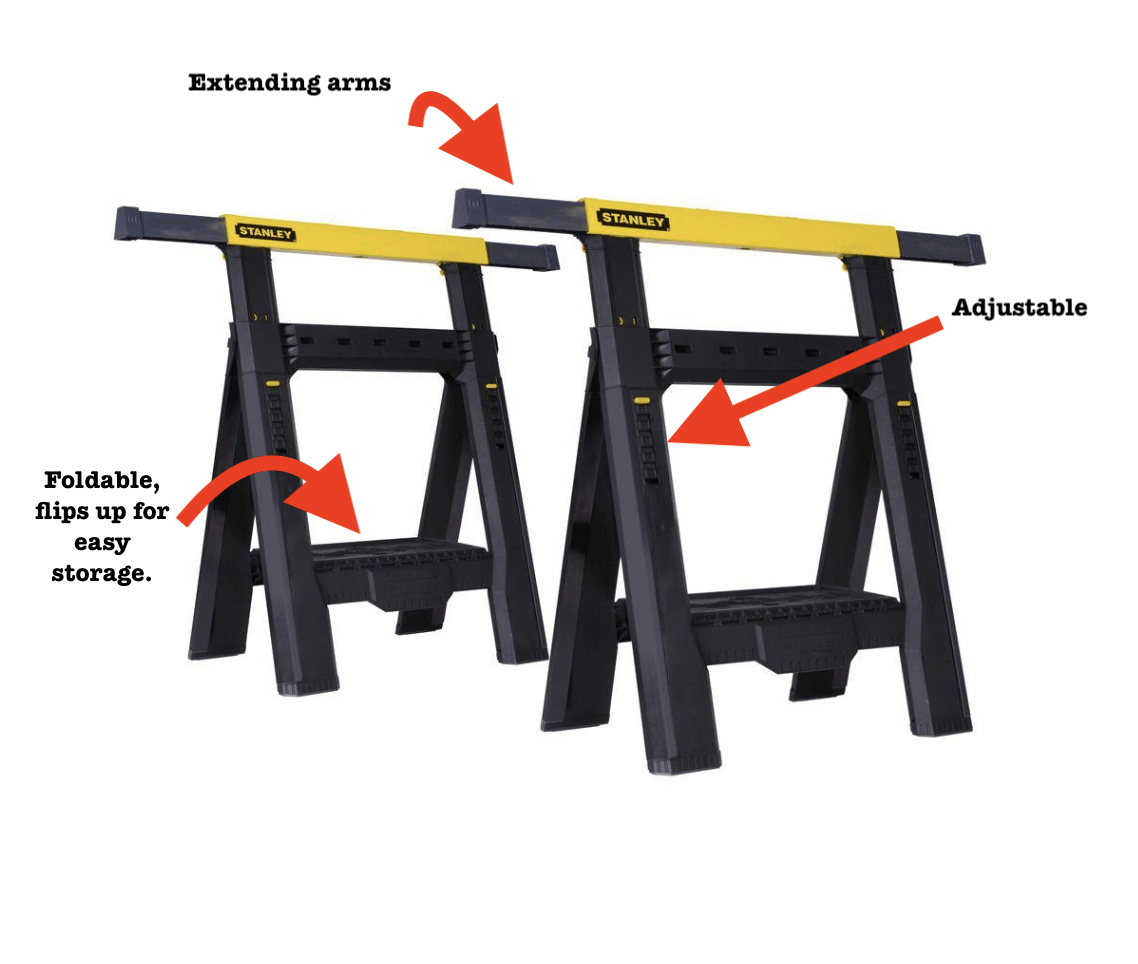
Image Source: thriftdiving.com
Choosing the Right Sawhorse for Your Project
Not all sawhorses are created equal. The type you choose will depend on the scale and nature of your projects.
Types of Sawhorses
- Traditional Wood Sawhorses: These are often the most affordable and can even be built as DIY sawhorses. They are sturdy but can be heavy.
- Metal Sawhorses: Typically made from steel or aluminum, these are durable and can support significant weight. Many are designed as folding sawhorses for easy storage and transport.
- Plastic Sawhorses: Lightweight and weather-resistant, plastic sawhorses are great for lighter tasks like painting. Some are adjustable in height, making them versatile.
- Adjustable Height Sawhorses: These are highly recommended as they allow you to customize your work surface height, which is crucial for ergonomics and precision. They are excellent as workbench sawhorses.
- Jobsite Sawhorses: Designed for portability and ruggedness, these are ideal for construction sites and outdoor projects like sawhorses for framing. They often fold compactly.
Factors to Consider When Buying
- Weight Capacity: Crucial for safety. Ensure the sawhorses can support the weight of your materials and tools. Heavy duty sawhorses will have higher weight ratings.
- Portability: If you move your workshop often or work on different sites, portable sawhorses are a must. Look for lightweight designs and easy folding mechanisms.
- Stability: The wider the base, the more stable the sawhorse. Check for non-slip feet.
- Height and Adjustability: Can the height be adjusted to suit your project and your own comfort?
- Material: Wood, metal, or plastic – each has its pros and cons regarding durability, weight, and cost.
- Features: Some sawhorses have built-in vices, tool trays, or slots for holding lumber.
Sawhorse Setup: Laying the Foundation for Success
Proper sawhorse setup is the first and most critical step to ensuring safety and efficiency on your project. Even the best sawhorses won’t perform well if they aren’t set up correctly.
Step 1: Choose a Level and Stable Surface
- Indoor vs. Outdoor: For indoor work, a garage floor or concrete slab is ideal. Outdoors, ensure you’re on firm, flat ground. Avoid soft earth or uneven terrain.
- Clear Obstructions: Make sure the area around where you’ll be working is clear of debris, tools, or anything that could cause a trip hazard.
Step 2: Position the Sawhorses
- Spacing: The distance between your sawhorses will depend on the length of the material you are working with. For long boards, you’ll need to space them appropriately to prevent sagging. A general rule is to place them about two-thirds of the way in from the ends of the workpiece.
- Alignment: Ensure the sawhorses are standing upright and are not tilted. If using multiple pairs, try to align them so they present a consistent working plane.
Step 3: Adjust Height (If Applicable)
- Ergonomics: If your sawhorses have adjustable height, set them to a comfortable working level. Your elbows should be at about a 90-degree angle when you’re performing tasks like cutting or sanding.
- Workpiece Stability: The height should allow your workpiece to sit securely without being too high to reach or too low to cause strain.
Step 4: Secure the Workpiece
- Clamps: Use clamps to secure your material to the sawhorses. This is vital for preventing movement during cutting or drilling. This is especially important when using sawhorses for cutting or sawhorses for woodworking.
- Top Surfaces: Many sawhorses have flat tops, but some have V-grooves or notches. Understand how to best utilize these features to hold your material.
Safe Practices When Using Sawhorses
Safety is paramount when working with any tools, and sawhorses are no exception. Following these safety guidelines will prevent accidents and ensure your projects are completed without incident.
Essential Safety Tips
- Inspect Before Use: Before each use, check your sawhorses for any damage, such as cracks, loose joints, or bent metal. Damaged sawhorses should not be used. This applies to both purchased and DIY sawhorses.
- Don’t Overload: Always adhere to the weight capacity of your sawhorses. Overloading can lead to collapse and serious injury. Heavy duty sawhorses are designed for heavier loads, but even they have limits.
- Keep Clear: Ensure that no part of your body is positioned directly under the workpiece being supported by the sawhorses.
- Stable Footing: Always wear appropriate footwear that provides good grip. Avoid loose clothing or jewelry that can get caught in machinery.
- Use Clamps: As mentioned, securing your workpiece with clamps is crucial for preventing it from shifting or falling.
- Center the Load: Place the weight of your workpiece as close to the center of the sawhorse as possible to maximize stability.
- Avoid Leaning: Never lean your body weight on the workpiece or the sawhorses, especially when they are supporting a load.
- Environment Awareness: Be aware of your surroundings. Keep children and pets away from the work area.
- Proper Saw Usage: When using power saws, ensure the blade is clear of the sawhorse itself and that you have a clear cutting path.
Maximizing the Versatility of Your Sawhorses
Sawhorses are incredibly versatile. Here’s how you can adapt them for various tasks and projects.
Creating a Temporary Workbench
One of the most common and useful ways to use sawhorses is to create a temporary workbench.
- Using Plywood: Lay a sheet of plywood across two or more sawhorses. This creates a large, flat, and stable work surface. This is an excellent way to create workbench sawhorses.
- Customizable Height: By using adjustable sawhorses, you can set the workbench height to your preference, making tasks like assembly, sanding, or even light machining more comfortable.
- Adding Vises: You can clamp portable vices to the edge of the plywood top or directly to some sawhorse designs, significantly enhancing their utility for woodworking.
Sawhorses for Cutting
When using sawhorses for cutting, stability and support are key.
- Supporting Long Materials: For cutting long boards or pipes, ensure the sawhorses are spaced to adequately support the material, preventing it from flexing or breaking during the cut.
- Clearance for Saws: Position the sawhorses so that your saw can move freely without hitting the sawhorse itself. Allow enough space for the offcut to fall safely.
- Protecting the Sawhorse: For tasks involving aggressive cutting or potential kickback, consider placing a sacrificial piece of wood on top of the sawhorse to protect its surface.
Sawhorses for Woodworking
Sawhorses for woodworking need to offer stability and a good surface for detailed work.
- Precision Cutting: Use clamps to firmly secure smaller pieces of wood for precise cuts.
- Assembly Support: They provide ideal support for assembling furniture, cabinets, or other woodworking projects.
- Sanding and Finishing: A stable surface on sawhorses allows for efficient sanding and applying finishes without wobbling.
Sawhorses for Framing
For heavier tasks like sawhorses for framing, you’ll need robust and stable options.
- Supporting Lumber: These sawhorses are designed to hold significant weight, making them perfect for supporting bundles of lumber or pre-fabricated framing sections.
- Working at Height: Some adjustable sawhorses can be raised to a comfortable working height for framing walls or roof structures.
- Stability in Wind: When working outdoors, ensure your sawhorses are placed on solid ground and consider using weights or stakes to prevent them from tipping in windy conditions.
Sawhorses for Painting and Finishing
When using sawhorses for painting, you need a surface that holds your items securely without damaging the finish.
- Holding Panels: Place large panels, doors, or furniture pieces on sawhorses for painting or staining.
- Preventing Damage: Use felt pads or old rags on the sawhorse surface to prevent scratches or marring on delicate finishes.
- Creating a Drying Rack: Multiple sawhorses can be arranged to hold items for drying at different angles.
DIY Sawhorses: Building Your Own
For the budget-conscious or those who enjoy building, DIY sawhorses can be a rewarding project.
Benefits of DIY Sawhorses
- Cost Savings: Building your own can be significantly cheaper than buying pre-made ones.
- Customization: You can build them to specific dimensions, heights, and weight capacities tailored to your needs.
- Learning Experience: It’s a great way to practice woodworking skills.
Simple DIY Sawhorse Plans
Many free plans are available online. A basic design typically involves:
- Legs: Four legs, often angled for stability.
- Top Beam: A sturdy piece of wood that forms the main support surface.
- Braces: Diagonal or horizontal braces to connect the legs and add rigidity.
Materials often include:
- 2×4 or 2×6 lumber
- Wood screws or lag bolts
- Wood glue
Basic Construction Steps:
- Cut Lumber: Measure and cut all your pieces according to your chosen plan.
- Assemble Legs: Attach the legs to the top beam, ensuring they are angled correctly for stability.
- Add Braces: Secure the braces between the legs and the top beam to reinforce the structure.
- Finish (Optional): Sand and apply a protective finish like paint or varnish.
Considerations for DIY Sawhorses
- Material Quality: Use good quality lumber for durability and strength.
- Joinery: Strong joinery is essential for safety. Use appropriate screws, bolts, and glue.
- Stability Testing: After building, test the stability by applying downward pressure and ensuring they don’t wobble.
Advanced Sawhorse Techniques and Accessories
Once you’ve mastered the basics, consider these ways to enhance your sawhorse experience.
Creating Folding Sawhorses
Folding sawhorses offer the best of both worlds: sturdy support when in use and compact storage when not.
- Hinged Designs: Many commercial folding sawhorses utilize hinges to allow the legs to fold up against the top.
- DIY Folding Mechanisms: You can incorporate hinges or simple pivot points into DIY designs for a folding capability.
Sawhorse Accessories
- Sawhorse Carts: For easily moving multiple sawhorses around your workshop or job site.
- Wheeled Sawhorses: Some sawhorses come with integrated wheels, enhancing portability.
- Sawhorse Hooks: For hanging tools or materials.
- Top Plates: Some sawhorses allow you to attach custom top plates made of sacrificial wood or with pre-drilled holes for vices.
Maintenance of Your Sawhorses
Proper maintenance will extend the life of your sawhorses and ensure their continued safety and effectiveness.
- Cleaning: Wipe down your sawhorses after each use, especially if they’ve been exposed to dust, dirt, or chemicals.
- Lubrication: For folding sawhorses, occasionally lubricate the hinges to ensure smooth operation.
- Tightening Fasteners: Periodically check and tighten any screws or bolts, especially on wooden or metal DIY models.
- Protective Coatings: For wooden sawhorses, reapply paint or varnish as needed to protect them from moisture and wear.
- Storage: Store sawhorses in a dry place, away from extreme temperatures and direct sunlight, to prevent degradation.
Frequently Asked Questions (FAQ)
Q1: What is the best type of sawhorse for heavy-duty projects like framing?
A1: For framing and other heavy-duty tasks, heavy duty sawhorses made from steel or reinforced wood are the best choice. They typically have higher weight capacities and a more robust construction to handle significant loads. Look for models with wider bases for added stability.
Q2: Can I use sawhorses on an uneven surface?
A2: It is strongly discouraged to use sawhorses on uneven surfaces. This can lead to instability and a high risk of the sawhorse tipping or collapsing. Always ensure you set them up on a flat, stable, and level ground. If the ground is slightly uneven, you might need to use shims to level them, but a truly flat surface is always preferred.
Q3: How far apart should I place my sawhorses when cutting a long board?
A3: The spacing of your sawhorses depends on the length and stiffness of the material. For long boards, a common practice is to place them about two-thirds of the way in from the ends of the workpiece. This ensures adequate support without causing the center of the board to sag excessively. For very long or flexible materials, you may need more than two sawhorses.
Q4: Are DIY sawhorses as safe as commercially made ones?
A4: DIY sawhorses can be just as safe, if not safer, than commercially made ones, provided they are built correctly with appropriate materials and strong joinery. The key is to follow reliable plans, use quality fasteners, and ensure the structure is sound and stable. Always test their stability before putting them to work.
Q5: What are the advantages of folding sawhorses?
A5: Folding sawhorses offer significant advantages in terms of portability and storage. They are easy to transport to different job sites and take up minimal space when not in use. This makes them ideal for individuals with limited workshop space or those who frequently work on the go.
Q6: How can I improve the stability of my sawhorses?
A6: Several methods can improve sawhorse stability. Ensure they are on a level surface. Use clamps to secure the workpiece firmly to the sawhorses. For particularly demanding tasks or windy conditions, you can add weight to the base of the sawhorses or use stakes to anchor them to the ground. Wider-based sawhorses generally offer better inherent stability.
Q7: What is the purpose of the notches or V-grooves found on some sawhorses?
A7: Notches and V-grooves are designed to help secure cylindrical objects like pipes or lumber in place, preventing them from rolling off the sawhorse. They provide an extra layer of security when working with materials that might otherwise be unstable.
Q8: Can I use sawhorses to support a tabletop for a permanent workbench?
A8: While sawhorses can create a temporary workbench sawhorses setup, they are generally not recommended for a permanent workbench unless they are very robust and specifically designed for that purpose. For a permanent workbench, building a dedicated workbench with a thicker top and a more rigid leg structure is usually a better long-term solution. However, you can use sawhorses to support a removable workbench top.
By following this comprehensive guide, you’ll be well-equipped to use sawhorses safely and effectively across a wide range of projects, from simple DIY tasks to more complex woodworking and framing endeavors. Happy building!