
Image Source: learn.kregtool.com
How To Drill In A Tight Space: Pro Tips
Can I drill in a tight space? Yes, you can drill in a tight space by using the right tools and techniques. What is the best drill for tight spaces? The best drill for tight spaces is often a compact drill or a right-angle drill, depending on the specific situation.
Working in confined areas presents unique challenges for any DIYer or professional. Whether you’re trying to hang a shelf in a cramped closet, mount a fixture behind a cabinet, or tackle repairs in the tightest of corners, the limitations of standard tools can quickly become apparent. The good news is that with the right approach and a few specialized tools, you can achieve excellent results even in the most restrictive environments. This guide will equip you with the pro tips needed for effective drilling in tight spaces, covering tool selection, technique, and safety.
Deciphering The Challenges of Close Quarters Drilling
Drilling in close quarters is not simply about fitting a drill into a gap. It involves overcoming several obstacles:
- Limited Visibility: Seeing your drill bit and the target surface is often difficult.
- Restricted Movement: Your body and arms have little room to maneuver, affecting accuracy and control.
- Obstacles: Pipes, wires, framing, and other building components can be in the way.
- Torque Management: Applying the necessary force without losing control can be tricky.
- Debris Management: Sawdust and shavings can quickly accumulate in a confined area, further obscuring your view and hindering operation.
The Essential Toolkit for Narrow Access Drilling
The right tools are paramount when dealing with tight spaces. Standard, full-sized drills can be unwieldy and simply won’t fit. Here’s a breakdown of the go-to tools:
Compact Drills: Your First Line of Defense
A compact drill, often referred to as a “stubby” drill, is a game-changer for close quarters. These drills are designed with shorter barrels and lighter bodies, making them significantly easier to handle in confined areas.
-
Benefits:
- Maneuverability: Their smaller size allows access to spots that larger drills can’t reach.
- Ergonomics: Designed for one-handed operation in many cases.
- Weight: Lighter weight reduces user fatigue during extended use.
-
Considerations:
- Power: While capable, they may not offer the same raw power as full-sized drills for very demanding tasks.
- Battery Life: Compact drills sometimes have smaller batteries, which can limit run time.
The Right-Angle Drill: For Those Awkward Corners
When a standard drill or even a compact drill won’t cut it, the right-angle drill (also known as an offset drill or right-angle grinder with a drill chuck) is your best friend. These drills have the chuck positioned at a 90-degree angle to the motor body, allowing you to drill into spaces that are otherwise inaccessible.
-
Benefits:
- Extreme Access: Ideal for drilling directly into joists, studs, or pipes in very tight wall cavities or floor spaces.
- Precise Control: The low profile allows for more stable drilling, especially when precision is needed.
- Versatility: Many can be fitted with different attachments for sanding or mixing in tight spots.
-
Considerations:
- Size: While the head is compact, the overall length might still be an issue in extremely tight areas, so check the dimensions carefully.
- Power Delivery: Power can sometimes be less direct compared to a straight drill.
Cordless Drills: The Freedom of Movement
While not exclusively for tight spaces, the convenience of a cordless drill cannot be overstated. In close quarters, not having a power cord to manage is a significant advantage, reducing the risk of snagging or tripping.
-
Benefits:
- No Cord Tangle: Eliminates a major hazard and frustration in confined work areas.
- Portability: Easy to move around and position without being tethered.
- Modern Features: Many cordless models include LED lights, variable speed control, and clutch settings that are beneficial for precise drilling.
-
Considerations:
- Battery Management: Always ensure your batteries are charged before starting work in a tight space where recharging might be inconvenient.
- Battery Weight: Some high-capacity batteries can add significant weight, so consider lighter, more compact battery options if available for your drill model.
Mini Drills and Precision Tools
For extremely fine or intricate work, a mini drill or a Dremel-style rotary tool can be invaluable. These are often used for pilot hole drilling in delicate materials or for very precise placement.
-
Benefits:
- Fine Control: Excellent for delicate tasks.
- Small Size: Can fit into the smallest nooks and crannies.
- Versatile Attachments: Can be used for drilling, sanding, polishing, and more with various bits.
-
Considerations:
- Limited Power: Not suitable for drilling into hard materials or for large holes.
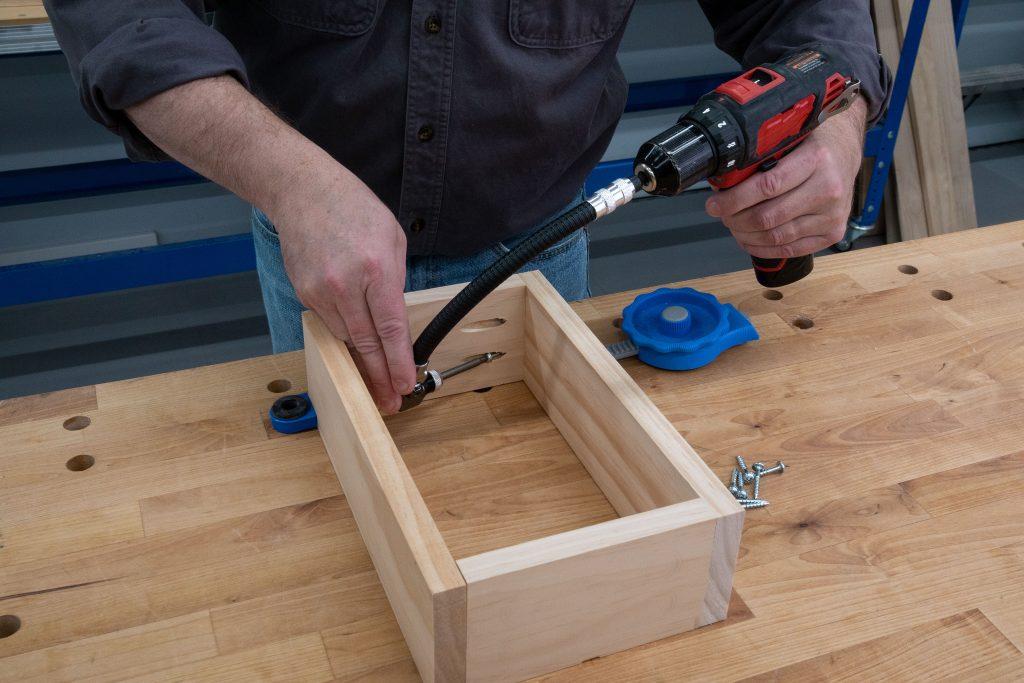
The Flexible Shaft Drill Attachment: Reaching Around Obstacles
A flexible shaft drill attachment is another ingenious solution for tight access. This accessory connects to your drill chuck and provides a flexible cable that can be bent and routed around obstacles to reach the drilling point. The business end typically has a smaller chuck or a collet for holding bits.
-
Benefits:
- Navigate Obstacles: Allows you to position the drill motor away from the work area while drilling.
- Ergonomic: Reduces strain on your wrist and arm by allowing you to hold the flexible shaft closer to the work.
-
Considerations:
- Dexterity Required: Controlling the flexible shaft and keeping the bit stable can take practice.
- Power Loss: There can be some minor power loss through the flexible shaft.
Orbital Sander for Tight Spaces: A Complementary Tool
While not for drilling, an orbital sander for tight spaces, such as detail sanders or corner sanders, is often needed in conjunction with drilling tasks in confined areas. Preparing a surface for drilling or cleaning up after might require such tools. Their compact size and maneuverability are key.
Mastering Techniques for Tight Corner Drilling
Having the right tools is only half the battle. Effective technique is crucial for successful tight corner drilling.
Planning and Preparation: The Foundation of Success
Before you even pick up a drill, thorough planning is essential.
- Assess the Space: Understand exactly how much room you have. Measure the clearance around the drilling point.
- Identify Obstacles: Look for pipes, wires, studs, or anything else that might impede your drill or the drill bit. Use a stud finder or even a magnet to locate hidden metal.
- Mark Your Target: Clearly mark the exact spot where you need to drill. Use a pencil or a fine-tip marker. For precision, consider using masking tape over the spot to prevent splintering and give your drill bit a better starting grip.
- Choose the Right Bit: Select a drill bit appropriate for the material you’re drilling into. For wood, standard twist bits are fine. For metal, you’ll need a metal-cutting bit. For masonry, a masonry bit is required. Ensure the bit isn’t longer than necessary to avoid hitting something behind your target.
Essential Techniques for Accurate Drilling
Once you’re ready to drill, focus on control and precision.
- Pilot Hole Drilling: For most materials, especially hardwoods or when using larger screws, pilot hole drilling is critical. This creates a small guide hole for the main screw or bit, preventing wood splitting and making the process much smoother. In tight spaces, a smaller pilot hole drill bit is easier to manage.
- Starting the Hole:
- Center Punch: For hard materials like metal or even dense hardwoods, a center punch can create a small indentation, preventing the drill bit from “walking” or slipping as you start.
- Slow and Steady: Begin drilling at a slow speed to create a clean entry point. Gradually increase speed once the bit has a good grip.
- Maintaining Stability:
- Two-Handed Grip (When Possible): Even with compact drills, using your second hand to stabilize the drill body provides much better control.
- Bracing: If you have a stable surface or object to brace against, use it to support your body and the drill.
- Leverage: Position yourself so you can use your body weight to apply steady pressure, rather than relying solely on arm strength.
- Angle Management:
- Visual Aids: Use a small mirror or even your phone camera to get a better view of the drill bit’s angle relative to the surface.
- Right-Angle Drill Use: For true 90-degree angles in tight spots, the right-angle drill is indispensable.
- Depth Control:
- Depth Stop: Many drills have adjustable depth stops. If yours doesn’t, you can wrap a piece of tape around the drill bit, marking the desired depth. Stop drilling when the tape reaches the surface.
- Marking the Bit: Similar to tape, you can mark the bit with a marker.
Managing Debris in Close Quarters
Debris can be a major problem.
- Vacuum Attachment: Some drills can accommodate small vacuum attachments to catch dust and shavings as you drill.
- Manual Removal: Keep a small brush or a compressed air can (used carefully) handy to clear away debris periodically. A shop vacuum with a crevice tool can also be very useful.
Safety First, Always
Drilling in confined spaces can introduce unique safety hazards.
- Eye Protection: Always wear safety glasses. In very tight spaces, debris can fly unpredictably.
- Hearing Protection: While smaller drills are often quieter, prolonged use can still be loud. Consider earplugs.
- Hand Protection: Gloves can improve grip and protect your hands from splinters or sharp edges.
- Secure Clothing: Avoid loose clothing or jewelry that could get caught in the drill.
- Electrical Safety: Be aware of potential electrical wiring behind surfaces. If unsure, use a wire detector or consult a professional.
- Tool Control: Never force the drill. If you feel significant resistance or the drill is binding, stop immediately. This prevents kickback and potential injury.
Specific Scenarios and Solutions
Let’s look at how these tips apply to common situations:
Drilling Behind Cabinets
- Challenge: Limited depth and width for both the drill and your arm.
- Solution: A compact drill or a right-angle drill is essential. Use a shorter drill bit. Consider a flexible shaft drill attachment if the angle is particularly awkward. Mark your drill point accurately and use tape to prevent damage to the cabinet or wall.
Drilling in Floor Joists or Wall Studs
- Challenge: Often requires drilling through wood at an angle or in a tight cavity.
- Solution: A right-angle drill is ideal here. It allows you to get directly onto the joist or stud without the motor body being in the way. Pilot hole drilling is recommended to prevent splitting the wood.
Drilling into Ceilings
- Challenge: Working overhead can be tiring and reduce visibility.
- Solution: A lightweight cordless drill is best. Use a steady hand or brace yourself. Consider a drill with a side handle for better support. Ensure you know what is above the ceiling to avoid drilling into pipes or wires.
Drilling in Furniture or Cabinets
- Challenge: Precision is key to avoid damaging the furniture.
- Solution: A mini drill or a cordless drill with a low-speed setting and a clutch is perfect. Use pilot hole drilling for screws to prevent the wood from splitting, especially near edges.
Comparing Key Tools for Tight Spaces
| Tool | Best For | Pros | Cons |
|---|---|---|---|
| Compact Drill | General tight-space drilling, cabinetry | Maneuverable, lighter weight | Less power than full-size drills |
| Right-Angle Drill | Awkward corners, joists, studs, close-up work | Excellent for 90-degree access, precise control | Can still be long, power can feel less direct |
| Cordless Drill | Freedom of movement, no cord hazards | Convenient, portable | Battery life, battery weight |
| Mini Drill | Fine detail, delicate materials | Very small, high precision | Very low power, not for structural tasks |
| Flexible Shaft | Reaching around obstructions | Bends to fit, ergonomic | Requires dexterity, potential power loss |
Frequently Asked Questions (FAQ)
Q1: What is the minimum clearance needed for a compact drill?
A1: The clearance needed varies by model, but many compact drills have a head height (from the chuck to the top of the motor housing) of around 4-5 inches. Always check the specific dimensions of the drill you are considering.
Q2: Can I use a regular drill in a tight space if I’m careful?
A2: While it’s possible in some moderately tight spaces, it’s significantly more difficult and increases the risk of damage to the surrounding area or the drill itself. Specialized tools like compact or right-angle drills are far more effective and safer.
Q3: How do I prevent drill bits from overheating in tight spaces?
A3: Use appropriate speeds for the material, don’t force the drill, and periodically withdraw the bit to clear debris and allow cooling. For metal, using cutting fluid can significantly help.
Q4: What if the surface I need to drill is curved or irregular in a tight space?
A4: This requires extra care. Use a pilot hole drilling technique with a very sharp bit. You might need to use a template or a guide jig if extreme precision is needed on a non-flat surface. A flexible shaft drill can sometimes offer better angles for stable contact.
Q5: How do I ensure a straight hole when working with limited visibility?
A5: Use a small level attached to the drill body if possible. Employ a jig or template if you have one. Practice on scrap material first to get a feel for the tool’s angle. A laser level, if you can position it correctly, can also be a guide.
Drilling in tight spaces doesn’t have to be a frustrating ordeal. By arming yourself with the right tools – prioritizing compact drills, right-angle drills, and understanding the benefits of cordless drills, mini drills, and flexible shaft drills – and by employing careful techniques like pilot hole drilling and proper close quarters drilling methods, you can confidently tackle any project, no matter how confined. Remember that preparation, precision, and safety are your most valuable assets in these challenging situations.