
Can you drill holes in sea glass? Yes, you absolutely can drill holes in sea glass safely with the right tools, techniques, and precautions. It’s a rewarding process that allows you to transform beautiful beach treasures into unique jewelry and crafts. This guide will walk you through everything you need to know about sea glass drilling techniques to achieve stunning results without breaking your precious pieces.
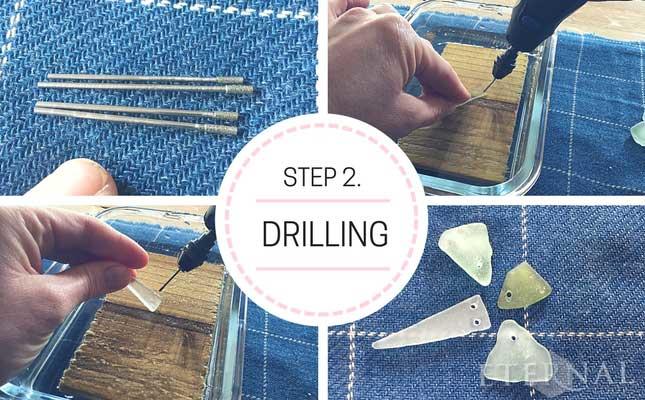
Image Source: cdn.ecommercedns.uk
Gathering Your Essential Equipment for Drilling Sea Glass
Successfully drilling sea glass begins with having the correct equipment for drilling sea glass. Rushing this step or using the wrong tools can lead to frustrating breaks and wasted effort. Here’s what you’ll need:
The Right Drill
- Rotary Tool (Dremel-style): This is the most popular and versatile tool for drilling sea glass. Its high speed and various attachments make it ideal for precise work.
- Drill Press: For more consistent and straight holes, a drill press is an excellent option, especially if you’re drilling many pieces. It offers stability that a handheld rotary tool might lack.
The Best Bits for Sea Glass
The type of drill bit is crucial for drilling smooth holes in sea glass. Using the wrong bit will cause the glass to shatter.
- Diamond-Coated Drill Bits: These are the undisputed champions for drilling glass. They come in various sizes, typically from 0.8mm to 3mm or larger, depending on your project. Look for bits specifically designed for glass or tile. They work by grinding away the glass rather than cutting it aggressively.
- Carbide Drill Bits: While less ideal than diamond bits, carbide bits can sometimes work for very thin or already weakened sea glass. However, they are more prone to shattering the glass and generating more heat. It’s best to stick with diamond bits for consistent success.
Water Source and Cooling System
Glass drilling generates significant heat, which can cause the glass to crack. Keeping the drilling area cool is paramount.
- Water Container: A small bowl or cup of water is essential. You’ll need to dip the drill bit and the sea glass into the water regularly.
- Spray Bottle: A spray bottle filled with water can be used to continuously mist the drilling area, providing ongoing cooling.
- Drip System (Optional): For longer drilling sessions, you can rig up a simple drip system to keep the area constantly lubricated and cool.
Safety Gear
Protecting yourself is non-negotiable when working with glass.
- Safety Glasses or Goggles: Essential to protect your eyes from flying glass shards.
- Dust Mask: Fine glass dust can be harmful if inhaled.
- Gloves (Optional): Some people prefer wearing thin, grippy gloves to help hold the glass steady.
Securing Your Sea Glass
Properly securing sea glass for drilling is critical to prevent it from moving during the process.
- Jeweler’s Vise or Small Clamp: A small vise or clamp designed for delicate work is ideal. You can wrap the sea glass in a soft cloth or felt before clamping to protect its surface and provide a better grip.
- Putty or Wax: For irregularly shaped pieces, a strong putty or sculpting wax can be used to hold the sea glass firmly in place on a stable surface.
- Non-Slip Matting: Placing your sea glass on a rubber or silicone non-slip mat can prevent it from sliding around on your work surface.
Step-by-Step Guide to Sea Glass Drilling
Now that you have your equipment, let’s get to the actual drilling. Following these steps will greatly increase your chances of achieving clean holes in sea glass.
Step 1: Preparation is Key
- Clean Your Sea Glass: Ensure your sea glass is thoroughly cleaned of any sand, salt, or debris. A gentle scrub with soap and water is usually sufficient.
- Choose Your Drilling Spot: Decide where you want the hole to be. Consider the shape of the glass and how you want to hang it. For pendants, drilling near the top edge is common.
- Mark the Spot (Optional): For extra precision, you can use a fine-tip marker to lightly mark the spot where you intend to drill. This mark will wash away with water.
Step 2: Securing the Sea Glass
- Stable Placement: Place your sea glass on your chosen securing method (vise, putty, or mat). Ensure it is held firmly but not so tightly that you risk cracking it. If using a vise, wrap the glass in a soft cloth or felt to cushion it.
- Water Bath Setup: Position your water container or ensure your spray bottle is within easy reach. You want to be able to cool the glass and bit frequently without interrupting your flow too much.
Step 3: The Drilling Process
- Cool the Bit and Glass: Before you start drilling, dip the diamond drill bit into your water container. Also, ensure the area of the sea glass you’ll be drilling into is wet.
- Set the Speed: If using a rotary tool, start with a low to medium speed. High speeds can generate excessive heat and friction, leading to cracks. A drill press will have more consistent speed control.
- Start at an Angle: Begin drilling at a slight angle (around 45 degrees) to create a small groove or indentation. This helps prevent the drill bit from “walking” or sliding across the surface.
- Apply Gentle, Consistent Pressure: Let the diamond bit do the work. Do not force the drill. Apply slow, steady pressure. Imagine you are grinding away the glass, not cutting through it.
- Lubricate and Cool Constantly: This is the most critical part of sea glass drilling techniques.
- Periodically lift the drill bit out of the glass and dip it back into the water.
- Mist the drilling area with water from your spray bottle.
- If submerged, ensure the glass remains in the water.
- Watch for any signs of overheating – if the glass looks hazy or the bit feels too hot, stop immediately and cool everything down.
- Drill Slowly and Steadily: Continue drilling, maintaining the gentle pressure and constant cooling. It can take several minutes, or even longer for thicker pieces, to drill through. Be patient!
- Clear Debris: Occasionally, you might need to lift the bit slightly to allow water to flush out the glass dust and prevent the hole from becoming clogged.
- Exiting the Other Side: As you approach the other side of the glass, ease up on the pressure considerably. The glass is thinnest and most vulnerable at this stage. Drill through slowly to avoid chipping the exit point.
Step 4: Finishing Touches
- Rinse and Inspect: Once the hole is complete, rinse the sea glass thoroughly to remove all dust and debris. Inspect the hole for smoothness and any potential chips.
- Smooth the Edges (Optional): If the edges of the hole feel rough, you can use a very fine grit diamond bit or a small sanding stick (also diamond-coated) to gently smooth them out. Do this with water and light pressure.
Troubleshooting Sea Glass Drilling Issues
Even with careful preparation, you might encounter problems. Here’s how to handle common troubleshooting sea glass drilling issues:
| Problem | Possible Cause | Solution |
|---|---|---|
| Glass Cracking/Shattering | Too much pressure, insufficient cooling, wrong bit. | Use less pressure, ensure constant lubrication and cooling, switch to a diamond-coated bit. Start at an angle. |
| Drill Bit Slipping | Surface too smooth, improper securing. | Secure the glass more firmly, start drilling at a slight angle to create a groove. Use a bit of putty to create a stable starting point. |
| Slow Drilling Speed | Dull bit, insufficient cooling, wrong speed. | Ensure your diamond bit is new or sharp. Increase lubrication and cooling. Adjust drill speed to a slightly higher setting (still moderate). |
| Hole Clogging | Too much glass dust, insufficient water flow. | Lift the bit slightly to allow water to flush out dust. Ensure a steady stream of water is reaching the drilling point. |
| Rough Hole Edges | Exiting too fast, bit not sharp enough. | Ease up on pressure as you exit the glass. Use a finer grit diamond bit or sanding stick to smooth the edges gently with water. |
Safety Precautions for Sea Glass Drilling
Safety precautions sea glass drilling should always be your top priority. Working with glass can be dangerous if not approached with care.
- Eye Protection is Non-Negotiable: Always wear safety glasses or goggles. Even a tiny shard of glass can cause serious eye injury.
- Ventilation and Dust Mask: Drill in a well-ventilated area or wear a dust mask to avoid inhaling fine glass particles.
- Secure Your Workspace: Ensure your work area is stable and free of clutter. You don’t want anything to knock your setup over.
- Handle with Care: Sea glass, especially after drilling, can have sharp edges. Handle your pieces carefully.
- Supervise Children: Never allow children to perform this task without direct, hands-on adult supervision.
Making DIY Sea Glass Jewelry
Once you’ve mastered drilling, the world of DIY sea glass jewelry opens up. Drilled sea glass pieces are perfect for:
- Pendants: The most common use. Thread a chain or cord through the hole.
- Earrings: Smaller pieces can be drilled and hung as dangles.
- Bracelets: Integrate drilled pieces into charm bracelets.
- Sun Catchers: Larger drilled pieces can be combined to create beautiful sun catchers.
For sea glass pendant drilling, aim for a hole size that accommodates your desired chain or cord thickness. A 1.5mm to 2mm hole is usually sufficient for most standard chains.
Achieving the Smoothest Holes
Drilling smooth holes in sea glass requires patience and the right touch. Beyond the basic steps, consider these tips:
- Start with Higher Quality Sea Glass: While you can drill most sea glass, pieces with fewer existing cracks or chips will be more forgiving.
- Use the Right Diamond Bit Grit: Diamond bits come in different grit sizes. Finer grits (higher numbers) will produce smoother finishes. You might even start with a slightly coarser bit to make the initial hole and then finish with a finer one for polishing.
- Don’t Rush the Exit: As mentioned, this is where many beginners encounter problems. Slowing down dramatically as you break through the other side is key to a clean exit.
- Consider a Drill Press: For consistency and precision, especially if you’re making multiple pieces, a drill press offers a stability that hand-held drilling can’t match.
Advanced Techniques and Considerations
- Drilling on the Edge: For some pendant designs, you might want to drill a hole very close to the edge of the sea glass. This requires extra care and a very stable grip or vise setup.
- Multi-Piece Designs: If you plan to connect multiple drilled sea glass pieces, ensure your hole sizes are consistent.
- Glass Types: While the techniques are generally the same, thicker or unusually shaped pieces might require more time and cooling.
Frequently Asked Questions (FAQ)
Q: Can I drill sea glass with a regular drill bit?
A: No, it is highly recommended to use diamond-coated drill bits specifically designed for glass or tile. Regular drill bits will likely shatter the sea glass and won’t be effective.
Q: How long does it take to drill a hole in sea glass?
A: The time can vary significantly depending on the size and thickness of the sea glass piece, the size of the drill bit, and your drilling speed. It can take anywhere from a few minutes to 15-20 minutes or even longer for very thick pieces. Patience is key.
Q: My sea glass cracked. What did I do wrong?
A: Cracking usually occurs due to excessive pressure, insufficient cooling (too much heat), or using the wrong type of drill bit. Ensure you are using a diamond bit, applying gentle, consistent pressure, and keeping the drilling area constantly wet and cool. Starting at a slight angle can also prevent the bit from slipping and causing stress.
Q: What if the hole edges are rough?
A: This often happens when exiting the glass too quickly or if the drill bit isn’t sharp enough. Try easing up on the pressure as you reach the other side. You can also use a finer grit diamond bit or a small diamond sanding stick to gently smooth the edges with water.
Q: Is it safe to drill sea glass without water?
A: No, drilling sea glass without water is very dangerous and highly discouraged. Water acts as a lubricant and a coolant. Without it, the friction generates extreme heat, which will almost certainly cause the glass to crack. It also creates hazardous glass dust.
Q: What size hole do I need for sea glass jewelry?
A: For most necklaces and pendants, a hole between 1.0mm and 2.0mm is sufficient for standard chains or cords. For earrings, smaller holes might be used. Consider the thickness of your jewelry findings when deciding on the hole size.
Q: Can I drill holes in frosted or etched sea glass?
A: Yes, the techniques are the same. Be aware that the etched surface might be slightly more delicate, so extra care with pressure and cooling is advised.
By following these detailed instructions and prioritizing safety, you can confidently drill holes in sea glass and create beautiful, unique pieces of DIY sea glass jewelry. Enjoy the process of transforming these ocean-worn treasures into something special!