
Can you drill a hole in tile without cracking it? Yes, absolutely! With the right tools, techniques, and a bit of patience, you can successfully drill holes in tile without damaging it. This guide will walk you through everything you need to know, from choosing the best drill bits for tile to employing advanced tile drilling techniques.
Drilling into tile can seem daunting. The fear of cracks spreading across your beautiful surface is a common one. However, by following these pro tips, you can confidently approach this task. We’ll cover how to drill ceramic tile and the slightly tougher job of drilling holes in porcelain tile, ensuring a clean and safe result every time.
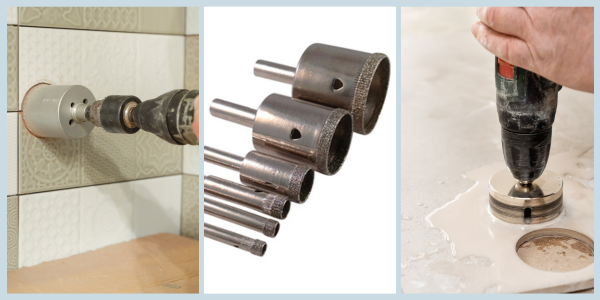
Image Source: cdn.ecommercedns.uk
Essential Tools for Tile Drilling
Before you even pick up a drill, gathering the right equipment is crucial. Using standard drill bits designed for wood or metal will likely result in a shattered tile. The key is to use bits specifically designed for hard surfaces like tile and stone.
Best Drill Bits for Tile
The market offers a variety of bits, but when it comes to tile, some are far superior to others.
- Diamond Drill Bits for Tile: These are often considered the gold standard for drilling tile, especially harder materials like porcelain. They feature a diamond-impregnated tip that grinds through the tile rather than cutting it. This slow, grinding action significantly reduces the risk of cracking. You’ll often find these in a spearhead or core-drill style.
- Carbide-Tipped Masonry Bits: While not as specialized as diamond bits, high-quality carbide-tipped masonry bits can work for softer tiles like ceramic. Look for bits with a sharp, pointed tip designed for initial penetration. However, they still carry a higher risk of chipping or cracking compared to diamond bits.
- Hole Saw for Tile: For larger, clean-cut holes, a hole saw designed for tile is the ideal choice. These are essentially a cylindrical saw blade with diamond grit or carbide teeth along the cutting edge. They create a clean, circular opening and are excellent for tasks like installing plumbing fixtures or ventilation.
Other Necessary Tools and Materials
Beyond the drill bit, you’ll need a few other items to ensure a smooth and safe drilling process.
- Drill: A variable-speed drill is highly recommended. The ability to control the speed is paramount for drilling tile effectively. A cordless drill is often preferred for its portability and ease of use.
- Safety Gear: This is non-negotiable.
- Safety Glasses: Protect your eyes from flying tile dust and debris.
- Gloves: Provide a better grip on the drill and protect your hands.
- Dust Mask: Tile dust can be harmful to inhale.
- Water Source or Lubricant: This is critical for wet drilling tile. Water cools the drill bit and the tile, preventing overheating and reducing dust. You can use a spray bottle filled with water, a steady trickle from a hose (if working outdoors), or a specialized tile drilling lubricant.
- Masking Tape or Painter’s Tape: Applying tape to the drilling area helps prevent the drill bit from wandering at the start of the hole and can reduce surface chipping.
- Measuring Tape and Pencil/Marker: For precise hole placement.
- Clamp (Optional but Recommended): If possible, clamp the tile down, especially if you are working on a loose piece. This adds stability and reduces the risk of the tile shifting.
- Wet/Dry Vacuum (Optional): For efficient cleanup of dust and water.
Pre-Drilling Preparation: Setting Yourself Up for Success
Proper preparation is the foundation of successful tile drilling. Skipping these steps significantly increases the chances of a mishap.
1. Mark the Drilling Spot Accurately
Use a measuring tape and a pencil or marker to mark the exact center of where you want the hole. Double-check your measurements. A small mistake here can lead to a much larger problem if you can’t simply fill and re-drill.
2. Apply Masking Tape
Tear off a few strips of masking tape or painter’s tape and firmly press them over the marked spot. This provides a good starting point for your drill bit, preventing it from skidding. It also helps to catch some of the dust and can minimize minor surface chipping as you begin.
3. Determine Tile Thickness and Material
Knowing whether you are working with ceramic or porcelain tile is important. Porcelain is significantly harder and denser than ceramic, requiring more care and potentially slower speeds. Assess the thickness of the tile. This helps in choosing the right drill bit and understanding how long you’ll need to drill.
4. Consider the Hole Size and Type
- Small Holes (e.g., for screws): Standard diamond-tipped bits or even carbide bits can work.
- Larger Holes (e.g., for plumbing): A hole saw for tile is the best option.
The Drilling Process: Step-by-Step Guide
Now that you’re prepared, let’s get to the actual drilling. Remember, patience and a gentle, controlled approach are key.
Step 1: Set Up Your Drill
Ensure your drill is set to the correct speed. For most tile drilling, a low speed setting is ideal. High speeds generate excessive heat, which can crack the tile or damage the drill bit. If your drill has a hammer function, ensure it is turned off. Hammer action is only for masonry and will shatter tile.
Step 2: Start the Hole
Place the tip of your drill bit precisely on the marked spot (over the tape).
* Gentle Pressure: Apply light, steady pressure. Let the drill bit do the work. Forcing the drill will lead to cracks.
* Initial Angle: For most bits, start drilling at a slight angle (around 45 degrees). This allows the bit to get a grip and begin grinding without immediately creating a large impact point.
* Create a Pilot Indentation: Once the bit starts to bite, gradually bring the drill to a perpendicular (90-degree) angle to the tile surface.
Step 3: Drilling with Water (Wet Drilling)
Wet drilling tile is highly recommended, especially for porcelain and when using diamond bits.
* How to Wet Drill:
* Spray Bottle: Periodically spray water onto the drilling area as you drill.
* Water Reservoir: For larger holes or longer drilling times, you can create a small dam around the drilling spot using plumber’s putty or clay to hold a shallow pool of water.
* Lubricant: Alternatively, use a specialized tile drilling lubricant.
* Benefits of Wet Drilling:
* Cooling: Prevents the drill bit and tile from overheating, significantly reducing the risk of cracking.
* Dust Suppression: Minimizes the amount of airborne tile dust, making the process safer and cleaner.
* Lubrication: Helps the bit grind more efficiently.
Step 4: Continue Drilling and Applying Pressure
- Steady Speed: Maintain a consistent, slow speed.
- Steady Pressure: Apply moderate, consistent pressure. Avoid jerky movements or sudden increases in force.
- Periodically Lift the Bit: Especially when drilling deeper holes, lift the drill bit out of the hole every few seconds. This allows water to flush out dust and debris, and it also helps to cool the bit.
- For Hole Saws: If using a hole saw for tile, keep it cutting with a steady pressure. The core will eventually break through, and you can then carefully remove the tile plug.
Step 5: Breakthrough
As you approach the other side of the tile, ease up on the pressure significantly. The tile is weakest just before the hole is completely formed. Continue slowly until the bit breaks through. If drilling through a wall or countertop, be mindful of what’s on the other side to avoid damaging it.
Step 6: Finishing the Hole
Once the hole is complete, gently clean the edges. You can use a small piece of sandpaper or a fine-grit sharpening stone to smooth any minor rough edges. Clean the area thoroughly with water.
Advanced Tile Drilling Techniques for Specific Situations
While the basic process applies broadly, certain situations call for specialized tile drilling techniques.
Shallow Hole Drilling on Tile
For shallow hole drilling on tile, such as creating anchor points for very light fixtures, you don’t need to drill all the way through.
- Mark Depth: Use masking tape as a depth indicator on your drill bit (wrap it around the bit at the desired depth).
- Shallow Penetration: Drill only until the tape indicator reaches the tile surface.
- Use Appropriate Bits: Diamond-tipped bits are excellent for this, as they grind precisely.
Drilling Through Grout Lines
If your hole needs to be positioned over a grout line, it’s generally safer than drilling directly in the center of a tile.
- Marking: Center your mark carefully on the grout.
- Bit Choice: You can often use carbide-tipped bits here, but diamond bits are still preferred for maximum safety.
- Start Slowly: Begin drilling very slowly to avoid shattering the grout itself or the edge of the adjacent tiles.
Drilling in Tight Spaces
Working in confined areas presents challenges.
- Maneuverability: Cordless drills offer greater flexibility. Consider using an offset or right-angle drill attachment if clearance is extremely limited.
- Water Application: Spray bottles become essential here, as creating a water reservoir might be impossible.
Drilling Multiple Holes
If you need to drill several holes in a single tile or across multiple tiles:
- Consistency: Maintain consistent speed and pressure for each hole.
- Cooling Time: Allow the drill and bit to cool between holes if drilling many.
Troubleshooting Common Drilling Problems
Even with the best preparation, you might encounter issues. Here’s how to tackle them.
Problem: Drill Bit is Wandering
- Solution: Ensure you’ve applied masking tape firmly. Start at a 45-degree angle and create a small indentation before bringing the drill perpendicular. If it continues, try a small amount of plumber’s putty around the bit to guide it.
Problem: Tile is Chipping Around the Hole
- Solution: This usually indicates too much speed, too much pressure, or the wrong type of drill bit. Slow down, ease pressure, and ensure you’re using a diamond bit for harder tiles. Wet drilling also helps prevent chipping.
Problem: Drill Bit Overheating
- Solution: You’re likely drilling too fast or not using enough water. Increase your water application or pause more frequently to let the bit cool.
Problem: Tile Cracks
- Solution: If a small crack appears, stop immediately. You may be able to salvage the situation by continuing to drill very slowly and carefully, using plenty of water, to complete the hole and minimize the crack’s extension. If the crack is significant, you might need to replace the tile. This is why starting with the right bits and techniques is paramount.
Tile Drilling Safety: What You Must Know
Safety should always be your top priority. Tile drilling safety is not just about avoiding damage to your materials; it’s about protecting yourself.
- Eye Protection: Always wear safety glasses. Tile dust is abrasive and can cause serious eye injury.
- Breathing Protection: Wear a dust mask. Inhaling fine tile dust can lead to respiratory issues over time.
- Grip and Stability: Ensure a firm grip on your drill. A stable work surface or clamped tile is essential.
- Electrical Safety: If working with a corded drill, be mindful of the power cord, especially when wet drilling. Keep it away from water and tripping hazards.
- Tool Maintenance: Ensure your drill bits are sharp and your drill is in good working order. Dull bits require more force, increasing the risk of accidents.
When to Consider Professional Help
While drilling a hole in tile is a manageable DIY task, there are times when calling a professional is the wisest choice.
- Very Large or Numerous Holes: If you need to drill many large holes or very precise large openings, a professional tile installer or stone fabricator has specialized equipment like core drills and water-fed systems that guarantee accuracy and minimize risk.
- Expensive or Delicate Tiles: If you’re working with very expensive, rare, or particularly brittle tiles, the cost of replacing a damaged tile might outweigh the cost of professional service.
- Unfamiliarity or Lack of Confidence: If you’re simply not comfortable with power tools or the prospect of drilling into tile, hiring someone is a good way to ensure the job is done right.
Frequently Asked Questions (FAQ)
Q: Do I need a special drill for tile?
A: You need a special drill bit for tile, but not necessarily a special drill. A standard variable-speed drill that can operate at low RPMs and without a hammer function is suitable.
Q: How slow should I drill tile?
A: For most diamond bits and tiles, aim for a slow speed, typically between 200-500 RPM. It’s better to err on the side of too slow than too fast.
Q: What is the best way to drill a hole in porcelain tile?
A: The best way to drill a hole in porcelain tile is to use diamond drill bits for tile, drill at a slow speed, apply steady, light pressure, and use plenty of water for cooling and dust suppression (wet drilling).
Q: Can I use a regular drill bit for tile?
A: It is strongly not recommended. Regular drill bits (like for wood or metal) will quickly overheat, dull, and likely shatter the tile.
Q: How do I avoid dust when drilling tile?
A: The best method is wet drilling, which suppresses dust. Using a dust shroud attachment connected to a vacuum can also help capture dust at the source.
Q: What if the hole needs to be perfectly centered?
A: Precision in marking and using masking tape to prevent bit wandering are crucial. For critical centering, consider using a drill guide or jig specifically designed for tile drilling.
By following these comprehensive tips, you can confidently and safely drill holes in your tile projects. Remember, preparation, the right tools, and a methodical approach are your greatest allies in achieving a flawless finish.