
Image Source: www.ctemag.com
How To Drill Aluminum Safely
Yes, you can drill aluminum safely by using the correct drill bits, speeds, and techniques. Drilling aluminum requires a slightly different approach than drilling steel or wood due to its softer nature and tendency to clog drill bits. Following these guidelines will help you achieve clean holes and prevent common problems.
Preparing to Drill Aluminum
Before you even pick up a drill, proper preparation is key to safe and effective aluminum drilling. This involves selecting the right tools and setting up your workspace.
Choosing the Right Drill Bits
The best drill bits for aluminum are typically made of high-speed steel (HSS) or cobalt. These materials offer a good balance of hardness and toughness, allowing them to cut through aluminum cleanly without becoming dull too quickly.
- HSS Drill Bits: These are a standard choice for drilling softer metals like aluminum. They are readily available and perform well for general-purpose drilling.
- Cobalt Drill Bits: For harder aluminum alloys or when drilling numerous holes, cobalt drill bits are a superior option. They retain their hardness at higher temperatures, which can occur during drilling, and resist wear better.
- Specialized Aluminum Bits: Some drill bits are specifically designed for drilling soft metals. These often have a higher rake angle and a sharper point to help with chip evacuation, reducing the chance of the aluminum sticking to the bit. Look for bits with a split point tip; this prevents the bit from “walking” across the surface when you start drilling, ensuring a more accurate hole location.
Lubrication is Crucial
Aluminum generates heat when drilled. Without proper lubrication, the aluminum can melt and stick to the drill bit, a phenomenon known as “galling.” This makes drilling difficult, damages the bit, and creates messy work.
- Cutting Fluid or Oil: A dedicated cutting fluid or a light machine oil is highly recommended. Apply it generously to the drill bit and the workpiece before and during drilling.
- Homemade Lubricants: If you don’t have specialized cutting fluid, a mixture of one part mineral oil to three parts kerosene can work. Alternatively, a simple bar of soap can be rubbed onto the drill bit for some lubrication, though this is less effective for prolonged drilling.
- Avoid Water-Based Coolants: While water-based coolants are common for steel, they are generally not ideal for aluminum. They can react with the aluminum, causing corrosion.
Selecting Your Drill
- Corded Drill: For consistent power and torque, a corded drill is often preferred, especially for thicker aluminum.
- Cordless Drill: For portability and smaller jobs, a good quality cordless drill with sufficient power and adjustable speed settings will suffice. Ensure the battery is fully charged.
Setting Up for Safe Drilling
Safety should always be the top priority when working with tools.
Personal Protective Equipment (PPE)
- Safety Glasses: Always wear safety glasses to protect your eyes from flying metal chips.
- Gloves: Wear sturdy gloves to protect your hands from sharp edges and hot metal.
- Hearing Protection: If using a powerful drill or drilling for extended periods, consider hearing protection.
- Dust Mask: While aluminum chips are generally not a respiratory hazard in the same way as some other metals, fine aluminum dust can be created, especially when drilling multiple holes. A dust mask is a good precaution.
Securing the Workpiece
This is one of the most critical steps for safety. Loose workpieces can spin with the drill bit, causing severe injury and damage.
- Clamps: Use C-clamps or bar clamps to firmly secure the aluminum to a workbench or stable surface. Ensure the clamps are tight and don’t obstruct your drilling path.
- Vise: For smaller pieces, a vise is an excellent way to hold the aluminum securely. Use soft jaws or a piece of wood or rubber between the vise jaws and the aluminum to prevent marring the surface.
- Drill Press: If you have access to a drill press, it offers the most stable and precise way to drill aluminum. The vise on a drill press provides excellent workholding.
The Drilling Process: Step-by-Step
Now that you’re prepared, let’s walk through the actual drilling of aluminum.
Marking the Hole Location
Use a center punch or a sharp scribe to mark the exact spot where you want to drill. A small indentation will help the drill bit start in the correct place and prevent it from wandering. For very precise work, a pilot hole drilled with a smaller bit can be beneficial.
Setting the Correct Drill Speed
The drill speed for aluminum is crucial. Too fast a speed will generate excessive heat, causing the aluminum to melt onto the bit. Too slow a speed can result in poor chip formation and a rough hole.
- General Guideline: A good starting point for drilling aluminum with HSS bits is a speed between 200 and 500 RPM. However, this varies greatly with the size of the drill bit and the specific aluminum alloy.
- Bit Diameter: Smaller drill bits require faster speeds, while larger drill bits need slower speeds.
- Aluminum Alloy: Softer aluminum alloys can be drilled at slightly higher speeds than harder alloys.
- Table of Recommended Speeds:
| Drill Bit Diameter | Recommended Speed (RPM) (HSS Bit) |
|---|---|
| 1/8″ | 400 – 600 |
| 1/4″ | 300 – 500 |
| 1/2″ | 150 – 300 |
| 3/4″ | 100 – 200 |
| 1″ | 75 – 150 |
Note: These are general recommendations. Always err on the side of caution and start with a slower speed, gradually increasing it if the cutting action is clean.
Drilling Techniques
- Apply Steady Pressure: Apply consistent, even pressure to the drill. Avoid forcing the drill bit. Let the bit do the work.
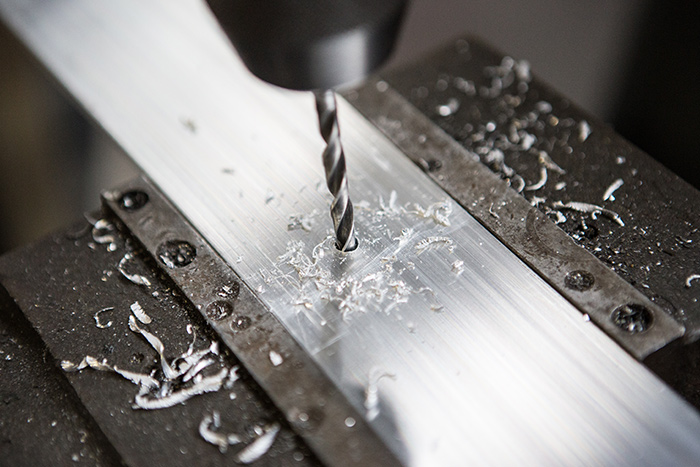
- Peck Drilling: For deeper holes, it’s essential to use a technique called “peck drilling.” After drilling a short distance (typically the depth of the drill bit’s flutes), retract the drill bit to clear the chips. Repeat this process until the hole is complete. This is vital for preventing aluminum chip buildup.
- Chip Evacuation: As you drill, aluminum chips will form. Ensure these chips are being cleared from the hole and the bit. This is where peck drilling and lubrication play a significant role. If you see chips accumulating and the drill starts to bind, retract the bit immediately, clear the chips, reapply lubricant, and continue.
- Drilling Thick Aluminum: When drilling thick aluminum, you’ll need to use slower speeds and apply more steady pressure. Peck drilling becomes even more important to manage heat and chip removal. Ensure your drill has enough power to handle the job. A drill press is highly recommended for drilling through thick aluminum sections to maintain control and accuracy.
- Drilling Thin Aluminum: For drilling thin aluminum, especially drilling aluminum sheet, you need to be careful not to deform the material. Use a backing material, such as a piece of scrap wood or a metal sheet, underneath the aluminum where you are drilling. This supports the aluminum and prevents the drill bit from tearing the edges of the hole as it exits. Lower speeds and lighter pressure are generally better when drilling aluminum sheet to avoid distortion.
Controlling Heat
Heat is the enemy when drilling aluminum.
- Lubrication: As mentioned, consistent lubrication is paramount.
- Peck Drilling: Retracting the bit allows it to cool slightly and clears chips that can insulate the bit and workpiece.
- Airflow: If possible, use compressed air to blow away chips and cool the workpiece, but be mindful of flying debris (wear your safety glasses!).
- Allow Cooling: If you are drilling a large number of holes, allow the workpiece and drill bit to cool down periodically.
Specific Challenges and Solutions
When aluminum machining, specific issues can arise.
Preventing Aluminum Chip Buildup
This is a common frustration. When aluminum chips pack into the flutes of the drill bit, they create friction and heat, making the drilling process difficult and potentially damaging the workpiece.
- Sharp Bits: Always use sharp drill bits. Dull bits create more heat and less efficient chip formation.
- Lubrication: Keep the cutting area well-lubricated.
- Peck Drilling: Regularly retract the bit to clear chips.
- Correct Speed and Feed: Too slow a speed or too much pressure can cause chips to recede and pack. Find the right balance.
- Flute Design: Bits designed for softer metals often have deeper, wider flutes to improve chip evacuation.
Hole Finish and Accuracy
- Start Slow: Begin with a pilot hole for larger diameter holes to ensure accuracy.
- Sharp Bits: Again, sharp bits lead to cleaner holes.
- Steady Pressure: Avoid jerky movements.
- Deburring: After drilling, use a deburring tool or a larger drill bit (spun by hand) to remove any sharp edges (burrs) around the hole.
Tapping Aluminum
If you need to create a threaded hole in aluminum, you’ll be tapping aluminum. This process involves using a tap to cut threads into the pre-drilled hole.
- Tap Drill Size: The correct tap drill size is crucial for successful tapping. Typically, the hole should be slightly smaller than the major diameter of the thread. Tap drill charts are readily available online or in machining handbooks.
- Lubrication for Tapping: Use a thread-cutting fluid specifically designed for metal. This lubricant is essential for preventing galling and ensuring clean threads.
- Tapping Technique:
- Drill the pilot hole to the correct tap drill size.
- Apply lubricant to the hole and the tap.
- Insert the tap into a tap wrench or drill chuck (if using a reversible drill on a very low speed and high torque setting, with extreme caution).
- Start the tap by turning it clockwise, applying gentle downward pressure.
- Turn the tap about a quarter to half a turn, then reverse it a quarter to half a turn to break the chip. This is critical for preventing tap breakage and ensuring good threads.
- Continue this process, lubricating and backing off periodically, until you have cut the desired thread depth.
- Clean out the chips and re-apply lubricant for the final passes.
Common Pitfalls to Avoid
- Using Dull Drill Bits: This is a primary cause of heat, poor hole quality, and bit breakage.
- Drilling Too Fast: Leads to melting, galling, and premature bit wear.
- Not Using Lubricant: Guarantees problems with heat and chip buildup.
- Not Securing the Workpiece: Extremely dangerous and can lead to injury and damaged materials.
- Forcing the Drill Bit: Puts undue stress on the bit and the workpiece, leading to breakage or poor hole quality.
- Not Clearing Chips: Can cause the drill bit to bind or break.
Frequently Asked Questions About Drilling Aluminum
Q1: What is the best drill speed for aluminum?
A1: The best drill speed for aluminum varies with the drill bit size and type, but a general guideline for high-speed steel bits is between 200 and 500 RPM. Smaller bits need faster speeds, while larger bits need slower speeds. Always check charts or start slow and adjust.
Q2: Can I drill aluminum with a regular drill bit?
A2: Yes, you can, but it’s not ideal for best results. Standard HSS drill bits will work, but bits designed for softer metals or made of cobalt will perform better and last longer. Ensure they are sharp and use lubrication.
Q3: How do I stop aluminum from sticking to my drill bit?
A3: This is called galling. To prevent it, use a sharp drill bit, apply a good cutting fluid or lubricant, drill at the correct speed (not too fast), and use a peck drilling technique to clear chips regularly.
Q4: Is it safe to drill aluminum without lubrication?
A4: While technically possible for very thin aluminum and small holes, it is not recommended. Lubrication is crucial for reducing heat, preventing galling, and ensuring clean cuts. Drilling without it significantly increases the risk of damaging your drill bit and the aluminum workpiece, and can also be less safe due to potential for binding.
Q5: How do I drill a clean hole in thin aluminum sheet?
A5: When drilling aluminum sheet, support the backside of the material with a piece of scrap wood or metal. This prevents the drill bit from “grabbing” and tearing the edges as it exits. Use a sharp bit, moderate speed, and light pressure.
By following these detailed steps and safety precautions, you can confidently and effectively drill aluminum for a wide range of projects. Remember that practice and attention to detail are your best allies when it comes to aluminum machining and drilling.