
Knowing how to measure your band saw blade is crucial for proper performance and longevity. The band saw blade length is the most critical measurement for fitting your machine, but several other factors contribute to choosing the right blade for your task. This guide will walk you through the essential measurements and considerations for your band saw blade.
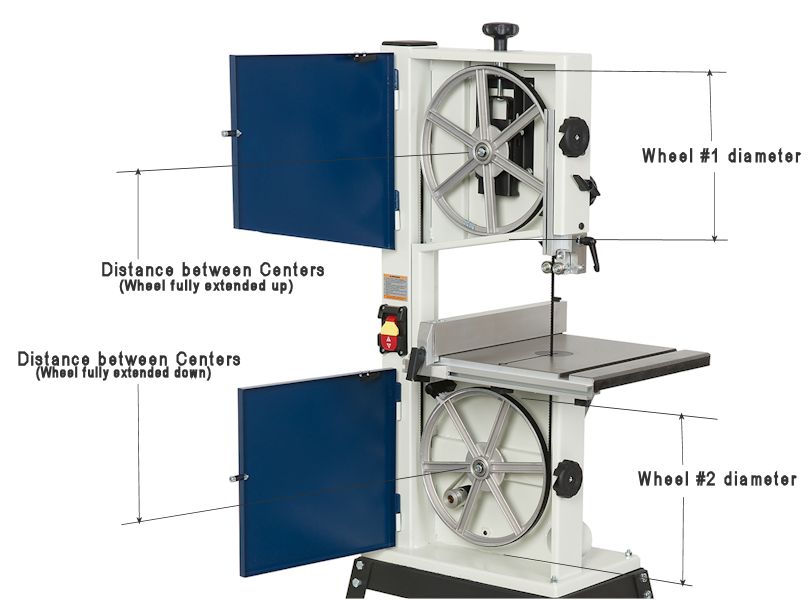
Image Source: www.bandsawbladecenter.com
Why Accurate Blade Measurement Matters
Measuring your band saw blade accurately isn’t just about ensuring it fits your saw; it’s about optimizing your cutting experience. A blade that’s too long or too short won’t track correctly, leading to poor cut quality, increased wear on the blade and guides, and potential damage to your saw. Likewise, incorrect measurements of width, thickness, and tooth configuration can result in inefficient cutting, blade breakage, and even safety hazards. This comprehensive band saw blade measurement guide will equip you with the knowledge to make informed decisions.
Essential Band Saw Blade Measurements
When you need to measure a band saw blade, focus on these key dimensions:
1. Band Saw Blade Length
This is the most straightforward and arguably the most important measurement. You need to know the exact band saw blade length required by your specific band saw model.
How to Measure Band Saw Blade Length
- Check Your Saw’s Manual: The easiest and most reliable way to find the correct band saw blade length is to consult your band saw’s user manual. It will clearly state the required length for your machine.
- Measure Your Existing Blade: If you don’t have the manual or are replacing a blade that’s already on the saw, you can measure the old one.
- Lay the used blade flat on a clean, level surface.
- Gently straighten the blade, being careful not to bend it further.
- Use a flexible measuring tape to measure from the tip of one tooth to the tip of the opposite tooth along the gullet (the curved space between teeth).
- Important: Do not measure the blade as a continuous loop. You need to measure it as if it were laid out in a straight line. A common mistake is to measure the circumference of the loop, which will be inaccurate.
- It’s often best to have a second person help you hold the blade straight while measuring.
- Measure Your Saw’s Wheel Circumference: If all else fails, you can measure the circumference of your band saw’s wheels.
- Measure the diameter of the upper drive wheel.
- Use the formula: Circumference = π × Diameter.
- Add approximately 1 inch to this measurement to account for the blade’s thickness and how it wraps around the wheels. This is a less precise method but can give you a close estimate.
Example: If your old blade measures 74 inches from tooth tip to tooth tip when laid straight, and you’re unsure, measure your saw’s wheels. If the wheels’ circumference is roughly 73 inches, a 74-inch blade is likely correct.
2. Band Saw Blade Width
The band saw blade width affects the turning radius of your blade and the type of cuts you can make.
How to Measure Band Saw Blade Width
- Measure the Back Edge: The easiest way to measure the band saw blade width is to measure the flat metal backing of the blade.
- Lay the blade flat, as you would for length measurement.
- Use a ruler or caliper to measure the width of the metal from one edge to the other, perpendicular to the length of the blade.
- Consider Blade Width and Cut Type:
- Narrow Blades (e.g., 1/8″ to 3/8″): Ideal for making tight curves and intricate shapes.
- Medium Blades (e.g., 1/2″ to 3/4″): Suitable for general-purpose cutting, including straight lines and gentle curves.
- Wide Blades (e.g., 1″ and wider): Best for resawing lumber, making long, straight cuts, and handling thicker materials.
Table: Band Saw Blade Widths and Applications
| Blade Width | Typical Applications | Turning Radius |
|---|---|---|
| 1/8″ | Very tight curves, scroll work, intricate designs | Smallest |
| 1/4″ | Moderate curves, general pattern cutting | Small to moderate |
| 3/8″ | General purpose, moderate curves | Moderate |
| 1/2″ | Straight cuts, gentle curves, general cutting | Moderate to large |
| 5/8″ | Resawing, straight cuts, thicker materials | Large |
| 3/4″ | Heavy-duty resawing, straight cuts, large stock | Very large |
| 1″ + | Industrial resawing, large dimension lumber | Largest |
3. Band Saw Blade Thickness
The band saw blade thickness, often referred to as gauge, is important for blade rigidity and strength.
How to Measure Band Saw Blade Thickness
- Use a Caliper: The most accurate way to measure band saw blade thickness is with a caliper.
- Place the caliper jaws on either side of the blade’s metal body (not the teeth).
- Record the measurement.
- Common Thicknesses: Blade thickness is usually expressed in decimal inches (e.g., 0.025″, 0.035″). Thicker blades are more rigid and less prone to deflection, making them better for resawing and straighter cuts. Thinner blades are more flexible and suitable for curved cuts.
4. Band Saw Blade TPI (Teeth Per Inch)
Band saw blade TPI refers to how many teeth are present in one linear inch of the blade. This directly impacts the finish of your cut and the speed at which you can cut.
How to Measure Band Saw Blade TPI
- Count the Teeth:
- Lay the blade flat.
- Use a ruler or a measuring tape marked in inches.
- Count the number of teeth from the tip of the first tooth to the tip of the last tooth that fits within a full inch.
- Interpreting TPI:
- Low TPI (e.g., 2-3 TPI): These blades have fewer, larger teeth. They are aggressive cutters, ideal for cutting thicker hardwoods, softwoods, and non-ferrous metals. They leave a rougher finish.
- Medium TPI (e.g., 4-8 TPI): Good for general-purpose cutting on materials up to about 1 inch thick. They offer a balance between cutting speed and finish quality.
- High TPI (e.g., 10-18 TPI): These blades have many small teeth and produce a smoother finish. They are suitable for cutting thinner materials, plastics, and some metals.
5. Band Saw Blade Tooth Pitch and Gullet Design
While TPI is a key metric, the band saw blade tooth pitch (the distance between teeth) and the shape of the band saw blade gullet (the space between teeth) are also crucial. These factors are closely related to TPI.
Fathoming Tooth Pitch and Gullet
- Tooth Pitch: Often, the number of teeth per inch directly implies the pitch. A 4 TPI blade will have teeth spaced further apart than an 8 TPI blade.
- Gullet Shape:
- Hooked Gullets: Have a more aggressive forward angle. They remove material quickly and are excellent for fast cutting in softer woods.
- Skip Tooth Gullets: Feature wider spacing between teeth and a rounded gullet. This design prevents clogging and heat buildup, making them suitable for softer woods, plastics, and non-ferrous metals where chip removal is important.
- Standard Gullets: Offer a balance between aggressive cutting and a good finish.
The relationship between TPI, pitch, and gullet is important:
- More teeth (higher TPI) means smaller gullets and less aggressive cutting.
- Fewer teeth (lower TPI) means larger gullets and more aggressive cutting.
You don’t typically “measure” gullet shape with a ruler, but you identify it by its appearance and how it’s described by the manufacturer. When selecting a blade, consider the material you’re cutting and the desired finish.
6. Band Saw Blade Material
The band saw blade material determines its durability, heat resistance, and cutting ability.
Deciphering Blade Material
- Carbon Steel: The most common and affordable material. It’s flexible and good for general woodworking. However, it dulls faster and can overheat.
- High-Speed Steel (HSS): More durable and heat-resistant than carbon steel. It holds an edge longer and is suitable for cutting harder woods and some metals.
- Bi-Metal: Combines the flexibility of a carbon steel backer with hard HSS or carbide teeth. This offers excellent durability, edge retention, and resistance to heat. Bi-metal blades are ideal for tougher materials and demanding applications.
- Carbide-Tipped: Feature carbide teeth brazed onto a steel blade. These are the most durable and longest-lasting, capable of cutting extremely hard materials and abrasive woods with exceptional efficiency.
When measuring or selecting a blade, the material is usually clearly indicated by the manufacturer on the blade itself or its packaging.
7. Band Saw Blade Tension
While not a physical measurement you take from the blade itself, band saw blade tension is a critical factor in its performance and longevity.
Gauging Blade Tension
- Manufacturer’s Recommendation: Always refer to your band saw’s manual for the recommended tension range for different blade widths and types.
- Saw’s Tension Gauge: Most band saws have a built-in tension indicator (a gauge or a numbered scale).
- Auditory Test (with caution): A properly tensioned blade, when plucked, should produce a clear, high-pitched “ring” or “ping.” A dull thud indicates it’s too loose. This method is subjective and requires experience.
- Visual Inspection: A blade that is too loose will sag or wander on the wheels. A blade that is too tight can overstress the saw’s components and lead to premature blade breakage.
Proper band saw blade tension is essential for correct band saw blade tracking.
Understanding Band Saw Blade Tracking
Band saw blade tracking refers to how the blade sits and runs on the band saw’s wheels. A properly tracked blade runs centered on the crowned surface of the wheels.
How to Check and Adjust Tracking
- Mount the Blade: Install the new or existing blade onto your band saw.
- Apply Minimal Tension: Apply just enough tension to take the slack out of the blade.
- Run the Saw Briefly: Turn on the saw for a few seconds and then turn it off.
- Observe the Blade: Check the position of the blade on both the upper and lower wheels.
- Ideal Tracking: The blade should be centered on the flat part of the wheel rim, just before it starts to climb the crown.
- Blade Too Far Forward: The blade is running too close to the front edge of the wheels.
- Blade Too Far Back: The blade is running too close to the rear edge of the wheels.
- Adjust the Upper Wheel: Most band saws have an adjustment mechanism for the upper wheel (usually a screw or lever).
- If the blade is too far forward, move the upper wheel forward slightly.
- If the blade is too far back, move the upper wheel backward slightly.
- Apply Full Tension: Once you’ve achieved good tracking with minimal tension, apply the recommended operating tension for your blade.
- Recheck Tracking: After applying full tension, recheck the tracking. You may need to make minor adjustments. The blade should still run on the flat part of the wheel rim, not the crowned section.
Correct band saw blade tracking is vital for preventing blade drift and ensuring straight cuts.
Tools for Accurate Measurement
Having the right tools makes all the difference when you need to measure a band saw blade.
Essential Measuring Tools
- Flexible Measuring Tape: For measuring the overall length of the blade.
- Ruler or Metal Straightedge: For measuring blade width and TPI.
- Calipers (Digital or Vernier): For precise measurement of blade thickness and width.
- Magnifying Glass: Helpful for counting teeth accurately, especially on finer-toothed blades.
- Manufacturer’s Specifications: Your saw’s manual and blade packaging are crucial references.
Frequently Asked Questions (FAQ)
Q1: What is the most important measurement for a band saw blade?
A1: The most critical measurement for a band saw blade is its band saw blade length, as it must match your specific band saw model to operate correctly.
Q2: Can I use a blade that’s slightly longer or shorter than recommended?
A2: It is strongly advised against using a blade that is significantly different in length. A blade that is too short will not reach the wheels properly, and one that is too long will not tension correctly and could damage your saw. Always use the specified band saw blade length.
Q3: How do I know if my band saw blade is properly tensioned?
A3: Proper band saw blade tension is achieved when the blade is tight enough to track correctly without sagging, but not so tight that it overstresses the saw. Your saw’s manual will provide tension recommendations, and a tension gauge or a specific “ping” sound when plucked can indicate correct tension. Proper tension is key to good band saw blade tracking.
Q4: What is the purpose of the gullet on a band saw blade?
A4: The band saw blade gullet is the space between the teeth. Its purpose is to clear chips and sawdust away from the cut, preventing clogging and heat buildup, which is especially important for faster cutting. The size and shape of the gullet are related to the band saw blade tooth pitch.
Q5: How does band saw blade width affect my cuts?
A5: The band saw blade width determines the turning radius of the blade. Wider blades are more rigid and are best for straight cuts and resawing, while narrower blades are more flexible and can cut tighter curves.
By carefully measuring and selecting your band saw blades based on length, width, thickness, TPI, material, and considering proper tension and tracking, you’ll ensure efficient, accurate, and safe operation of your band saw. This band saw blade measurement guide should provide you with all the necessary information.